Showing posts with label paper crafts. Show all posts

Friday, April 4, 2014

April Fools' Dinner

On April Fools' Day, I served these meatloaf "cupcakes" with "brownies" for dessert. Mia, especially, enjoyed the silliness of it all, and I was pretty tickled myself that my experimental food -- I would not even call it a recipe -- was such a surprise hit! Even Logan, who is going through the ever fun I-won't-eat-that-meat-'cause-it's-not-a-chicken-nugget phase, enthused, "Tricky meatloaf is yummy!"

My inspiration was a friend, Jenifer, who had posted a pic of this a while back. I just happened to have purchased the Cheddar Jack and Bacon Fresh Take mix at the store that morning, and I decided it must make great meatloaf! I quickly found I this recipe and then modified it according to the family's tastes. (I'm really just writing this down here so that I remember how I made it for the next time.)

{Cupcakes for Dinner? Why not?}

Ingredients:
  • 1 lb ground turkey
  • 1 pkg Kraft Fresh Take Cheddar Jack and Bacon 
  • 1 egg, beaten
  • 3 Tbs ketchup
  • 1 pkg instant garlic mashed potatoes (plus water, milk, and butter)
  • carrot
Directions:
  1. Pre-heat oven to 350*.
  2. In a bowl, combine turkey, Fresh Take mix, an egg, and ketchup.
  3. Line muffin tin with silicone baking liners (or spray well). Spoon meatloaf mixture into cups, pressing down firmly. Makes about 12 meatloaf "cupcakes."
  4. Bake at 350* for about 35-40 minutes or until internal temperature reaches 165*. Let rest for about 10 minutes.
  5. Meanwhile, make a package of instant potatoes according to package directions. Place potatoes into a pastry bag and then pipe onto the meatloaf "cupcakes" to make frosting. (Note: You can mash your own potatoes if you prefer. I was doing it this way to save time.)
  6. Garnish "cupcakes" with carrot curls and serve. (Green beans were a natural side dish for this meal.)
{Whaddya mean this "cupcake" is healthy?}


For dessert, I copied my friend Kim and served a pan of fresh-made "brownies." Mine were made from card stock weight kraft paper and cut using my Cricut machine. In retrospect, I didn't need to make nearly as many. A single brown E per person would have done the trick, but I felt it would be extra fun if I made an assortment of E's in different fonts and sizes. Then, I just put a few on each plate.

{"Brownies" for Dessert!}

Logan was less than thrilled. He whined, "I don't want to eat cardboard." (Although, that did not stopping him from taking a bite before I cut and served him an actual brownie.) Mia, however, was amused by this trick saying, "Brown E's... I get it! Good one, Mom!"

To make my real brownies, I used this recipe, which I have made only one small addition to: The frosting was very dry so I added some milk.

Ingredients for Brownies:                    
  • 1/2 cup butter
  • 1 cup sugar
  • 2 eggs
  • 1 tsp vanilla extract
  • 1/3 cup cocoa powder
  • 1/2 cup flour
  • 1/4 tsp salt
  • 1/4 tsp baking powder
Directions for Making Brownies:
  1. Preheat oven to 350*. Grease the pan. Mine was 9" x 7".
  2. Melt butter in microwave. (You can also do this over the stove, but microwave is obviously faster.) Place melted butter into the bowl of a stand mixer (or big mixing bowl, if mixing by hand) and beat in sugar, eggs, and vanilla. Add cocoa, flour, salt, and baking powder. Beat until well-combined. Pour into the greased pan.
  3. Bake for 25-30 minutes.
  4. While baking, make frosting. (I just combined all the ingredients in my stand mixer and beat until they were well-mixed, stopping and scraping the sides of the bowl as needed.) Spread onto brownies while they are warm from the oven. Enjoy!
Ingredients for Frosting:
  • 3 Tbs butter, softened
  • 3 Tbs cocoa powder
  • 1 Tbs honey
  • 1 tsp vanilla extract
  • 1 cup confectioners sugar
  • 1 Tbs milk
{Would you like a brown E?}

Friday, March 21, 2014

Very Hungry Caterpillar Hat

March is Reading Month, so Logan's preschool class did an author study on Eric Carle. Yesterday, he came home with this cute Very Hungry Caterpillar hat to share with his sister. It's a quick and easy craft to do with little ones.

{Celebrate Reading Month with this Fun Hat!}


Materials:

  • construction paper (red, yellow, green, black)
  • scissors
  • paper trimmer (optional)
  • glue stick
  • stapler

Directions:

  1. Cut two strips of red paper about 3-4 inches wide. Staple one piece to the other, end to end. Wrap the extra long strip around your child's head for size, and then cut off the excess. Tip: A paper trimmer is nice for this, but scissors will work, too.
  2. Cut two yellow circles for eyes. Ours are about 2 1/2" wide. Cut two green circles, slightly smaller (Ours are about 1 1/2" wide), and have your child glue them to the yellow circles. Glue the eyes to the center of the red paper strip. Note: Circles do NOT need to be perfect!
  3. Cut two narrow strips of black paper, about 1" wide, for antennae. Tip: Again, a paper trimmer is helpful, but you can use scissors if you don't have one. Staple these to the red paper strip, on either side of the eyes.
  4. Staple the ends of the red paper together to finish the caterpillar hat, which your child can now wear!


Monday, March 3, 2014

Rainbow Collage Craft

I have vented my frustration with this winter, and I am now ready to move on to spring! Here is a recent project that we did that looks very cheerful hanging in my now winter craft-free home. I am hoping that this will at least brighten my outlook on things since it doesn't appear that spring will actually arrive for a bit yet.

Materials:
  • construction paper (red, orange, yellow, green, blue, purple)
  • paper trimmer (optional)
  • scissors
  • glue stick
  • box board (side of cereal box)
  • large bowl, pan, or lid (for tracing)
  • pen/pencil
{Rainbow by Mia, Age 7}


Directions:
  1. Cut one inch strips of colored paper. Trim each strip into smaller squares, about one inch in diameter. (Note: Older kids can also use this for scissor skills practice and cut their own. I chose to have materials ready in case my little dude also wanted to make a rainbow.)
  2. Cut away one side from a cereal box. Using a large bowl, pan, or lid, trace around it to make an arch, starting from one end and going to the other. Using one side as the base, you will end up with a semi-circle. Cut out the semi-circle. (If desired, you can do some additional cutting to the center section to make it into a true arch. Mia wanted it as-is, so I didn't do that.)
  3. Give child the box board semi-circle (or arch), paper squares, and a glue stick and let her create a rainbow. There is no right or wrong way to do this. Mia did it very carefully, laying out the red partway, and then starting each other color, until she knew how it would look. She discovered that she had to overlap some tiles to work with the curves. I was really impressed at how she handled this with so much skill and dexterity! (Optional note: You can first draw lines to make the rainbow into sections. This may be helpful to younger children.) Tip: Another fun addition would be to add cotton ball clouds. Regular school glue or tacky glue works best for that. 
    {Mia was systematic about laying the collage tiles.}
  4. Once the glue is dry, display the rainbow collage -- perfect for St. Patrick's Day or any rainy day!

Monday, February 24, 2014

DIY Paper Chains Photo Backdrop

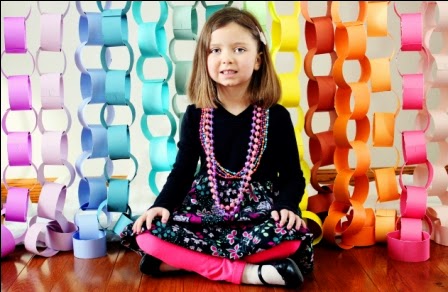
After a month, I am getting around to sharing some of Mia's birthday photos! These were taken by Erin of E.K. Photography, so be sure to check her out and give her some love. In my opinion, some of the cutest pics of Mia were the ones that Erin took using the paper chains that I made for a backdrop.


I saw a photo on Pinterest, which of course, always makes things look easy. This is easy, but there were no directions on how long to make the chains, how many chains to make, or how wide to make the strips, all of which I feel are kind of important to the success of a project! Here are the steps I used to create this paper chain photo backdrop.


  1. Each chain was made using 4 pieces of 12" x 12" card stock, cut into 2 inch wide strips with a paper trimmer. (I had previously tried 1" and 3" strips and found them to be too skinny and too fat, respectively. The perfect width, after trial and error, was 2" strips.) 
  2. I stapled each strip into a ring, linking them as I went along. This wasn't hard, but it did take some time. In total, there were 14 paper chains for the backdrop. Ideally, I would have made more chains for a wider backdrop, but I ran out of card stock -- or at least enough of the same color so that I could make chains that were long enough. (They had to be taller than Mia, of course.)
  3. To display the chains, Erin and I slipped them onto her backdrop holder, arranging them in a sort of rainbow.


All photos used with permission of E.K. Photography.

Friday, February 21, 2014

Valentine's Projects - 2014

I've recently chatted with a couple other people about how I do not make the kids' valentines. (That may actually surprise you since I like to make just about everything else!) For what they are, though, and considering how little time children actually spend appreciating them, this is not worth it to me. (I do understand what a friend said, though, about a child wanting a certain theme or character that wasn't readily available. It was smart of her, in that case, to make them herself!) For my kids, I just run out after Valentine's Day,-- when stuff is on clearance -- and pick up one or two boxes that I know they will like to set aside for the next year.

This year, for example, Mia had a choice of Disney fairies or princesses and she selected the fairies. (I found her a box of princess valentines that came with suckers to use next year. I figure suckers don't really go bad. Any other candy I would worry about, but suckers should be fine.) Logan chose Cars, so he will have either the Toy Story ones or the Hot Wheels that I just picked up the other day. They still get choices, but I don't have to spend 20 minutes in the store while they debate among a million options. So far, it has worked for us. (And for the record, I'm not knocking anybody's choice to make the cutesy homemade kind. I have seen some really awesome ones! It's just not something I care to do as long as my kids are fine with the current system.)

That said, we did do a few Valentine's Day related crafts this February. Mia's teacher sent home a note a few days before their class party that said they needed to have a valentine holder of some sort. I was trying to figure out what sort of box to use when I remembered the cute felt envelopes featured in the February issue of FamilyFun magazine. We had everything we needed at home, so this was a good choice. I showed Mia the picture, and she loved it, so it was decided. I downloaded the Special Deliveries Envelope pattern and then traced it onto some pink felt that I had left over from making the poodle skirt. (My only complaint is that they don't tell you how much felt you need, so let me tell you. I measured it to be about 41" by 28.5" so allow a bit extra, just in case my measurements are slightly off.)

{Finished valentine holder is 91/2" x 141/2"}


For embellishment, we added a red felt heart, and Mia selected 2" blue self-adhesive felt letters. (We didn't have a "M" so she decided an upside down "W" would work in its place.) I skipped the step for cutting holes and threading ribbon through to make this a chair back valentine holder since I wasn't sure if they would fit the chairs at school, and this seemed like unnecessary effort. It turned out great, and she was very happy. I was also glad that it could easily fit inside her backpack for the bus ride home, which would not have been the case if we had gone with a box of some sort!

{This is the great heart garland!}


As Valentine's Day approached, Mia felt that we needed some extra decorations and I showed her how I had made some heart-shaped chains inspired by this blogger's photo that I had seen on Pinterest. Her directions are great, and I wish I had actually read them first. One important step that I missed was starting with folded paper to get that nice edge at the bottom of the heart. I just gave Mia some 1" strips of red and pink construction paper and showed her how to invert them before stapling (as opposed to overlapping them for traditional chain links). Then, I suggested that she pinch the bottom segment to form the base of the heart. Mostly, she skipped that so her hearts are rounded and sweet-looking instead of crisp and precise. She was happy with the results, so I couldn't have cared less. Besides, they looked kid-made, and that was the point! Mia quickly used up the red and pink and asked me to make more strips out of purple and blue paper. By the time she was done, we had a garland that draped nearly all the way from one side of the dining room to the other. (Some of the chain links were regular circles interspersed among the hearts.)

{Close-up of Heart Chains}


Today was yet another snow day. (Well, technically, it was an ice day.) Anyway, I had some project ideas in mind and one was stamped hearts from toilet paper tubes, which came from this blogger. (I had wanted to try this before Valentine's Day, but then Mia's school needed lots of TP tubes for science night and I sent in all that I had at the time, around 50!) Mia was not interested, but Logan happily created some stamps with the heart-shaped tubes that I made. We had two tubes to work with since I no longer had a big stash of them: one to dip in pink paint and one to dip in purple paint, both of which I poured onto a Styrofoam tray. These stamps were quick and easy to make using the directions found on the Rust & Sunshine blog. My only suggestion would be that you could also cut the tubes in half to make more if you wanted to do this with more kids but were short on tubes.

{Art in Process...}


{Finished Stamped Art}

{Close-up of Tubes, After Stamping}

Sunday, February 16, 2014

Photo Thank You Cards for a Puppy Paw-ty

I once read that thank you notes should be sent within three months of the event. I think for busy folks, the sooner the better, so my goal was to get them done within three weeks. We just celebrated Mia's 7th birthday with a puppy paw-ty on the first, so I am going to meet that goal with these photo thank you cards. As a bonus, they serve as a fun and inexpensive souvenir from the party.

{Front of Card}


Materials:
  • card stock weight kraft paper (mine was 8 1/2" x 11")
  • paper trimmer
  • photos from dog house photo prop
  • scrapbooking adhesive
  • scalloped scissors
  • black ink pad
  • date stamp
  • "Wonderful Times" stamp
  • computer and printer

Directions:
1.  During the party, I took pictures of the guests wearing puppy ears and posing in the dog house photo prop. Then, I had them printed at Meijer. For family members who sent gifts, or for kids who didn't want to pose, I used pictures of Mia, so I had extras printed for this reason.

2.  Next, I folded a piece of kraft paper in half, width wise, and cut along the fold. Then I folded each piece in half again, width wise, to create two cards.

3.  In Microsoft Word, I created a fill-in-the-blank template for the inside of the cards. This fit four to a page in landscape setting and I used this free font. It read:

Dear ___________________________,                     
Thanks for helping make my 7th birthday                           
a doggone good time! Thanks also for the                     
______________________________­_    
______________________________­
______________________. It’s paw-fect!
Your friend,                                                                

At the bottom right corner of each, I included a red paw print clip art. I used scalloped scissors to trim these to size and then adhered them on the inside of the cards, on the right.

4.  I trimmed the photos to fit inside the cards and then adhered them to the inside, left of the fill-in-the-blank template.

{Inside of Card}


5.  For the front of the cards, I printed off several of this cute puppy holding a cupcake clip art. Again, I cut these out with my scalloped scissors and adhered them to the center of the cards. Then, I added the date of the party and the phrase "Wonderful Times" with stamps and a black ink pad. Tip: If you don't have this sort of thing (both are the dial type of stamp that you see at libraries), you can type anything into your computer and print it out. This would give you more choices of font style, size, and color.

6.  Last but not least, I had Mia fill in the cards with the recipient's name, description of the gift (mostly donations for the local Humane Society!), and, of course, her signature.

Thursday, January 23, 2014

Winter Mittens Paper Craft

Here is another cute and simple preschool craft created by our wonderful library lady, Mrs. D.! Logan always enjoys using the paint daubers, so this was a hit. (Note: If you don't have paint daubers at home, you can buy Bingo markers at Dollar Tree that work very well for dot-eriffic projects.)


Materials:

  • construction paper
  • pencil
  • scissors
  • hole punch
  • yarn
  • Bingo/paint daubers

Directions:
  1. Draw and cut out a mitten shape. Use this as a template to create a matching mitten, and cut it out. (Tip: If you want a sturdier template to use again and again, consider making one out of boxboard -- like a cereal box.)
  2. Punch a hole in each mitten.
  3. Cut a length of yarn. Thread each end through the holes and tie knots to secure.
  4. Give your child paint or Bingo daubers and let him decorate the mittens. Allow paint to dry before displaying the mittens.

11 more Bingo marker project ideas for the rest of the year:

Thursday, January 16, 2014

Puppy Paw-ty Invites

{Front of Invitations}


Mia decided that her upcoming birthday party will have a puppy theme, which is fun. One nice thing about this theme is that it's not a specific character so that gives me plenty of flexibility for creating the menu, decorations, and party activities. First, I made the invitations using kraft paper card stock and my computer.

Materials:
  • 8 1/2" x 11" kraft paper card stock (1 piece makes 2 cards)
  • paper trimmer/scissors
  • circle punch
  • adhesive
  • red and yellow card stock scraps
  • scalloped scissors
  • scrapbooking marker (with calligraphy tip)
  • gold eyelets
  • eyelet setting tool

Directions:
1.  I folded a piece of card stock in half (width-wise) and cut along the fold. Then I folded each piece in half again to make two cards. I did this a total of four times.

2.  For the wording, I used a free font called Puppy Bellies. It includes the bone and paw print icons that I used. The front of the card reads, "Come. Sit. Stay. Mia is turning 7 and you're invited to a puppy paw-ty!" (Yes, I used a punny spelling. Couldn't resist. Also, the i's are dotted with paw prints which is an adorable feature of this font.) This was done in Microsoft Word so that I got 4 per page in landscape format.
{Inside of Invitation}

The inside of the invitation features the party details on the right side. The row of doggie silhouettes was created using another free font called Can Dog TFB. I did this in Microsoft Word in portrait format, yielding 4 per page. On the left, we are asking for donations to the local humane society in place of presents. (I'll let you know whether or not that works out. Last year, I wrote "your presence is your present" but we still wound up with way more Barbie dolls than one little girl possibly needs. I am hoping that this new idea leads to useful stuff for charity. When I presented the idea to Mia, she was enthusiastic.) Again, I formatted this in Microsoft Word. Using the landscape setting, I was able to fit 2 per page.

3.  After printing off all the necessary pages, I trimmed them down with my paper trimmer and then gave all the pieces a decorative edge with scalloped scissors. Then, I adhered everything with scrapbooking adhesive squares.

4.  The cards looked a bit plain with just brown, white, and black, so I decided to dress them up a bit by adding paper collars using some red card stock scraps. I cut them to fit the paper but waited to adhere them until after the next step.

5.  The last step was personalization. I continued the collar idea by making dog tags out of yellow card stock scraps. I used a circle punch to make them round. Then, I used gold eyelets and my eyelet setting tool to attach the tags to the paper collars. Next, I adhered the collars and tags with my adhesive squares. For a final touch, I took my calligraphy-tipped scrapbooking pen and wrote the name of each invitee on a tag. I made 8 invitations using materials I already had which meant that I didn't have to spend any money!

Wednesday, December 18, 2013

Painted Christmas Tree Craft

Logan started this project at the library last week and then finished it this week. This shouldn't be too hard to do in an afternoon so long as you let the paint dry in between the painting and decorating steps. (Just give your child an empty cardboard box to play with. Those always seem to keep my kids occupied...) My favorite part of this craft is the clever and fun painting technique: using an actual limb from an evergreen tree or shrub in place of a paint brush! I also like that Mrs. D. added a small magnet to the back so that we can display the tree on the refrigerator (or the dishwasher or the back door -- we've got options.) It's definitely beginning to look a lot like Christmas around our house!

{Finished Tree by Logan, Age 4}
Materials:

  • white card stock (or green)
  • scissors
  • fresh evergreen branches
  • green tempera paint
  • container to hold paint (I like Styrofoam trays.)
  • brown construction paper
  • glue stick/glue
  • something to protect work surface (optional -- I like cereal box liners.)
  • yellow construction paper
  • stickers or foam stickers
  • self-adhesive magnet (optional)

Directions:

  1. Cut a large triangle out of white (or green card stock) to make the tree. Mrs. D. added simple branches by cutting notches out of the sides, which is simple and quick to do.
  2. Cut a trunk from brown construction paper. Adhere the trunk to the base of the tree. (Tip: If doing this project with more then one child, you may want to write names on the back sides of the trees before moving on to the next step.)
  3. Collect some fresh evergreen branches.
  4. (Protect work surface and clothing, if desired.) Pour some green tempera paint into a bowl or onto a plate or Styrofoam tray. Let your child paint the tree using evergreen branches. Once he is done painting, set the tree aside so that paint can dry completely.
  5. Decorate the tree! Cut a star out of yellow construction paper and let your child glue it to the top. Then, let him add stickers, regular or foam, for the ornaments.
  6. To make it magnetic, simply add a self-adhesive magnet to the back of the tree. Your child's creation is now ready to be displayed on any magnetic surface. (Tip: If you don't have magnets, you can tape this just about anywhere. Or you can display it on a clothesline style art display. Ours came from IKEA.)
Other Ideas:
  • You could make wintry trees in place of Christmas trees. Just substitute white glue "snow" in place of the sticker "ornaments."
  • If you don't have stickers, trim the tree with whatever you have at hand: buttons, pom poms, sequins, beads, ribbon, yarn, pipe cleaners, rhinestones, feathers, etc.
  • Mrs. D. displayed several plain green trees on the white board to make a winter scene. A few well-placed lines with a black dry erase marker, and it looked like the trees were standing in a snowy meadow -- very simple but pretty for a classroom display!
  • Painting with evergreen branches could also be used to make wreaths. Just use a paper plate for the base and have your child finger paint on some read berries. Add a red or gold bow for hanging.
  • Or skip the tree altogether, and just use the branches for paint brushes for a tactile experience. My little man is not always excited about crafts, but he loves painting in new ways, so he found this one to be very fun.

Tuesday, November 26, 2013

Cupcake Liner Owl Craft

This cute craft is brought to you by our lovely library lady. During story time, Logan (my kid who is actually not all that into crafting) happily produced this cheery bird. I think that he loves Mrs. D., so she motivates him to be creative, which is great. The cupcake liner eyes are perfectly adorable, and I only wish that I had thought of it myself!

{Cupcake Owl by Logan, Age 4}
Mia liked this feathery fellow, too, so we made a few more to hang in the window. For most of them, I just traced the original to get the body's shape. However, she wanted one baby owl, so I drew a smaller body.

Materials:
{Red Owl by Logan}
  • construction paper
  • pencil
  • scissors
  • glue (tacky glue works best)
  • 2 googly eyes (or paper circles)
  • feathers (or paper strips)
  • 2 cupcake liners (we used both regular size and mini)

Directions:
  1. Draw and cut out the owl body. If you are making several, you may want to keep the first cut-out and use it for a template. The basic shape is an oval. On one end, instead of rounding it, create a pointed triangle shape. Fold this down for the owl's head. (My kids ended up wanting these to hang out like a flap instead of being secured, so I am not sure that is what Mrs. D. intended, but it wasn't worth arguing.)
  2. For feathers, Mrs. D. had cut several strips of construction paper in brown, black, tan, gray, and white. If planning to use paper feathers, cut these in advance and curl them around your finger or a pencil.
  3. Cut diamond shapes for the beaks. To make several, I first cut a strip of paper, then cut smaller rectangles. I folded each rectangle in half (hamburger fold) and then cut a triangle, leaving the fold in tact. Once unfolded, these formed the beaks. We used yellow and orange construction paper. Mrs. D. had also cut out brown construction paper feet, which we skipped. If you don't want to use googly eyes, cut black paper circles.
  4. Have your child assemble his owl. Glue two cupcake liners to the head to make the eyes. Then add the googly eyes or paper circles to the centers. Next, glue down the beak. If you are including feet, now is a good time to glue them to the bottom of the owls' body, either on the front or the back. Then, add feathers. We used actual feathers, which is why tacky glue worked the best, but the paper strips can be adhered easily using school glue or a glue stick. (Glue stick is the least messy.) 
    {One of Mia's owls, which I call "Showgirl."}
  5. Allow glue to dry before displaying your owl craft. 
    {Mama & Baby Owls by Mia, Age 6}
Other Ideas: I decided that it would be fun to perch the owls on actual twigs, and I envisioned using pipe cleaner legs to secure them. However, Mia was happy to make owls without feet so I never mentioned this. I also came up with the idea to use paper (or fabric) flowers for the eyes, and Mia made one very showy owl that had pink feathers and paper flower eyes with jeweled centers (from my scrapbooking supplies), which ended up being her absolute favorite.

Tuesday, October 29, 2013

Marble-Painted Spider Web Craft

Here's yet another fun holiday craft idea from our fantastic story time lady, Mrs. D! My little man (who I have mentioned is not hugely into crafts like his big sister) really had a great time creating this project, and I can't blame him. Who doesn't love fun ways of painting? And painting with marbles is definitely fun!

He enjoyed adding the foam spider sticker at the end, but you make a spider from a pom pom and some pipe cleaners like we did here. Or you can just add a plastic spider ring in its place. I'm thinking you could either cut off the plastic ring part and then glue it on, or if that doesn't work, make a slit in the paper, and poke the ring part through and tape it to the back side of the paper.

I'm also feeling inspired to do a string-painting version of this spider web craft... So many spooky possibilities!

{Spider-in-a-Web by Logan, Age 4}


Materials:
  • round cake pan or pie tin
  • black construction paper
  • pencil
  • scissors
  • white tempera paint (and small bowl/cup to hold it)
  • marble/s
  • spoon 
  • adhesive foam spider sticker (optional)
Directions:

  1. Place a piece of black construction paper inside your cake pan or pie tin. Using a pencil, trace around the inside and cut out the paper circle.
  2. Lay the construction paper inside the cake pan or pie tin.
  3. Place some white paint in a cup or bowl along with a marble or two. Help your child coat the marble/s with paint, using a spoon. Again, using the spoon, help your child place a marble on top of the paper.
  4. Have your child gently roll the marble around to make a "web" pattern on the black paper. If desired, put the marble back in the paint to re-coat it.
  5. Have your child place a spider sticker in the web and then allow the paint to dry completely before displaying his artwork.

Wednesday, October 16, 2013

Print Making with Plastic

For Logan's birthday celebration, his grandma brought a veggie tray from the grocery store. Since I don't usually buy these, I had never really studied the packaging before. Interestingly enough, the tray's bottom had a lovely texture that called to me: "Make some prints!"

Yes, inanimate object speak to me on occasion. We creative types think of this as the "creative process." I have no idea what "normal" people refer to this as. Anyway, it's how I came up with an unconventional way of re-using this plastic tray. Mia enjoyed making these prints one afternoon while her brother was fast asleep (probably from post-party excitement).


{One of many "star" prints made by Mia, age 6}

Materials:
  • paper (construction paper, computer paper, card stock, etc.)
  • acrylic paint in your choice of colors
  • plastic packaging (ours was from a veggie tray)
  • Styrofoam tray to hold paint (or a plate)
  • brayer (or a foam paint brush)
  • something to protect work surface (we used cereal box liners)
{Black construction paper gives a totally different look.}

Directions:
  1. Acrylic paint will stain, so first prepare your work space. We covered the table with cereal box liners (my favorite, at the moment), but newspaper or a vinyl tablecloth that you are not in love with will work equally well. I also recommend that kids wear old clothing or paint smocks.
  2. Pour a small amount of paint into a Styrofoam tray (or onto a plate). You can use up to 3 colors without it getting too muddy. Tip: Styrofoam trays can be re-used many times, which is why I like them. If you are concerned about germs, just run them through the dishwasher on the top rack, and voila! Sanitized and ready for crafting.
  3. Gently roll the brayer through the paint to coat it with a small amount of paint and then roll the paint-covered brayer over the textured plastic tray*. Tip: If you don't have a brayer+ -- a hard rubber roller with a handle (ours is wooden, some are plastic) -- you can use a foam paint brush to apply the paint to the tray. It will just be a bit trickier to get a thin, even coating, which is ideal for print making.
  4. Lay a piece of paper (whatever kind you have) on top and smooth your hands over the back side, applying even pressure. Gently peel off the paper and set it aside to dry. 
  5. These prints would look great in a frame or you can use them to make cards or wrapping paper.
{Apply paint to a plastic tray using a brayer.}

*Note: We first did this on the inside of the tray, and then later we cleaned it off and switched to the outside of the tray, which had the opposite pattern on it. This way we ended up with two different designs from that one plastic veggie tray!

+Note: A brayer is a nice-but-not-necessary tool to have. If you think that you will do a fair bit of print making, it might be worth the investment. I purchased mine several years ago at a craft store (either Michaels or Jo-Ann) and it cost about $10. You can also find them online.

{Here's the reverse side pattern -- 2 for 1 crafting!}


Here are 10 more ideas for print making that you might enjoy:
  1. Fruit and Veggie Prints
    {The reverse side made a "lacy" design.}
  2. Cookie Cutter Stamp Art
  3. Shamrock Stamping with Cookie Cutters
  4. Print Making with Styrofoam
  5. Sun Prints
  6. Plastic Bottle Flower Prints
  7. Stamped Art with Pencil Erasers
  8. Bubble Wrap Indian Corn Print Making
  9. A-Corny Print Making Project
  10. Rose Bouquet Print Making

Wednesday, September 25, 2013

Photo Thank-You Cards for a Shark-Themed Birthday Party

After making fill-in-the-blank style photo-thank-you cards for the past few birthday parties, I think I have it almost down to a science. The only part that nearly threw me was that when Mia was this age she was able to start helping to personalize the notes by signing her name. Logan, on the other hand, can't write his name and to be honest, I'm not even sure if he knows what letter it starts with! Luckily, I was inspired by my friend Liz who had her son color a homemade shark birthday card, and I realized that Logan could do the same thing for his thank-you cards. (By the way, Liz, I have your card sitting right in front of me, so it's coming soon!)

{Card views from the outside (top) and inside (bottom)}

Materials:
  • blue card stock (8 1/2" x 11")
  • paper trimmer
  • word processing software/printer
  • pinking shears
  • scrapbooking adheseive (or glue stick)
  • markers/crayons/colored pencils
  • pen
Directions:
  1. At the party, take a picture of each guest. We used the shark photo prop that I had made for this.
  2. Have photos printed. Note: My 4" x 6" prints were ordered from Snapfish.
  3. To get two cards per piece of card stock, fold a sheet in half, hamburger style. Then, use a paper trimmer to cut along the crease. Now you have two cards. Again, fold each one in half like a hamburger.
  4. Check to see that the photo fits inside the card, trimming as needed. Next, use scrapbooking adhesive (or a glue stick) to adhere the photo to the inner left part of the card.
  5. While the card is still open, use your pinking shears to cut a "bite" out of the top left corner of the card. Make sure that this won't cut out anybody's face, of course. If desired, use a pen to add the date below the photo.
  6. For the fill-in-the-blank thank-you templates, use word processing software like Microsoft Word. Mine is in portrait layout and I was able to fit four per page. I chose to keep this simple, but still fun by including some invented words (or, as I like to call them, "mommyisms.") The wording reads:

Dear ______________________­­­_____,                        
     Thanks for helping me celebrate my                                       
“jawsome” 4th birthday! Thanks also for                         
the  ____________________________                                           
________________________________                                           
________________________________.                                                 
It’s “fintastically” fun!                                                       

Your friend,                                                                                        
Logan                                                

There was also a photo of a shark that I found online and inserted to the left of Logan's name, but I can't get it to show up here. After printing these out, I trim them to size with my paper trimmer and then use pinking shears to make decorative shark "bites" along the top and bottom edges. Lastly, affix the fill-in-the-blank template to the inside of the card, to the right of the photo. Depending upon the age of the birthday boy (or girl) you can either fill this in or let him (or her) help.

7. For the front of the card, print out simple coloring page shark designs. I can't seem to find the image I used, but just do a search for something like "shark images for coloring." I pasted my image into Microsoft Word and scaled it so that I could fit six per page, in landscape format. Then, I used word art to "Thank You!" below each shark. I trimmed and adhered these to the front of each card and then Logan colored the shark pictures.

I love the idea of taking the theme all the way through the party and wrapping it up with a thank-you card. Adding photos is a little something extras that makes for fun souvenirs. These cards were not difficult to make, (once I did the advanced planning and creation of the shark photo prop!) and they were perfectly personalized to the theme of Logan's "jawsome" 4th birthday party. For more themed party thank-you card ideas, see my previous posts about the Care Bears party thank-yous and the Cars-themed party thank-yous and the Fancy Nancy party thank-yous.

Monday, August 26, 2013

DIY Napkins for a Shark Party Theme

One of the simplest projects that I did for Logan's "jawsome" 4th birthday party was stamping the napkins to go along with the theme. It's a simple trick I've used for various kids' birthday parties over the years. I just found a package of inexpensive party napkins (Dollar Tree has them in several colors, and this is where my package of 30 for this project was purchased) and a stamp that goes along with the theme. In the past, some of my stamps didn't perfectly "match" the theme, but if I had an ice cream cone or a cupcake stamp on hand, and my kiddo approved of it, then that's all I needed.

However, in this case, I didn't have anything suitable for Logan's desired shark theme. I found a stamp an under-sea stamp set on clearance at Wal-mart a few months before the party. It was just 50 cents, so I bought it, not even sure how I would use it at the time, but knowing that for that price it would be well worth it. (This is when it pays to listen when the kids start tossing out party suggestions. Then, whenever you happen to be out shopping, take a quick cruise through the clearance section and see what is there that could be useful for your upcoming celebration.) I strongly encourage advanced planning, if like me, you don't want to spend much money on birthday parties!

After pulling out the stamp pads that I had in my craft stash, I quickly decided to go with the teal color. Paired on top of the dark blue, it made the most sense to me as a shark swimming in the water. To get the best coverage on the stamp, I lightly tapped it about 3 or 4 times on the stamp pad and then firmly and evenly pressed it down onto the napkin. I re-inked the stamp before each impression to ensure even coverage.

One important thing to note about stamping on napkins, is that you will not get perfect delineation. The ink gets absorbed into the paper a bit, so don't expect crisp results. My shark stamp actually had an eye that showed up on first impression but then quickly faded as the ink was dispersed on the napkin. To me, this was not a big deal. I still got the shark I wanted (albeit eye-less), but it might make a difference if your stamp has lots of details that you feel are important to the overall design.

{Left: freshly stamped, Right: after ink dried}

In the end, I had 30 shark party napkins that cost me a total of $1.50. I fanned them out in two areas of the counter near the food and lemonade (which I had dyed blue to go along with the theme). Big impact, small price tag, happy birthday boy. Totally "jawsome!"

Sunday, July 7, 2013

A Flag for July 4th Craft

While my kids were at "Camp Grandma" they made these American flag projects at story time. The book that they heard was called I Pledge Allegiance, and it broke down the Pledge of Allegiance into pictorial references to make it easier for kids to grasp the big concepts, which I thought was pretty cool. The lady who read the story, Jill, said she was inspired by the torn paper illustrations, so I thought that they would have made torn paper flags. However, she must have decided it was easier to prep for a group by cutting the red strips and blue squares in advance using scissors. If you are doing this at home, I really think tearing the paper would be so cool, assuming the kids are old enough to do this themselves. Anyway, here is how we did this craft.

{Flags by Mia, Age 6 and Logan, Age 3 1/2}

Materials:
  • white paper
  • red and blue construction paper
  • scissors (optional)
  • glue stick
  • wooden skewers (or plastic drinking straws)
  • stapler (or tape)
  • adhesive paper hole reinforcements (like this)
Directions:
  1. Cut (or tear) white paper to the desired size. Ours are made from 8 1/2" x 11" computer paper that was cut in half, hamburger style. Any white paper would work.
  2. Cut (or tear) squares from blue construction paper.
  3. Cut (or tear) strips of red construction paper.
  4. Design your flag. Both kids started by gluing their blue square to the white flag. (Mia did hers completely on her own, which is why it is in the opposite corner that it technically should be. This worked out nicely, though, for display.) Next, they glued on their red strips. (Note: The intent was to leave space in between for the white stripes. Mia understood this better than Logan did, of course, since she is older.)
  5. Add some "stars." Jill gave them these white circle paper hole reinforcements, which I thought was clever. (I am always a fan of using what you have on hand!) You could also use star stickers, or draw your own stars, too. Torn white paper is another option that would look nifty.
  6. Lastly, we tucked the wooden skewers into the end of the flag, rolled it over, and stapled them to secure. The staples poked out some, so tape might actually be a safer choice for little hands. (Note: I inserted the sharp end of the skewers so that they were hidden, for safety's sake, but I overheard one mom with older kids suggest that they should leave it poking out the bottom end so that they could stick them in the lawn. This sounded cool, but definitely short-term since these crafts were not made to last. I would, perhaps, stick them in an indoor plant, though.) Tip: If you are concerned about the safety of wooden skewers altogether, you can cut off the pointed end, or simply substitute a plastic drinking straw as we did in our 4th of July mini flag project from a couple of years ago.


Wednesday, April 24, 2013

Caterpillar on a Leaf Craft

Here is another cute and simple idea that I got from our Story Time lady, Mrs. D. Yesterday, Logan made this caterpillar out of pom poms that he stuck onto the leaf, which had already been made for him. If you like thematic craft projects, this could easily go along with a study of butterflies and caterpillars, which was the theme for this week. Or it could be used in conjunction with the study the letter "C."

One nice thing about this craft is that it requires few materials. If you don't have pom poms on hand, you will, of course, need to purchase them. However, pom poms are an affordable craft staple. You can pick them up at Dollar Tree, Wal-mart, or any craft store. I would suggest Dollar Tree if it's not out of your way because we got a package of 80 pom poms there recently, and this is enough to last us quite awhile, even with frequent crafting.

{Caterpillar by Logan, Age 3 1/2}
Materials:
  • green construction paper
  • scissors
  • decorative scissors (optional)
  • colored paper (or pipe cleaner)
  • pom poms (any color)
  • glue (Glue Dots are optional)
  • markers
  • hole punch (optional)
  • googly eyes (optional)
Directions:
  1. Cut a leaf shape from green construction paper. If you do not want to draw it free-hand, there are lots of templates available online. I like this one, for example. Mrs. D. had already drawn veins on the leaf using a green marker, which made the craft look more complete. Tip: You can also cut the leaves with decorative scissors like zigzag or scalloped edges if you wish. Tip: If desired, you can use a hole punch to make it look like the caterpillar has chewed the leaf. This may be hard to see in the photo, but the edge is "chewed." You could also punch holes in the interior of the leaf since caterpillars love to eat!
  2. Have your child glue some pom poms to the leaf to make the caterpillar's body. We used Glue Dots for this. Tip: If using Glue Dots, it is easier to stick the pom pom to the Glue Dot rather than trying to peel off the Glue Dot and then stick it to the pom pom.
  3. Give your child a narrow strip of colored paper that has been folded in half. Have him or her glue this to one end of the caterpillar to make the antenna. Tip: You could also use a section of pipe cleaner for this.
  4. Add a face if desired. Logan used a marker to draw eyes, which didn't show up very well. Tip: I suggested that we could glue on googly eyes, but he wasn't too interested, so we left it as is.
  5. Make sure the glue is dry before you move the caterpillar to its display spot.

Tuesday, April 23, 2013

3-D Paper Plate Flower Craft

Here is a simple flower craft that Logan made at Story Time a couple of weeks ago. Since he chose only the tiger-striped paper for his petals, I called this flower his "tiger lily." It would be pretty to fill a wall with these paper petals, which are so very spring-like!

{"Tiger Lily" by Logan, Age 3 1/2}

Materials:
  • small paper plate
  • cupcake liner
  • paper (decorative or solid colors)
  • scissors
  • decorative scissors (optional)
  • green crepe paper
  • glue stick/glue
  • circle punch (optional)
Directions:
  1. Pre-cut paper into flower petal shapes. Tip: If desired, use scalloped or zigzag scissors. Tip: You can also cut or use a circle punch to create colorful paper circles for the center of the flower.
  2. Have your child glue the petals onto the top (eating side) of a paper plate. Tip: I think it would look nice if the child first colored the paper plate, but we didn't have that option due to time constraints.
  3. Have your child apply glue to the bottom of a cupcake liner (ours was decorative foil, but paper would work, too) and the adhere to the center of the paper plate. If desired, add glue to a colorful paper circle and then insert it into the middle of the cupcake liner.
  4. Help your child cut some crepe paper for the flower's stem and then glue it to the back. Tip: For a little something extra, Mrs. D., the Story Time lady, suggested making the stem the same height as the child. Cute, right? It made me think that this could be adapted to make a more permanent growth chart for the wall with a measuring stick, perhaps? I guess that's an idea for another time... Tip: You can find 2-packs of crepe paper at Dollar Tree, which is the cheapest that I have seen it. Both are the same color, which is the only downside, but it's still a good deal.
  5. Allow glue to dry completely before displaying your child's flower craft.