Showing posts with label Dollar Tree crafts/activities. Show all posts

Tuesday, February 4, 2014

DIY Puppy Ears

These fun puppy ears doubled as photo props (for the upcoming thank-you cards) and as party favors. What can I say? I like when stuff serves double-duty -- it's just plain smart. Plus, I saved money by making them myself instead of purchasing them from this site! Here's how I made these cute puppy dog ears (I made 11 pairs total) for about $6.

{Some of the finished puppy ears}
Materials:

  • tan felt (I bought 6 sheets of 8 1/2" x 11" size at Wal-Mart, 23 cents each)
  • brown marker
  • scissors
  • brown/black plastic headbands (These came in 3-packs from Dollar Tree. I bought 4 sets.)
  • hot glue gun
  • cream felt (This came in a neutral colors multi-pack at Wal-Mart, but I only used cream for this project.)

Directions:
  1. Fold a piece of felt in half, width-wise. Cut along the fold. 
  2. Now, take one half piece and fold it in half, lengthwise this time. Cut along the fold. 
  3. Draw a floppy ear on one side and cut it out. Mine had a triangular notch at the top end.
    {This is how I folded and cut my felt to get started.}
  4. Use this as a template for all the other ears. Trace around it onto the felt. A brown marker works nicely, and even if it shows on the felt later, it doesn't really clash. (Note: You can either cut the felt smaller first, or just trace an ear, flip it over, fit the template ear against the tracing, and trace again. Then, cut all traced ears out. I did it both ways, and didn't really have a preference.)
    {How I laid the ears for tracing with as little waste as possible.}
  5. Lay out ears in sets of two, facing them the desired direction. (I made each one curve toward the center.) Then, using a hot glue gun, adhere each ear to a plastic headband. Lay them flat while the glue cools.
    {Here is my triangle tip + hot glue, before folding.}
  6. Cut spots from cream felt. Mine were all shapes and sizes, but you can make basic circles if you prefer. Apply the the ears using the hot glue gun. I took my triangle tip, turned it over, applied the glue to that area, and then folded it over on itself around the plastic headband. Again, lay flat while glue cools. Tip: If glue strings bug you, use your fingers to remove any glue strings.
  7. Your puppy ears are now ready to wear!

DIY Stamped Napkins for a Puppy Paw-ty

I have done a post about DIY themed napkins before (Shark party) but I figure it is worth mentioning again. This is a super quick, easy, and inexpensive way to coordinate with any party theme. Most everything else I use is reusable: cups, plates, bowls, but for kids' birthday parties it seems like a necessity to have napkins on hand.

To make my own, I simply bought a package of 30 white napkins from Dollar Tree. Then I used dog stamps and ink pads that I already owned (in red and brown) to personalize them for Mia's recent puppy paw-ty. Mia helped choose which stamps to use, although I narrowed it down some based on the size of the stamp and whether or not it looked right on the napkin. In the end, we chose 5 designs, so each one was used 6 times.

{Easy DIY Napkins for a Puppy Paw-ty!}

Tuesday, January 28, 2014

Frozen Water Balloons

Well, I only pinned this idea a year ago... Maybe I am on the ball, because, really, how many things do people pin and how many of those pins do they actually accomplish? (I've never thought about the rate of attempting vs. just saving ideas, but I bet my track record is pretty good compared to most people.) Anyway, this wasn't something that the kids could really help me with, which was a bummer, but we all enjoyed the results. It was just something fun for yet another "snow day," which was really a "way too cold to go to school day and, therefore, you can't go outside and play day" -- of which we have had far too many this year! I lined them up along our porch railing so that we can easily see them from the living room window.

{A row of pretty frozen "eggs" on my porch railing}

Materials:
  • water balloons 
  • food coloring
  • water
  • pan to hold balloons (optional)
  • scissors (optional)

Directions:
  1. Stretch out your water balloon. Add a few drops of food coloring. (I used 3 drops per balloon. I made one balloon for each color of pure food coloring: red, yellow, blue, green, neon pink, neon purple, neon green, and neon blue plus I mixed a few colors. For example, orange = 2 yellow + 1 red.) Tip: Do NOT use regular balloons. Trust me on this. You will just end up with a mess of colored water!
  2. Fill the balloon with water. (Mine came from Dollar Tree and the package included a little nozzle to attach to the faucet. It didn't stay well, though, so I secured it with packaging tape. If you decide to do that, have a towel handy! Actually, you may want a towel handy, anyway, since a few of the balloons are bound to leak. We lost two at this stage.) Tie the end of the balloon in a knot.
  3. Place filled balloons outside to freeze. This takes a few hours. Be careful not to move them too soon, or they may pop. (This happened to me when I was checking on them about 2 hours later. I figured with the sub-zero temperatures that they might be ready. They weren't. One popped and made a mess on the front porch. I didn't check again for another 4 hours or so just to be safe!)
  4. Remove the balloons and display your frozen "eggs." You could use scissors for this. I just peeled them off with my fingers. (Here I lost a couple that had become frozen into the purple puddle from the popped balloon that I moved prematurely. They ended up cracking when I tried to chisel them away with my boot.)
{Neon colors are surprisingly less vibrant.}

NOTE: If you enjoyed this project, you might also like making Colorful Frozen Ice Shapes. On another note, there are just a few days left for the Livingston Parent Journal's fundraising efforts. Please stop by their crowdfunding site and see if there is a way that you can help out! Thanks so much.

Thursday, January 23, 2014

Winter Mittens Paper Craft

Here is another cute and simple preschool craft created by our wonderful library lady, Mrs. D.! Logan always enjoys using the paint daubers, so this was a hit. (Note: If you don't have paint daubers at home, you can buy Bingo markers at Dollar Tree that work very well for dot-eriffic projects.)


Materials:

  • construction paper
  • pencil
  • scissors
  • hole punch
  • yarn
  • Bingo/paint daubers

Directions:
  1. Draw and cut out a mitten shape. Use this as a template to create a matching mitten, and cut it out. (Tip: If you want a sturdier template to use again and again, consider making one out of boxboard -- like a cereal box.)
  2. Punch a hole in each mitten.
  3. Cut a length of yarn. Thread each end through the holes and tie knots to secure.
  4. Give your child paint or Bingo daubers and let him decorate the mittens. Allow paint to dry before displaying the mittens.

11 more Bingo marker project ideas for the rest of the year:

Friday, January 17, 2014

DIY Table Cover for a Puppy Paw-ty

Oooooh! I love it when things come together and actually turn out the way that I picture them in my head. This is the first decoration that I have tackled for the upcoming puppy paw-ty: a hand-stamped table cover. I made the stamp out of a piece of Styrofoam tray and stamped the paw print all over some brown kraft roll paper that I picked up at a garage sale. (Note: You can also find this at Dollar Tree.) I am pleased with the results and with the fact that I made this for absolutely no cost!

{Close-Up of Table Cover}

Materials:
  • Styrofoam (left over meat packaging, run through dishwasher)
  • pencil
  • carving tools (I used a small screwdriver and my fingernails. A screw, nail, butter knife, or similar item would likely work as well. I don't suggest anything that you could easily injure yourself with, though!)
  • scissors
  • roll of brown kraft paper
  • brown ink pad (or black)
  • rocks to weight paper down (optional)

Directions:
  1. Cut away the sides from a Styrofoam tray to make a flat surface.
  2. Using a pencil, draw a paw print. Mine was a kidney bean shape (or an upside down heart) with four circles on top. Tip: After my first trial did not turn out as I had hoped, I learned to make the circles for the toes larger than I expected to need them to be, and placed everything fairly close together.
  3. Use your tool (I liked using a small screwdriver for this.), repeatedly go over the outline of the paw print design to make it deeper. Then, using your tools, start carving out the extra white space around the parts that you want to be raised up for the stamp. (I resorted to using fingernails, but I don't necessarily recommend doing this. I bent one nail back slightly and eventually tore it a bit from this.) Tip: Don't worry about making it perfect because a) This is impossible! and b) The imperfections look nice on the final product, more realistic, in my opinion.
  4. Press your Styrofoam stamp onto an ink pad and test it on some scrap paper. If it doesn't look as clear as you would like, go back to step 3 and carve away more. Test and repeat carving as desired.
  5. Once the stamp creates a print you like, you're ready to make a table cover. Measure out the kraft paper to more than cover your table and cut it to size. Lay it out on a flat surface (I used my kitchen floor because a) the table was covered with... stuff and b) this was easier on my back since I could just keep scooting along as I went rather than bending and stretching over my table). Tip: Weight it down if it is trying to curl back up. (I used some painted rocks that were handy.) Stamp paw prints however you would like. I chose to make it look like a dog had walked up one side of the table cover and back down the other. You could do random paw prints if you like. This didn't take too much time, even with re-inking between impressions, which I felt would ensure the crispest prints. Again, I didn't worry if some of the prints didn't turn out "perfect" because this adds to the charm. 
  6. When I was done stamping, I made sure the ink was dry before rolling it up to store until party time. I anticipate that I will need to tape it to the table. It should be a cute and low-key table runner, perfect for a puppy-themed paw-ty.

Thursday, December 19, 2013

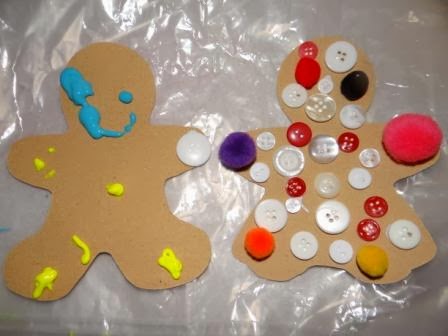
Sandpaper Gingerbread Family Craft

For the past few years we have kept an Advent calendar. In the beginning, I used to put small candy such as Hershey's kisses inside each box, but last year I decided to get away from that. I typed up various activities (make hot cocoa, drive around and look at lights, watch a Christmas show, read a Christmas book, write a letter to Santa, etc.) and put the slips of paper into each box. This way, we are doing things as a family instead of just eating junk food.

Admittedly, my kids are not always thrilled about this. For example, they just plain ignored the slip that said, "make a list of our blessings." Fortunately, they were happy the other day when it said "do a Christmas craft." I didn't really have anything planned, but I had remembered pinning this idea ages ago. So I pulled out my sandpaper (purchased from Dollar Tree for this project) and my cookie cutters and we got to work.

The original craft that I was inspired by involved a lot of puffy paint (cute, but not exactly young child-friendly!) and it was intended to be used as invitations for a cookie exchange. This sounds very cute, too, but here is how I modified the craft to make a more appropriate project for my two kids.

{Gingerbread Boy and Girl by Logan, Age 4}
(Can also be captioned, "why puffy paint should not be placed in the hands of preschoolers!"
Although, his wasn't too bad. It was actually dry by the following morning, which surprised me.)

Materials:
  • sandpaper
  • gingerbread boy and girl cookie cutters
  • pen
  • scissors
  • tacky glue
  • embellishments: buttons, feathers, pom poms, beads, pipe cleaners, craft foam, felt, markers, yarn, sequins, etc.
  • puffy paint (optional -- not suggested for preschoolers and toddlers!)
  • something to protect work surface (recommended -- I like cereal box liners.)
  • old clothes/paint shirts (optional -- strongly recommended if using puffy paint!)

{Our Sandpaper Gingerbread Family by Mia, Age 6}

Directions:
  1. Flip sandpaper over to the non-textured side. Place a gingerbread boy or girl cookie cutter on top and trace around it using a pen. Repeat as many times as desired. I found that we could fit 5 gingerbread people per sheet of sandpaper. (2 large and 3 small) Cut out the gingerbread people.
  2. (If desired, protect work surface and kids' clothing before decorating gingerbread people.) Allow kids to decorate their gingerbread people by using tacky glue to apply whatever embellishments you have at hand. We used many craft staples that you likely have at home: buttons, yarn, pom poms, pipe cleaners, and regular markers. There are many, many, many possibilities. For example, Mia used buttons in the traditional fashion to make a shirt and Logan used them just for decoration all over an entire gingerbread girl. She also used feathers in more than one way -- to make a skirt and also cut and shaped to make hair. (Note: If you are brave enough to let your kids use puffy paint, remember that it will stain clothing and plan accordingly. Also, it is very tricky to "pipe" it neatly, as you can see from my own example with the blobby outline around the head, so that may be frustrating for little ones.)
  3. Make sure that glue dries completely before displaying your gingerbread people. 

 {Brett came home and asked, "Where's Mama's?" Now I have one, too.}

Other Ideas:
  • I think it would be cute to string several of these together to make a garland.
  • Since we have both boy and girl cookie cutters in both large and small sizes, Mia decided that she would make one gingerbread person to represent each member of the family. This would a cute thing to do as a family or as a class: everyone decorates a gingerbread person to look like himself.
  • These could also be made into ornaments by punching a hole and then adding ribbon, yarn, bakers twine, or a pipe cleaner. The only downside is that the sandpaper is kind of flimsy, so you may want to first reinforce these with a layer of card stock. A more durable option would be craft foam.
  • In fact, if you don't have sandpaper, craft foam would be fine for this project. You just will not have the textural aspect unless you find a way to create it. One way would be to add a layer of glitter, but this is going to be messier than sandpaper, by far.
  • To make these into puppets, add a craft stick like we did here.
  • I really do like the idea, too, of using these as invitations to a cookie exchange. In the past, I made my own apron invitations for an exchange, but these would be a bit easier to mass produce.
  • If you don't have a gingerbread cookie cutter, don't run out and buy one! (unless they are already on clearance, in which case feel free to share where you are finding them -- not that I need any more...) You could also use a teddy bear or a puppy or any other item that would look good in brown.
  • Looking for more ideas of things that you can do with cookie cutters? You might also like: cinnamon applesauce ornaments, gingerbread men paper dolls, craft foam ornaments (page 20), and Christmas sun catchers.

Wednesday, November 27, 2013

Turkey Table Toppers

Here's an easy craft to keep the kids busy this Thanksgiving. Once again, this idea is brought to you by our wonderful library lady, Mrs. D. (I hope she isn't offended that I love her ideas and run with them!) These turkey table toppers are fairly quick and easy for little ones to create without too much parent prep. I think that it would be cute to have child-made place cards for everyone by simply adding names to the tail feathers. That would surely make for a happy Thanksgiving table.

The good news is that most of the items needed for this project are things you likely have at home. The only item you may not have are the Bingo markers. I assume that the library ordered these Bingo daubers, but my suggestion is that you save yourself a lot of money and get some from Dollar Tree! I bought ours there over two years ago and they are still working great. (I normally see these in the school supply aisle.) We have red, orange, green, blue, and purple. The only color I have seen at Dollar Tree that I did not purchase was black since I figured that would have limited craft possibilities. Personally, I think this was a great investment for kids' crafts so I would definitely recommend getting some!

{Turkeys by Logan, 4, and Mia, 6}
Materials:
  • TP tube
  • small paper plate
  • scissors
  • tacky glue (or school glue)
  • yellow/orange construction paper
  • brown construction paper
  • pencil
  • 2 googly eyes (or eyeball stickers)
  • Bingo markers (or regular markers)
  • red pipe cleaner (or construction paper)
  • something to protect work surface (optional)
Directions:
  1. Cut a small paper plate in half. One half is needed per turkey, so if you are only making one turkey, set this aside for another project. (One option is this paper plate turkey.)
  2. Cut a toilet paper tube in half. If you want to make lots of turkeys but you are short on TP tubes, you can also cut them into thirds. Using your scissors, make two small notches on one end of the tube, about 1/4" deep. They will be spaced equally apart so that the paper plate will be able to slide into the notches after it is decorated. (If you need a project for leftover tube sections, try making bird feeders.)
  3. Make a beak out of yellow (or orange) construction paper. The easiest way to do this is to cut a strip of paper and then cut a smaller rectangle from the strip. Then, fold the rectangle and cut a triangle so that the fold is the base of the triangle. When glued onto paper, this will make a 3-D beak.
  4. Draw and cut out a turkey body from brown construction paper. The basic shape is a small circle on top of a larger circle and it should be about 4 1/2" tall. (Note: Mrs. D.'s is thinner and reminds me of a bowling pin and mine looks a bit more like a fat pear, but I think they both are fine. Also, hers is flat on the bottom and mine is rounded, and they both seem to stand up nicely, so take your pick.) Tip: If you are planning to make more than one turkey, use the first one as a template and trace around it to make more.
  5. For the wattle, we used a scrap of red pipe cleaner. If you want to use pipe cleaner, you may need to cut a piece about 1" long. Tip: I keep left over bits of them in an old plastic peanut butter jar for times when we need just a small piece. This way, we don't have to cut up a perfectly good pipe cleaner. Tip: If you don't have pipe cleaners, you could also make a wattle from red construction paper, cut into a kidney bean shape.
  6. Have your child decorate the half paper plate using the Bingo markers. It doesn't matter which side of the plate gets decorated. Tell kids that they do NOT need to press hard. Tip: If the ink isn't flowing well, make sure the cap is secure, and shake the Bingo markers. If this doesn't work, gently tap, tap, tap the marker until the ink starts flowing. Set aside to dry. Tip: Sometimes markers will bleed through, so you might want to protect your table before starting. I like to use cereal box liners, but you can also use newspaper, an old vinyl tablecloth, or wax paper. Tip: If you don't have Bingo markers, let your child decorate the plate with regular markers.
    {Mia made a rainbow turkey.}
  7. Have your child decorate the turkey's body. Mrs. D. provided eyeball stickers for a no-mess option. (Logan's make me smile because one is upside down.) Mia used googly eyes and adhered them with tacky glue. (Tip: If you don't have eyeball stickers or googly eyes, use a black marker to draw eyes.) Next, both kids glued down their beaks. Mia then added her red pipe cleaner wattle. (Tip: If you don't have a pipe cleaner, use red construction paper or draw one with a red marker.) Lay flat until glue is completely dry.
  8. Kids may need help with assembling their turkeys. Place some glue on the back of the turkey's body and affix it to the tube, making sure that the two slits are on the top of the tube, and are to the left and right of the body. Slide the paper plate, flat side down, into the two slits so that the colorful side is facing the front.
  9. Display your child's turkey table topper. You may want to make several for all of your Thanksgiving guests.
One final thought: I know it has nothing to do with Thanksgiving, but Mia's rainbow tail feathers inspired me, and I could totally see tweaking this craft and making it into a showy peacock. To do this, use pretty blue paper in place of brown. Skip the wattle, and add lots of colorful Bingo marker dots to the body. For a final flourish, add a blue feather on top of the peacock's head, and voila! A pretty peacock!

Have a blessed and safe Thanksgiving!

Monday, November 4, 2013

How to Accessorize a Witch Hat (for a Particularly Fashionable Girl)

I got pretty lucky this year in that I didn't have to spend very much money to come up with Halloween costumes that made the kids quite happy. Mia wore a cute black and orange witch dress that my mom had found at a garage sale. She paired that with sparkly black tights (which she already owned), a long-sleeve black shirt (new, but very practical, so worth a few dollars investment), black shoes (which she already owned), and a black flower belt (also new, but again, she has already worn it several times, so totally worth a few dollars), which helped with fit since the dress was a teensy bit large. She also accessorized with a charming little broom that we had found at a garage sale for 75 cents.

The only thing I had to recently purchase specifically for costume wear was a witch hat. (I had actually gotten one at that same garage sale where we found the broom -- 50 cents. However, when we got it out and examined it, we found that it was a) falling apart and b) much too big. The redeeming quality is that it had some black sequined trim on the brim, which having been sloppily hot glued, was easy to remove.) I bought a new hat for her at Dollar Tree. It was orange with a spider web lace all over it and it fit her well. The only problem was that she felt it was a bit on the plain side.

{BEFORE}

I decided that it would be easy enough to trim it out and make it more acceptable to my little fashionista. We already had the black sequined trim, which laid nicely along the brim, making it simple to adhere with hot glue. Unfortunately, it only went around half of the hat, and left the rest looking very unfinished. I ended up buying a roll of black tulle at Walmart for about $3. (Ironically, this trim item was the single most expensive thing I purchased for either of the kids' Halloween costumes this year!) I bunched it up and applied it along the rest of the brim using my hot glue gun.

Then, we went through our craft stash and selected other items to accessorize the hat: three black feathers, a small scrap of orange tulle, a black and orange star-shaped button, and some ribbon that said "Trick or Treat" with candy corn on it. To complete the hat, I layered on some embellishments starting with the black tulle, making two lengths that hang down, and affixed them with hot glue. On top of the tulle, I placed the decorative ribbon, again with two lengths. Next, I fanned out the three black feathers and adhered them. I followed that with a little "flower" that I made by pinching the orange tulle into a round shape. After it was glued down, I added the button for the center, and voila -- an adorable witch hat for my sweet little witch!


{AFTER}

While I wasn't originally planning to spend anything more than the cost of the hat, I think this impromptu project made a big impact. With a bit of my time and some hot glue, I was able to transform that witch hat from drab to fab for just a few dollars. This project cost me about $4.50 -- $1 for the hat, $3 for the black tulle, and 50 cents for that sequined trim that I got from the discarded hat. It was completely worth it to see my little girl's big smile when she tried on her newly accessorized hat!

{My sweet little witch}

Monday, October 14, 2013

Easiest Ever Pumpkin Craft

I recently learned how to make these at our local library, and I am very pleased with how mine turned out. Really! I am not making this up. This is the easiest pumpkin craft ever, and you need absolutely NO craft skills to pull it off. Also, you barely need any materials, and these pumpkins are really quick to craft. So, it's basically a perfect craft, even for beginners.

If I had any complaint, it would be that this is a little bit more expensive up-front than many other craft projects that I have made. That said, you will have plenty of duct tape left over, so it is really just a general craft investment. (And for the record, I can't complain, because all of my materials were provided by the library. Love!) I am sure I will be making more cool duct tape pumpkins... as soon as the faux pumpkins start going on clearance at the craft stores.


{Happy Halloween Crafting!}

Materials:

  • foam pumpkin (I recently saw some small ones at Dollar Tree!)
  • 1-2 rolls of decorative duct tape (I have found small rolls in the dollar section of Target.)
  • scissors (optional)

Directions:

  1. If using more than one roll of decorative duct tape, decide which design/solid color will be used for your stem and which will be used for the body of the pumpkin. Tear (or cut, but honestly, I found it easier to just tear it with my hands) off small sections and cover the stem. You can even tear the tape in half to have easier to work with strips if you stem is on the small side. Don't worry if the base looks messy because you will end up covering it later. Tip: If your stem is too long or awkward to work with, cut it with your scissors. I found this to be really helpful!
  2. Now, cover the base of the pumpkin with strips of duct tape. The best way to do this is to start at the top near the stem and then slowly smooth the tape down along the pumpkin. You will want to leave space in between each strip of tape, and then come back later and fill in the gaps. Tip: I decided to tear off several strips and lay them along the edge of the table to make the process go more smoothly. I just eyeballed them to see that they were the approximate length that I needed. Tip: Don't worry about making your pattern (if your tape has one) line up perfectly! I could have made myself insane trying to get those chevron stripes to line up just so, but I saved myself the worry, and it came out fine. The eye just tells me that it lines up (for the most part) even if it really doesn't.
  3. Find a place to display your spooktacular pumpkin craft. See, I told you that was easy, right?

Tuesday, September 17, 2013

Homemade Photo Prop for a Shark Birthday Party

This was the first project I started making for Logan's shark-themed birthday party, and once I saw this fellow swimming on my kitchen floor, I knew that I was track for a pretty "jawsome" birthday for my favorite little boy! (This was good news because scrounging up the appropriate amount of cardboard had been somewhat challenging, so once again, it pays to plan ahead, folks.) I found inspiration for this project here, but as always, I tried to figure out how to do it myself for as cheaply as possible. Note: While this project cost me next to nothing, (Proof positive: the best things in life are free!) it did take about 3 hours to complete, and that actually shows that I am getting faster at these cardboard constructions as I make more and more of them.


Materials:

  • corrugated cardboard
  • scissors
  • pencil
  • ruler
  • tape: clear packaging, masking, Scotch
  • Sharpies: black and red
  • paint brushes
  • white acrylic paint
  • gray primer
  • two white plastic bottle caps
  • hot glue gun
  • 2 blue plastic table covers
Directions:

  1. First, I cut apart two of the largest boxes I could find to produce flat sections to work with.
  2. Then, I laid them out and found the center with my ruler and pencil. I sketched out the shark's head, followed by the fins and tail section.
  3. Next, I cut out the different parts of the shark's body, using scissors. I also used my scissors to cut out the inner part of the open shark's mouth.
  4. I taped each section to the next, using lots of clear packaging tape. This was on the back (printed side) of each box piece, meaning that the front of my shark was plain brown cardboard.
  5. I laid a vinyl tablecloth (used only for crafts) on my dining table and then painted the shark using gray primer that we already had on hand. A large foam paint brush worked very well for this, and since I got such great coverage, I only applied one coat. (This right here saved me lots of time. Normally when I make this sort of party prop, I need to do at minimum, two coats of acrylic paint.) I let this dry completely before moving on.
  6. For the teeth, I used white acrylic paint and a smaller paint brush.
  7. Afterward, I used a red Sharpie marker to draw in the gum line around the teeth. I followed that with a black Sharpie marker, which I also used for all of the outlining to make the shark look more finished.
  8. The finishing touches were the eyes. I took two white bottle caps from apple juice containers and used the black Sharpie to make slit-like pupils. Then, I hot-glued each one to the top of the shark's head.
  9. For the background, I used two blue plastic table covers from Dollar Tree. (So if you're keeping track, this project cost me a total of $2.12.) I folded them both in half and then I used lots of rolled masking tape to adhere the shark on top of the two table covers, which were held together with Scotch tape. After it was taped down, I cut away the inside of the shark's mouth so that there was no blue backdrop in that part. 
  10. Displaying the photo booth was the hardest part to figure out. Luckily, Brett was able to help with the logistics. After trying several types of tape, we settled on clear packaging tape (and plenty of it!) to secure the layers of plastic table cover to the top of our mantel. (Failed attempts included Scotch tape, blue painter's tape from Dollar Tree, and masking tape.) I added some red table cover (left over from a previous party) to the inside of the mouth area by taping it to the fake fire place with Scotch tape.
  11. The kids, and some brave adults, too, were then able to stand or kneel behind the backdrop, put their faces inside the shark's mouth, and let me take pictures (which were for the thank you cards). It stayed up for many days before I decided to take it down, and I think it was picture perfect.
{Say, "Ahhhhhhhhhhhhhh!"}

{You can't say I never post photos of myself!}


Thursday, September 12, 2013

Best Homemade Bubbles

Last summer, I tried out three different recipes for homemade bubbles, and I posted about our experiences here. This year, I had hoped to do a similar experiment and try out several more recipes for bubble solutions. However, I only tried this one. In part, time slipped away from me, but the main reason for not trying other recipes is that I really like this one! Recently, a few people have asked me for the recipe, so I decided it was time to share my current favorite bubble recipe.

This one has made the rounds on Pinterest and Facebook so you may have seen it before. When I saw it, people were claiming that it makes super industrial-strength, indestructible bubbles, so naturally I was curious to give it a go. The original recipe said to use JOY dish detergent, which I have been unable to find. So, I used Palmolive instead. I am not sure if the brand makes a significant difference, but our bubbles were pretty run-of-the-mill as far as pop-ability goes. With the right tools, however, this did create very large bubbles, and quite easily, I might add. Combine this with the fact that the recipe does NOT call for ingredients that are terribly expensive or more difficult to find (glycerin, for instance, which I used for last year's recipes) and it is a sure-fire winner.


So, far I've made a couple of batches, and we've had lots of fun with these bubbles throughout the spring and summer months. It was a hit at Logan's recent shark-themed birthday party. We have even  packaged this in small peanut butter jars along with homemade pipe cleaner wands and given it for birthday gifts along with some other homemade goodies, so this also makes a nice gift.

Ingredients:
  • 6 cups water
  • 1 cup light corn syrup (I used Karo.)
  • 2 cups dish soap* (I used Palmolive.)
* If using ultra concentrated dish soap, reduce to 1 1/3 cups.

Directions:
  1. In a large bowl, add water and corn syrup. Stir until combined. Note: It is difficult to completely dissolve the corn syrup, so just do the best that you can.
  2. Add dish soap. Sand gently until well mixed, avoiding creating bubbles as best as possible.
  3. Dip wands into bubble solution and blow or wave to create bubbles. Tip: To make it easier, pour the solution into containers such as cake pans and pie tins. Set these on the ground (or any flat surface) and let kids dip their wands into the solution.
  4. To store bubble solution, pour it into a container with a lid. This should keep for many weeks. As mentioned above, I like peanut butter jars for this. They are unbreakable, but secure.
Note: Any bubble "wand" will work, whether it is something you have saved from commercial solutions or homemade wands made from twisted pipe cleaners, which are a favorite of mine.

Plastic bottles with the bottom cut off work very well for young children who are just learning to how to blow bubbles.

We've also had lots of fun this year with a couple of fly swatters that I got in a 2-pack at Dollar Tree, which can be used two different ways: first you can blow bubbles, or you can wave them around to create lots of tiny bubbles. We have found that swatting up and down works better than side to side.


Also, don't forget to check your kitchen for possible "wands!" Slotted spoons and spatulas are two that we have found to work well. I've even had success with old glow necklaces, which make quite large bubbles!

So, don't be afraid to think outside of the box (or commercial bubble container) here! It's very easy and affordable to make your own bubbles at home.


{Tiny bubbles... make me happy!}

Monday, August 26, 2013

DIY Napkins for a Shark Party Theme

One of the simplest projects that I did for Logan's "jawsome" 4th birthday party was stamping the napkins to go along with the theme. It's a simple trick I've used for various kids' birthday parties over the years. I just found a package of inexpensive party napkins (Dollar Tree has them in several colors, and this is where my package of 30 for this project was purchased) and a stamp that goes along with the theme. In the past, some of my stamps didn't perfectly "match" the theme, but if I had an ice cream cone or a cupcake stamp on hand, and my kiddo approved of it, then that's all I needed.

However, in this case, I didn't have anything suitable for Logan's desired shark theme. I found a stamp an under-sea stamp set on clearance at Wal-mart a few months before the party. It was just 50 cents, so I bought it, not even sure how I would use it at the time, but knowing that for that price it would be well worth it. (This is when it pays to listen when the kids start tossing out party suggestions. Then, whenever you happen to be out shopping, take a quick cruise through the clearance section and see what is there that could be useful for your upcoming celebration.) I strongly encourage advanced planning, if like me, you don't want to spend much money on birthday parties!

After pulling out the stamp pads that I had in my craft stash, I quickly decided to go with the teal color. Paired on top of the dark blue, it made the most sense to me as a shark swimming in the water. To get the best coverage on the stamp, I lightly tapped it about 3 or 4 times on the stamp pad and then firmly and evenly pressed it down onto the napkin. I re-inked the stamp before each impression to ensure even coverage.

One important thing to note about stamping on napkins, is that you will not get perfect delineation. The ink gets absorbed into the paper a bit, so don't expect crisp results. My shark stamp actually had an eye that showed up on first impression but then quickly faded as the ink was dispersed on the napkin. To me, this was not a big deal. I still got the shark I wanted (albeit eye-less), but it might make a difference if your stamp has lots of details that you feel are important to the overall design.

{Left: freshly stamped, Right: after ink dried}

In the end, I had 30 shark party napkins that cost me a total of $1.50. I fanned them out in two areas of the counter near the food and lemonade (which I had dyed blue to go along with the theme). Big impact, small price tag, happy birthday boy. Totally "jawsome!"

Friday, July 19, 2013

Curtain Call

Near the end of the school year, I found a sweet little wooden puppet theatre at a garage sale for just $2! I had never seen one at a garage sale before. Ever. So, I scooped it up. Then, after getting it home, I discovered that all of our puppets have gone AWOL. Perhaps because they have never had a proper theatre in which to perform? So, it has sat in a corner of the living room most of the time, occasionally getting opened up for brief puppet shows sadly consisting of about 2 finger puppets, all we could find after searching the WHOLE house!

Now, fast forward to this insanely hot week, when I have thought (more than once) that I somehow ended up in the Sahara instead of good old Michigan, by some weird turn of events. Yeah, it's crazy hot here, and the kids and I have slowly been going batty from being cooped up. This means that the Activity Director (a.k.a. "Mom") has been coming up with lots of projects to try to maintain our sanity.

One such project was making spoon puppets with Mia while Logan (miraculously!!) took a two-hour nap in the afternoon. Our spoons were all left over from my sister-in-law's kitchen themed bridal shower that I threw for her a couple years ago. (Yes, I know, I'm a bit of a pack rat... Honestly, I had been planning for these to become puppets all along, and it's taken me this long to find the motivation. Desperate times, you know?) We ended up with ten spoon puppets altogether, although I am mystified as to where the other two wooden spoons went. I know they came in 4-packs from Dollar Tree, so it seems like we should have twelve, but that's okay. This was more than enough to create a well-stocked puppet theatre.

{Wooden Spoon Puppets by Mia, Age 6}

Materials:
  • wooden spoons
  • permanent markers
  • acrylic paint
  • foam paint brushes
  • tacky glue
  • googly eyes
  • felt
  • craft foam
  • scissors
  • buttons
  • sequins
  • fabric scraps
  • plastic gems
  • pipe cleaners
  • paint tray (old Styrofoam tray or a plate or bowl) 
  • hot glue gun (for adult use only)
  • something to protect work surface (cereal box liner or wax paper)
Directions:
  1. We used acrylic paint for the faces of the puppets. (Well, all of them except for the one she says is "sun burned" which she colored with an orange marker). I didn't have any "flesh" colors on hand, so I mixed up an assortment of skin tones using pinks, yellow, orange, some blue, and white. Apply a thin coat to the front side of the spoon, going down the "neck" somewhat. Then, flip it over, and apply a thin coat to the back as well. You don't need to paint the entire spoon, unless you want to. Lay flat on your cereal box liner (or wax paper) to dry completely, which takes just a few minutes. Tip: Acrylic paints will stain fabric, so old clothes/paint shirts are recommended. Also, you will want to protect your work surface. We used a cereal box liner, which works very nicely for this.
  2. Add clothing to your puppets. Mia used Sharpie markers to draw shirts and pants on some that she decided would be men. For the women, I helped her drape fabric scraps of her choosing to make dresses and then I used my hot glue gun to secure the material. 
  3. Add faces and hair. Mia drew hair on the men. She came up with assorted hair-dos for the women, which were made out of pipe cleaners, and adhered using hot glue. (Yarn would also work, but she wasn't interested in using any.) For faces, she drew noses and mouths using Sharpie markers. She added googly eyes with tacky glue.
  4. Don't forget the accessories and other details! All of the men have mustaches, which is funny to me since we don't know any men with mustaches. She also gave two of the three men glasses, drawn with black Sharpie before adding the eyes. A couple of the men are wearing craft foam bow ties, which I applied with hot glue and one has little buttons on his shirt, which again were hot glued. One of the girls, which Mia called "Rapunzel," has similar bows in her hair and another has a purple butterfly gem. Lastly, the "Old Lady," has two earring (miss-matched) and a necklace.
  5. Make sure all glue is dry before putting on your first wooden spoon puppet performance. Enjoy!
{Some of my favorite people put on a puppet show.}


Note: Not all puppets need to be people. They could be animals (like Mia made), robots, monsters, or whatever you can come up with! Mia chose to make two dogs and two cats, too. One of the "skin tones" came out on the yellow-ish side, but she declared it to be the perfect color for a Golden Retriever. His body and ears are yellow felt. His collar is red felt and his "license" is a gold sequins. (This is probably my favorite one, too. He's awfully cute with his lopsided kid-applied eyes, making it look like he is considering something mischievous.) Both of the cats have striped bodies of alternating orange and brown Sharpie marker, and they have their own collars and tags, too. The last dog looks a bit cat-like sense he has short pointy ears and whiskers, however Mia insists that dogs have whiskers, too! For whatever reason, we had no "children" that she created. When I pictured this project, I figured some of the puppets would naturally look like the members of our family, but clearly it's good to let kids do their own thing!


Friday, July 12, 2013

Water Balloon Painting!

This activity is definitely messy fun! You have been duly warned. It was an idea that I found here. While it sounds a bit kooky, I am always up for new ways of painting, so we had to try it out. The hardest part was getting them to be patient while I filled all the balloons, but once we were ready to go, the kids had a blast! If you're not afraid of getting of a bit messy, this is a great summer activity.

{Finished Painting by Mia, Age 6}

{Finished Painting by Logan, Age 3}

Materials:
  • water balloons (Ours were from Dollar Tree.)
  • paint (Ours was powdered tempera that I mixed up in small batches.)
  • plastic dosing syringe (like the ones you get for administering oral antibiotics to little ones)
  • paper (Ours was a roll of craft paper I got from a garage sale. I've also seen it at Dollar Tree. If you happen to have a roll of butcher block paper, that would work, too.)
  • scissors
  • masking tape
  • bowl to hold the filled balloons (Nice, but not necessary, this came in handy as well when it was time to pick up the pieces of popped balloons.)
  • towels, washcloths, wipes, or paper towel (for clean-ups!)
Directions:
  1. I strongly recommend having everyone change into old clothing before starting. I asked my kids to go barefoot, but the pavement was hot, so we compromised and they wore their Crocs (easily cleaned up, so no worries).
  2. Mix up your paints. I have 4 colors of powdered tempera paints: red, yellow, blue, and green, so I just mixed a small bit of water with each of those in my plastic paint cups. Then, I mixed red and yellow to get orange and red and blue to get purple, so we had a total of 6 colors to use. (Tip: If you have ready-made tempera paints, you can skip this step, but I think that powdered temperas are a good investment. You can make up as little or as much as you need for each use and it's easy to adjust the consistency to accommodate the type of paint project you are doing. In the end, I think they are cheaper, plus you don't have to worry about them drying out and being ruined.)
  3. Add some paint to each water balloon, using a plastic dosing syringe. I think we filled about 20 balloons in total.
  4. Next, add some water to each water balloon so that they are inflated more. Don't add too much water, though. They don't need to be as big as possible. (Tip: Honestly, I am wondering if this step since we had trouble getting them to pop, anyway, and this just diluted the paint. We tried only one balloon without the water, and while it was much smaller, it popped just the same -- with being stomped -- and the paint remained vivid and undiluted.)
  5. Cut some paper off of your roll of craft paper (or butcher block paper) and adhere to a flat, smooth surface using masking tape. We did this in the driveway. Alternatively, you could weight the paper down with rocks, or skip this altogether if you are not concerned about it getting blown or moved in any way. (Tip: I recommend one piece of paper for EACH child. It's just easier this way.)
  6. Now that you are all prepped, start making some art. Sadly, we found that the balloons did not pop when thrown at the paper. Rather, they bounced off and rolled away. So, I just suggested that Mia and Logan stomp on them, which they found to be great fun!

{Photos taken mid-pop!}

{See the splash? Messy fun!}
7.  Let your paintings air-dry. (Ours took about an hour on a bright, sunny day.) Then, remove them and display, if desired. Personally, I was thinking of this as a process-based project rather than a product-based one, but the results were pretty cool, so I found a place to hang each of the finished art projects. (Tip: Our finished paintings fit nicely on two different doors. I just made sure to place them above the doorknobs.)


Wednesday, April 24, 2013

Caterpillar on a Leaf Craft

Here is another cute and simple idea that I got from our Story Time lady, Mrs. D. Yesterday, Logan made this caterpillar out of pom poms that he stuck onto the leaf, which had already been made for him. If you like thematic craft projects, this could easily go along with a study of butterflies and caterpillars, which was the theme for this week. Or it could be used in conjunction with the study the letter "C."

One nice thing about this craft is that it requires few materials. If you don't have pom poms on hand, you will, of course, need to purchase them. However, pom poms are an affordable craft staple. You can pick them up at Dollar Tree, Wal-mart, or any craft store. I would suggest Dollar Tree if it's not out of your way because we got a package of 80 pom poms there recently, and this is enough to last us quite awhile, even with frequent crafting.

{Caterpillar by Logan, Age 3 1/2}
Materials:
  • green construction paper
  • scissors
  • decorative scissors (optional)
  • colored paper (or pipe cleaner)
  • pom poms (any color)
  • glue (Glue Dots are optional)
  • markers
  • hole punch (optional)
  • googly eyes (optional)
Directions:
  1. Cut a leaf shape from green construction paper. If you do not want to draw it free-hand, there are lots of templates available online. I like this one, for example. Mrs. D. had already drawn veins on the leaf using a green marker, which made the craft look more complete. Tip: You can also cut the leaves with decorative scissors like zigzag or scalloped edges if you wish. Tip: If desired, you can use a hole punch to make it look like the caterpillar has chewed the leaf. This may be hard to see in the photo, but the edge is "chewed." You could also punch holes in the interior of the leaf since caterpillars love to eat!
  2. Have your child glue some pom poms to the leaf to make the caterpillar's body. We used Glue Dots for this. Tip: If using Glue Dots, it is easier to stick the pom pom to the Glue Dot rather than trying to peel off the Glue Dot and then stick it to the pom pom.
  3. Give your child a narrow strip of colored paper that has been folded in half. Have him or her glue this to one end of the caterpillar to make the antenna. Tip: You could also use a section of pipe cleaner for this.
  4. Add a face if desired. Logan used a marker to draw eyes, which didn't show up very well. Tip: I suggested that we could glue on googly eyes, but he wasn't too interested, so we left it as is.
  5. Make sure the glue is dry before you move the caterpillar to its display spot.

Tuesday, April 23, 2013

3-D Paper Plate Flower Craft

Here is a simple flower craft that Logan made at Story Time a couple of weeks ago. Since he chose only the tiger-striped paper for his petals, I called this flower his "tiger lily." It would be pretty to fill a wall with these paper petals, which are so very spring-like!

{"Tiger Lily" by Logan, Age 3 1/2}

Materials:
  • small paper plate
  • cupcake liner
  • paper (decorative or solid colors)
  • scissors
  • decorative scissors (optional)
  • green crepe paper
  • glue stick/glue
  • circle punch (optional)
Directions:
  1. Pre-cut paper into flower petal shapes. Tip: If desired, use scalloped or zigzag scissors. Tip: You can also cut or use a circle punch to create colorful paper circles for the center of the flower.
  2. Have your child glue the petals onto the top (eating side) of a paper plate. Tip: I think it would look nice if the child first colored the paper plate, but we didn't have that option due to time constraints.
  3. Have your child apply glue to the bottom of a cupcake liner (ours was decorative foil, but paper would work, too) and the adhere to the center of the paper plate. If desired, add glue to a colorful paper circle and then insert it into the middle of the cupcake liner.
  4. Help your child cut some crepe paper for the flower's stem and then glue it to the back. Tip: For a little something extra, Mrs. D., the Story Time lady, suggested making the stem the same height as the child. Cute, right? It made me think that this could be adapted to make a more permanent growth chart for the wall with a measuring stick, perhaps? I guess that's an idea for another time... Tip: You can find 2-packs of crepe paper at Dollar Tree, which is the cheapest that I have seen it. Both are the same color, which is the only downside, but it's still a good deal.
  5. Allow glue to dry completely before displaying your child's flower craft.

Friday, April 19, 2013

Sandpaper Letter Rubbings

Here is another activity that was inexpensive to put together with materials from Dollar Tree including sandpaper from the hardware aisle. This one took about an hour and a half to put together, but now that I have it done, it can be used over and over again. I did all of the tracing while watching TV, so it's not like it was difficult. As I was cutting out all of the letters, I wondered if I could have saved time by making them with my Cricut, but I wasn't sure if that would be too rough on the blade and I didn't want to experiment to find out. I suppose you could do it with letter punches if you happen to have those, which I do not. However, this way only required the $1 investment of the punch-out bulletin board letter set from the teacher supply section of Dollar Tree, and it was guaranteed not to ruin any expensive equipment.

The inspiration for this project came from the book, The Little Hands BIG FUN Craft Book by Judy Press. I recently checked it out from our library and found lots of good ideas.

I am excited because making these letters has sparked Logan's interest in letters, which he previously was not very familiar with, and didn't really seem to care to learn. He especially likes running his fingers over the bumpy texture of the letters. I decided to take advantage of that to help him learn his letters. So, I take his index finger and run it over the letters the way that we would write them saying, for A, "up, down, across" or for N, "up, down, up," and so on. He repeats the motions and the words, and I believe that this sensory element really helps it stick in his mind since he is an active little boy. Plus, it means more bang for our buck.

{Finished letters!}

Materials:
{Tracing in process...}

  • sandpaper
  • 2" punch-out letters 
  • Sharpie marker
  • scissors
  • X-acto knife
  • boxboard
  • paper trimmer (optional)
  • tacky glue
  • paper
  • crayons (I suggest scribble cookies)
  • clip board (optional)
Directions:
  1. Punch out the letters you will use. I chose to do each letter of the alphabet, but you could select letters to spell out a message or just a name if you prefer. Tip: Store these in a zippered bag.
  2. Trace the chosen letters onto the rough side of the sandpaper. You are going to cut these out so save space by placing them as closely together as possible. You can turn letters upside down for example or put them out of order. I ended up using 2 pieces of sandpaper from the package of 12 that I bought at Dollar Tree. Tip: I wasn't really thinking when I did this and I did the M/W twice, when once would have been fine. It was the exact same letter just oriented differently. I suppose this could be different depending upon the font used, but for me, I realized I had wasted time.
  3. Cut out the sandpaper letters. Tip: An X-acto knife is helpful for removing the smaller interior sections from letters like A, B, and O, for example.
  4. Using a paper trimmer, if you have one, scissors otherwise, cut 3" squares of boxboard. I needed 3 cereal boxes for this, which meant that I had some left over. (Or, if your letters are a different size, adjust the size of your boxboard squares accordingly.)
  5. Use tacky glue to adhere sandpaper letters to the boxboard squares. Make sure to apply glue to the smooth side so that the finished letters have texture. Allow glue to dry completely.
  6. Once glue is dry, place paper over the letters. Rub crayons over top to produce letter rubbings. We found that our scribble cookies were ideal for this. Tip: If using regular crayons, remove the papers and use the sides of the crayons for rubbing. Tip: If you are planning to take this busy bag activity in the car, I suggest taking along a clipboard to hold the paper over the sandpaper letters.
{Scribble cookies work well for making rubbings.}