Showing posts with label May crafts. Show all posts

Sunday, July 7, 2013

Recycled Easter Egg Maracas

I'm baaaaaack! We had an AMAZING time in Puerto Rico (without kids!), and I would love to share some of the cool stuff we saw and did, but I literally have no clue where to begin. So, for now, I am backtracking. Actually, this project relates in a way because maracas are a traditional musical instrument of Puerto Rico. So, go me, I'm not as off-track as I thought.

This fun, simple craft is one that the kids and I did in VBS, right before heading off on vacation. We had a global carnival theme and during the last day, we "visited" Mexico. My friend, Julie, came up with the craft projects for the week, and I helped out a bit. I don't know where she found this idea, but it was great, and ALL of the kids from preschool to 6th grade LOVED making maracas. (Actually, I think several of the teen helpers came back later to make their own maracas, too, so this pretty much appeals to kids of all ages.) Plus, it's a fun way to re-use those extra Easter eggs that I am sure you have laying around.

{This maraca is simple and fun to make.}

Materials:
  • empty plastic Easter eggs (1 per maraca)
  • plastic spoons (2 per maraca)
  • decorative duct tape (or regular masking tape and markers to decorate)
  • scissors (optional)
  • macaroni noodles (or rice, dried beans, beads, etc.)
Directions:
  1. Open a plastic Easter egg and put in about 5 macaroni noodles. If you don't have those, any dried pasta, rice, or beans will work. You could also use beads, button, brads or whatever small items you have on hand to make the noise. Close the egg after filling it. (Note: It doesn't matter what color egg you use, or even if the two halves match because you will be covering it up.)
  2. Tear (or cut, if you prefer) off 3 pieces of tape. We used a variety of decorative duct tapes. Some kids chose to use plain masking tape, which they decorated with markers after assembling the maracas. Two pieces of tape will be longer, about 8 inches (you don't need to measure, just approximate) and the last one will be shorter, about 4 inches. (Note: If doing this with a large group, as we did, tear many strips in advance and place them on a wall where kids can easily reach them. We did this in sets of 3, which turned out to be unnecessary because they liked to mix and match their patterns.)
  3. This next step is easier if you have a helper. Cradle the egg between two plastic spoons and then adhere the tape. (One person can hold it all together while the other person applies the tape. Just ask your child which job he wants and then you can do the other one!) We found that it was easiest to use the short piece to go over the tops of the spoons to sandwich the egg in between and hold it all together. Then, we used the longer pieces, one at a time, to go around the egg and cover the rest of it along with part of the spoons. It does not need to look perfect, but you can always add more tape if needed. (Note: If you don't have any plastic spoons on hand, you can just make egg-shaped shakers by filling them and applying the tape.)
  4. If using masking tape instead of decorative duct tape, now is the time to draw designs with markers. Otherwise, you are done. Enjoy making music with your maracas!

Tuesday, April 23, 2013

3-D Paper Plate Flower Craft

Here is a simple flower craft that Logan made at Story Time a couple of weeks ago. Since he chose only the tiger-striped paper for his petals, I called this flower his "tiger lily." It would be pretty to fill a wall with these paper petals, which are so very spring-like!

{"Tiger Lily" by Logan, Age 3 1/2}

Materials:
  • small paper plate
  • cupcake liner
  • paper (decorative or solid colors)
  • scissors
  • decorative scissors (optional)
  • green crepe paper
  • glue stick/glue
  • circle punch (optional)
Directions:
  1. Pre-cut paper into flower petal shapes. Tip: If desired, use scalloped or zigzag scissors. Tip: You can also cut or use a circle punch to create colorful paper circles for the center of the flower.
  2. Have your child glue the petals onto the top (eating side) of a paper plate. Tip: I think it would look nice if the child first colored the paper plate, but we didn't have that option due to time constraints.
  3. Have your child apply glue to the bottom of a cupcake liner (ours was decorative foil, but paper would work, too) and the adhere to the center of the paper plate. If desired, add glue to a colorful paper circle and then insert it into the middle of the cupcake liner.
  4. Help your child cut some crepe paper for the flower's stem and then glue it to the back. Tip: For a little something extra, Mrs. D., the Story Time lady, suggested making the stem the same height as the child. Cute, right? It made me think that this could be adapted to make a more permanent growth chart for the wall with a measuring stick, perhaps? I guess that's an idea for another time... Tip: You can find 2-packs of crepe paper at Dollar Tree, which is the cheapest that I have seen it. Both are the same color, which is the only downside, but it's still a good deal.
  5. Allow glue to dry completely before displaying your child's flower craft.

Tuesday, May 1, 2012

Lovely Little Ladybug


{Ladybug by Mia, Age 5}
Materials:
  • small paper plate
  • red paint
  • paint brush
  • something to hold paint
  • black construction paper
  • 2 black pipe cleaners
  • 2 googly eyes
  • scissors
  • circle punches (optional)
  • paper trimmer (optional)
  • glue
  • clear tape
  • newspaper (optional, to protect work surface)
Directions:
  1. Protect work surface with newspaper. Have child wear old clothing or cover up clothes. (We use an old t-shirt of mine for a paint shirt. Pour some red paint onto a tray or plate. Have child paint the bottom side of a small paper plate. Set aside to dry.
  2. Use paper punches or scissors to make circles out of black construction paper. We used a 2" circle punch for the ladybug's head and 1/2" circle punch for the ladybug's spot. Depending upon your child's age, she could do this on her own. (I just made lots of different sized circles and had them ready. There was a third in-between size that Mia chose not to use. Punching circles and cutting pipe cleaners were the only parts of this craft that I did.) Note: You can also make a long, narrow strip of paper to show the division of the wings on the ladybug's back. Mia opted not to use this.
  3. Cut a black pipe cleaner in half. One half will be bent to form the ladybug's antennae. The other half will be cut in half again. Take the second pipe cleaner and cut it into quarters. You will now have 6 shorter pieces of pipe cleaner to use as legs.
  4. Once the paint is dry, make the head by taping the 2" (or larger if you prefer) circle to the plate so that it is slightly overlapped by the plate. (Note: I had suggested to Mia that she might want to tape the backside so it wouldn't show, but she wanted to tape it on the front.) Glue on two googly eyes. Bend the 1/2 length of black pipe cleaner as desired to make the antennae and then tape it to the top of the head (on the backside if you don't want the tape to show).
  5. Glue the smaller circles to the ladybug to make the spots.
  6. Tape the 6 shorter lengths of pipe cleaner to the ladybug's body (on backside if you don't want the tape to show) and bend as desired. You now have a lovely ladybug to display once all the glue is dry.
Here is the source of inspiration for this project. Other favorite bug crafts that we have made include beaded clothespin butterflies, coffee filter butterflies, and butterfly footprint paintings.

Monday, April 16, 2012

Beaded Clothespin Butterflies

I think this has to be one of my favorite crafts that we have ever done. Not only are they cute, but even my Little Man could thread his own beads onto the pipe cleaners (while I held the pipe cleaner) so this is really a craft that can be done with almost any age group. The only part I had to do was assembling the butterflies. This was a great way to occupy our time on this very windy and somewhat rainy day. I could also see making these butterflies for Easter or for Mother's Day gifts. Here is where I found the idea for this (floating around on Pinterest).

{A couple of Mia's butterflies}

{Beaded Butterfly by Logan, Age 2 1/2}
Materials:
  • wooden clothespin
  • 3 pipe cleaners
  • scissors
  • plastic beads
  • acrylic paint
  • paint brush
  • something to hold paint
  • glue (hot glue is recommended)
  • wax paper (optional)
  • fishing line (optional)

Directions:
1) Paint a wooden clothespin as desired. Set aside to dry. Tip: I suggest doing this on wax paper, especially if you are painting all sides of the clothespin. It won't stick as much as it would if you laid it to dry on newspaper. Tip: Acrylic paint stains clothing so have kids wear old clothes or protect clothing before starting.

2) Leaving about one inch uncovered on either end, string beads onto a pipe cleaner. Repeat with a second pipe cleaner. Tip: I found the easiest way to do this was to bend it upward at the end so that the last inch wasn't available for the kids to put beads on. This also prevented beads with larger openings from sliding off the ends (not a big issue, but still it could be helpful.)

3) Cut the last pipe cleaner in half. Bend it in half for the butterfly's antennae. Thread a bead onto each end and wrap around to secure if desired. (Some beads may stick well on their own. You can also add glue if you like.)

4) Making the wings is the trickiest part. (The blog post this idea came from said to make a figure 8, which took me some trial and error, so I will try to make the directions as clear as possible.) Take one beaded pipe cleaner and form a circle.


Then take slightly more than 1/2 on top pull it into a small circle and bring the end over to the rest of the pipe cleaner. Fit the end in between two beads and loop it tightly around one time, making sure that the end sticks off the side that will be on the inside of your butterfly. Now you have something that looks like a lowercase "g."


Bring the other end up to meet the beads where you just twisted the pipe cleaner. Again, loop the end around and make sure that it is secured around both sections of the beaded pipe cleaner. Loop around again if needed. Now you have a sort of figure 8 with a one oval larger than the other. To me, it looks a bit like a capital "J" in cursive handwriting.


That's the first wing. Repeat step 4 with the other beaded pipe cleaner to make the second wing. Congratulations! The hard part is over.


5) Once clothespin is dry, pinch it open, add a drop of white glue or hot glue, and insert center of pipe cleaner antennae. The pipe cleaner antennae will be held in place once the clothespin is closed.

6) To attach the wings, put glue into both sides of the spring on the clothespin. Tip: Hot glue works best. Of course, this should only be used by an adult. Then, insert pipe cleaner ends into each side of the spring. Tip: You may wish to trim the ends first if they appear too long. Another suggestion is to add more hot glue as needed if the wings don't seem sturdy enough.


{I know I shouldn't brag, but isn't my butterfly so darn cute?!}

{"Princess" the Butterfly by Mia, Age 5}
7) Allow glue to dry before displaying your butterfly. I hung our butterflies from the dining room chandelier. To do this, I took a length of fishing line, and placed the clothespin in the center. Then I tied it around and knotted it off so that the fishing line was nestled into the groove. Lastly I took the two ends of fishing line, threaded them both through the an arm of the chandelier, and secured them with a double knot. I repeated this for all 5 of our butterflies.

{I love how they flutter in the breeze when we walk by.}


Wednesday, February 8, 2012

Rose Bouquet Print Project

{Bouquet by Logan, Age 2}
The inspiration for this project comes from the current (Feb. 2012) issue of Disney "FamilyFun" magazine ("Pretty Produce" on page 18). At first, we just made cards with the end of the celery stalk like the article suggested. Here's Logan's -------------------->
Then, after the kids started stamping all over the paper (which is fine, of course), I realized that we could take it a step farther and make bouquets. They're perfect for Valentine's Day, but would also make nice Mother's Day gifts.

Materials:
  • construction paper
  • tempera paint
  • Styrofoam tray to hold paint (or plate or bowl)
  • foam paintbrush
  • end cut from bunch of celery (Ours was about 2 in. long.)
  • cardboard (Ours was a cereal box.)
  • scrapbooking paper
  • pencil
  • scissors
  • glue
  • newspaper to protect work surface
  • optional items for decorating: rhinestones, pom poms, ribbon, etc.
Directions:
{Bouquet by Mia, Age 5}
  1. Pour a small amount of paint onto a Styrofoam tray (or similar). Dip paintbrush into paint and spread on the cut part of the celery. The child will stamp this repeatedly onto the paper to make a cluster, adding paint as desired. Tip: I think it looks nice if you make a few impressions before adding more paint because this gives variation in the color. Let paint dry completely.
  2. Draw a vase shape onto one side of an empty, flattened cereal box. Cut out. Trace this same shape onto a piece of decorative paper and cut out. Glue paper on top of cardboard. Let glue dry.
  3. Once painted flowers are dry, cut around the bunch leaving some colored paper border. Glue the flowers onto your cardboard vase. Another option would be to make stems from paper, pipe cleaners, or drinking straws. Affix to the back of the vase and then glue or tape the printed flowers on top of the stems.
  4. Decorate as desired. Mia added self-adhesive (a lot of) rhinestones and some pom poms.

Monday, June 13, 2011

Father's Day Silhouette Craft

{Mia, age 4 and Logan, age 21 months}
Materials:
  • black paper
  • white crayon (or chalk)
  • clear tape
  • scissors
  • decorative paper
  • glue stick (or scrapbooking adhesive)
  • paper trimmer (optional)
  • picture frame (optional)
Directions:
  1. Have child stand with his or her side against (or close to) the wall in a dimly lit room. 
  2. Tape a piece of black paper (I used 8 1/2" x 11" card stock) to the wall so that the child's face fits in profile. (My paper wasn't quite large enough to fit all of Mia's hair so I fudged it a bit, but I don't think it's very noticeable.)
  3. Quickly trace around the shadow of the child's face, hair and neck using a white crayon or piece of chalk. It doesn't need to be perfect, but you will want to do the nose, mouth and chin first before the child gets squirmy since these parts are tricky.
  4. Cut out the child's silhouette.
  5. Adhere to a piece of decorative paper. (I used 8 1/2" x 11" scrapbooking paper.) You can put the glue on the side you trace on if you are concerned about the white showing. If using chalk, it may be possible to wipe it off, too. Trim paper as needed and place your child's silhouette in a frame if desired. (I found two black 8" x 10" photo frames at Big Lots.) This makes a thoughtful and inexpensive gift for Dad's desk at work. (You could also make silhouettes as Mother's Day gifts, but I am assuming that if you're reading this, you're a mom.)
  6. Repeat steps 1-5 with other children as desired. You could even create a gallery of silhouettes as your children grow.

Tuesday, May 31, 2011

Paper Plate Basket of Flowers Craft

This craft never got displayed at our house because Mia almost immediately took the flowers out and told me that she wanted to put Easter eggs inside instead of flowers--I think I may have seen this craft somewhere before and that might have inspired the flower basket. I'm not really sure, though. I guess you can decide whether or not you want it to be an Easter craft, a Mother's Day craft, or just a spring craft.

{Basket of Flowers by Mia, Age 4}
Materials:
  • paper plate
  • scissors
  • craft sticks
  • tape
  • crayons 
  • construction paper
  • green marker
  • ribbon (optional)
  • paint (optional)
  • paint brush (if using paint)

Directions:
  1. Cut a paper plate in half.
  2. Trim around the the outer arc of one half of the plate. This piece will be the basket handle.
  3. Color your basket and handle using crayons or markers.
  4. Tape basket handle to the back of the paper plate half.
  5. Make flowers for the basket. Mia traced some flower shaped cookie cutters and I helped her cut them out. She also used some flower shaped sponges (which we had bought on clearance at Meijer) to stamp some shapes with tempera paint. Once the paint was dry, I helped her cut them out.
  6. Using a green marker, color some craft sticks to make stems for the flowers. Tape craft sticks to the back side of the paper flowers.
  7. If desired, add a decorative bow to the flower basket. You might also want to add one to the back for hanging it.

Monday, May 16, 2011

"Just Ducky" Foot Print Painting

Logan's teacher helped him make this cute little duck at play group last week.

{Ducky by Logan, Age 20 Months}
Materials:
  • paper
  • paintbrush
  • yellow or brown paint
  • black and orange markers
  • bowl or plate to hold paint
  • newspaper (optional)
  • paper towel, baby wipes, etc. for cleaning up
Directions:
  1. Use a paintbrush (foam works well) to apply paint to the bottom of child's foot.
  2. Press child's foot onto a piece of paper. (I like to do this by placing the paper on the floor on top of some newspaper and having the child stand on it to make the print.)
  3. Clean child's foot and allow paint to dry.
  4. Make the heel of the foot print into the duck's head by using a black marker to draw an eye and an orange marker to draw a beak.
  5. Display your ducky painting or give it away as a gift. (Foot print art makes a nice Mother's Day present.)
Note: While at play group again today, I noticed the ducks that inspired Logan's teacher and they had been cut out and arranged in a construction paper pond setting. Very cute! (May 18, 2011)

    Saturday, May 7, 2011

    Dyed Pasta Necklace

    {Pasta Necklace by Mia, Age 4}
    Materials for Dying Pasta:
    • tube shaped pasta
    • food coloring
    • bowls
    • water
    • vinegar 
    • spoon or slotted spoon
    • tin foil
    • cookie sheets
    • zippered baggies
    Directions for Dying Pasta:
    1. You will need one cup of water in a bowl per color of pasta you wish to dye.
    2. Add 2 tablespoons of vinegar and food coloring. (The directions I found online call for about 20 drops of liquid color, but I used gel food coloring and just used a spoon to blend each color.)
    3. Add pasta to the liquid mixture and let soak for about 20-30 minutes. (I used one cup of Ditalini, a short tube-shaped pasta for each color: pink, blue, green, and yellow, but other types of pasta such as macaroni, penne, rigatoni, and wagon wheels will also work if you are planning to use them as beads.)
    4. Remove pasta from bowls and set on foil-lined trays. (I used a slotted spoon for this.) Discard dye or use to make coffee filter carnations. Allow pasta to dry over night.
    5. Store dried pasta in zippered baggies.
    Materials for Making Pasta Necklace:
    • previously dyed pasta
    • yarn, string, ribbon, etc.
    • scissors
    • tape (optional)
    • cookie sheet or tray (optional)
    Directions for Making Pasta Necklace:
    1. Cut a length of yarn (or ribbon or string) and tie a knot on one end, making sure that it is large enough to prevent pasta from slipping off. (Tip: I like to actually make a small circle on the end before knotting and then use this as a place to secure the necklace when it is finished.)
    2. If desired, wrap a small section of tape around the opposite end of the yarn so that it resembles the end of a shoe lace. This prevents the yarn from fraying when you thread the beads.
    3. Thread beads onto necklace as desired. (Tip: I have found that placing a few beads onto a tray-- or cookie sheet if you don't have a tray-- is helpful. It gives you or your child a large enough area to work on, but it prevents the beads from rolling all over the place and making a mess. You can also store works in progress directly on the tray.)
    4. Once your necklace is complete, tie off the end to the desired length and trim off excess yarn if necessary.
    5. Wear your dyed pasta necklace or give it away, perhaps for Mother's Day.

    Wednesday, April 27, 2011

    Toilet Paper Tube Wind Sock

    Here's my take on a decorative wind sock craft. Please note that it is not meant to be hung outside.
    {Wind Sock by Mia, age 4}
    Materials:
    • toilet paper tube
    • paint
    • paintbrush
    • scissors
    • glue
    • hole punch
    • tissue paper (or construction paper)
    • yarn (or ribbon or string)
    Directions:
    1. Paint a toilet paper tube and allow paint to dry.
    2. Cut tissue paper (or construction paper) into strips about 1/2 to 3/4 inch in diameter (and slightly longer than the tube itself.)
    3. Once the paint is dry, glue the tissue paper strips to the bottom of the toilet paper tube.
    4. Use a hole punch to make two holes on either side of the tube.
    5. Thread some yarn, ribbon, or string through the holes. Tie the ends and your wind sock is ready to be hung up.

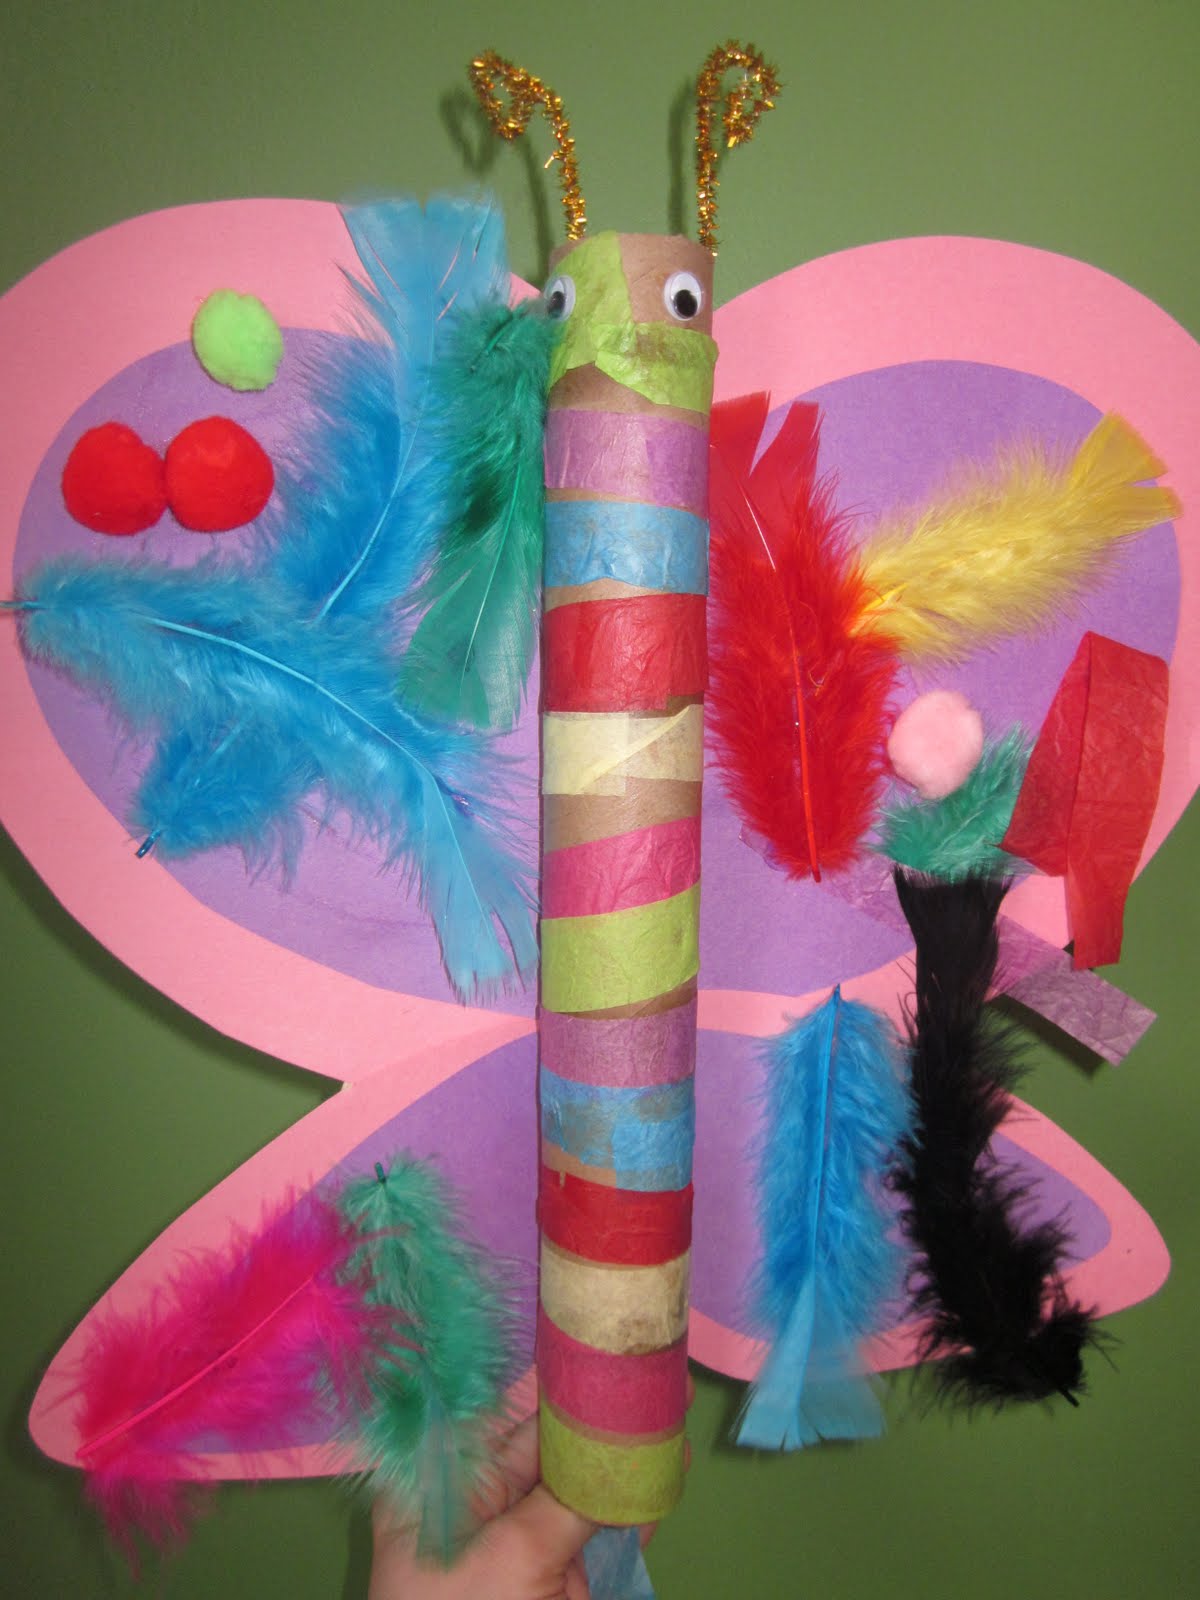
    Cardboard Tube Butterfly

    {Butterfly by Mia, age 4 (with wings cut by Mama)}
    Our recent trip to Butterflies are Blooming at Frederik Meijer Gardens inspired this pretty spring craft.

    Materials:
    • cardboard tube
    • scissors
    • tissue paper
    • pipe cleaners
    • tape
    • googly eyes
    • construction paper
    • Mod Podge (or glue)
    • foam paint brush (if using Mod Podge)
    • other decorative items: feathers, pom poms, beads, etc.
    Directions:
    1. Cut strips of tissue paper (or construction paper) and use Mod Podge (or glue) to adhere the strips around a cardboard tube. We used the tube from an aluminum foil carton, but a paper towel or toilet paper tube would also work.
    2. Cut wings from construction paper. Tape wings onto the back of the tube once the Mod Podge or glue is dry.
    3. Cut a pipe cleaner in half. Curl one end of each half for the butterfly antennae. Attach to the inside of the tube with tape.
    4. Glue two googly eyes onto the front of the tube. 
    5. Decorate the butterfly's wings as desired. Mia used strips of tissue paper, feathers, and pom poms, but you could use just about anything.

    Monday, April 18, 2011

    Pasta Petals Project

    {Pasta Petals by Mia, Age 4}
    While cleaning out the pantry, I came across some expired pasta -- really, really expired. Mia wanted to do a craft so I decided they could be made into flowers (although my husband said they look like pinwheels). Problem solved. I won't feel guilty about wasting food. And I don't have to serve pasta that has apparently been in our house longer than Mia!

    Materials:
    • paper (or cardboard)
    • glue 
    • pasta
    • scissors
    • drinking straws
    • buttons
    Directions:
    1. Decide on the arrangement for your flowers.
    2. Glue buttons onto construction paper be the centers of the flowers. You could also use cardboard if you want something sturdier.
    3. Arrange pasta around the buttons and glue down to form the petals. We used Kroger Rainbow Salad Twirls, but most any pasta would work. We liked that there were three different colors already, but you can paint or dye plain pasta if desired.
    4. Cut drinking straws to desired length and glue onto paper to form stems for the flowers.
    5. Once the glue is dry, display your artwork.

    Thursday, April 7, 2011

    Coffee Filter Carnations

    This craft was inspired by a coffee filter flower that Mia made in preschool. Hers was painted with watercolor paints, which you could also do, but I thought this was a quick and simple alternative. Another option is to color the coffee filters with washable markers and then spray them with water. If you didn't want to mess around with coloring or painting, you could also just cut out circles of colored tissue paper to make these flowers. Thanks to Sue for adding that this is a great way to use up your extra dye after coloring Easter eggs!

    Materials:
    • glass of water
    • food coloring
    • coffee filters
    • green pipe cleaners
    • newspaper (optional)
    Directions:
    1. Add a few drops of food coloring of your choice to a glass of water.
    2. Fold a coffee filter into quarters and dip the pointed end into the glass of water. Allow the color to seep all the way up, unfold the coffee filter, and then set it aside to dry. (I sometimes do this on newspaper, but I've also found that a wire baking rack works nicely because the coffee filter won't stick to it.)
    3. Take the dry coffee filter, pinch it in the center, and twist it tightly so that the twisted portion is about 1/2 to 1 inch long.
    4. While holding the twisted part of the coffee filter in one hand, wrap the end of a green pipe cleaner around it until it is covered (about 4-6 times.) Kids may need help with this part.
    5.  Make several flowers and display them in a vase or give them away as Easter or Mother's Day gifts.

    Monday, April 4, 2011

    April Showers Bring May Flowers Sun Catchers

    I've been on a sun catcher kick lately so these umbrella and flower sun catchers were the perfect craft for this dreary day. Mia enjoyed them too, and she asked if we could make some more. Their bright colors look cheerful in the window even if there isn't any sun, so she may have the right idea! It seems like spring is never going to arrive...

    {Sun Catchers by Mia, Age 4}

    Materials:
    • construction paper (any color)
    • scissors
    • clear contact paper
    • tissue paper (any color)
    • pencil 
    • clear tape
    • paper trimmer (optional)
    • hole punch (optional)
    • yarn, string, ribbon, etc. for hanging (optional)
    Directions:
    1. Cut tissue paper into small squares. Older kids can do this themselves. We used approximately 1/2 inch squares, but you could make yours bigger. 
    2. Fold a piece of construction paper in half like a hamburger (or use two pieces of construction paper if you would like to make a larger sun catcher).
    3. Draw a flower or umbrella shape (or trace around a cookie cutter or a picture from the Internet) onto one half (or one piece) of the paper, and cut out the flower or umbrella shape. Do not draw your design too close to the edges of the paper. Cut paper in half along the fold. You should now have two pieces of paper with identical fish cut-outs.  Tip: If you are using two pieces of paper, you will need to make sure they stay together so that you get identical flowers or umbrellas.
    4. Cut two pieces of clear contact paper (I used both a paper trimmer and scissors for this.) so that they are 1/4 inch larger than the construction paper all the way around. Tip: Do not remove backing from contact paper until you are ready to use it.
    5. Adhere one piece of paper to the clear contact paper so that there is a border of 1/4 inch all around the paper. Tip: Slowly peel the contact paper away from the backing as you smooth the construction paper down onto the contact paper. This way you don't end up with "bubbles."
    6. Have your child stick tissue paper squares onto the contact paper flower or umbrella shape until it is filled. (Mia chose pink and purple for the flower petals and green for the leaves and stem, and she decided that the umbrella should have rainbow colors. She came up with her own technique for filling in smaller spaces like the umbrella handle: crumple the tissue paper into balls. This makes it a bit bulkier, but it still works, and it gives it some visual interest.)
    7. Layer the second piece of construction paper on top of the first, making sure that the flower or umbrella shapes line up.
    8. Add the second piece of contact paper over the top, smoothing it down as you go. Trim away excess if desired, but don't trim too much or the sun catcher will not stay together. 
    9. You can display your sun catcher in a window using clear tape. Another option is to use a hole punch to make two holes near the top, thread some ribbon or yarn through the holes, tie it off, and then hang your sun catcher.