Showing posts with label sun catcher. Show all posts

Tuesday, April 2, 2013

Easter Egg Sun Catchers

I feel like I am behind on posting since Easter has come and gone, but really, it felt a bit early this year. Anyway, here is a project we did on Sunday. We've done plenty of these sun catchers over the past couple of years. It's so easy and relatively mess-free, that once you have made them you find occasions to make more. Plus, it helps if you already have a stock-pile of pre-cut tissue paper squares in an assortment of colors. I prepped a few paper eggs and Con-tact paper rectangles and then took the whole bunch along to Grandma and Grandpa's house so that all the kids could make them, if they chose.

{Pink Egg by Mia, Age 6 & Yellow Egg by Logan, Age 3}
Materials:
  • colored tissue paper
  • scissors
  • pencil
  • construction paper
  • clear Con-tact paper 
  • scrap paper (optional, for making egg template)
  • paper trimmer (optional)
  • clear tape (for hanging finished sun catchers)
Directions:
  1. Cut colored tissue paper into small squares. I used approximately 1 inch squares, but you could make yours bigger or smaller depending on the age of the children. Tip: To make this process go faster, layer a couple of pieces of tissue paper together, cut into smaller rectangles, and then cut the rectangles into strips, re-layering as needed. Put as many strips together as you can comfortably cut before cutting smaller squares. Tip: I save all of the cut tissue paper from previous projects, and store it in zippered baggies according to color. Tip: You don't need to go out and buy nice, new tissue paper. We re-use all the crumpled pieces that come in gift bags.
  2. Fold a piece of construction paper in half like a hamburger. 
  3. Fold a piece of scrap paper in half, hamburger-style, draw one half of an egg shape, and cut it out. Make sure that your template will fit within the borders of your folded construction paper, with about an inch or more border all the way around. Tip: You could also find an egg template online if you prefer. Tip: If you are only making one egg sun catcher, you can save this step by simply folding your paper in half a second time, drawing your egg shape, and then cutting it out. You should end up with two corresponding egg shapes on either original half of the folded paper.The template is just handy if you know you will be making several sun catchers.
  4. Lay your egg template onto the construction paper, trace it with a pencil, and then cut it out so that both sides of the folded paper have a corresponding egg shape removed from the center.
  5. Cut two pieces of clear Con-tact paper (I used both a paper trimmer and scissors for this.) so that they are at least 1/2 to 1 inch larger than the construction paper all the way around. Tip: Do not remove backing from contact paper until you are ready to use it. Tip: If you have leftover pieces of Con-tact paper, save them for future projects. For example, I find that the long, somewhat narrow strip left after making several of these sun catchers is just the right size for "laminating" labels onto jars of homemade play dough, which we give as gifts. The smaller remnants are also good for hanging leaves in the fall.
  6. Adhere one side of the paper to the clear Con-tact paper so that there is a border of at least 1/2 inch all around the paper. Tip: Slowly peel the Con-tact paper away from the backing as you smooth the construction paper down onto the contact paper. This way you don't end up with "bubbles."
  7. Have your child stick tissue paper squares onto the Con-tact paper egg shape until it is filled. Tip: You can use multiple different colors or shades of the same color (pink, purple, etc.) of tissue paper to give the sun catcher a more complex design. It looks especially nice where the two colors have overlapped in places.
  8. Layer the other half of construction paper on top of the first, making sure that the egg shapes line up. Tip: If you wish for the project to have a name and date, add this to the back before sealing up the sun catcher.
  9. Add the second piece of Con-tact paper over the top, smoothing it down as you go. Trim away excess if desired, but don't trim too much or the sun catcher will not stay together. 1/4 inch is the minimum border I would recommend.
  10. You can display your sun catcher in a window using clear tape. Another option is to use a hole punch to make two holes near the top, thread some ribbon or yarn through the holes, tie it off, and then hang your sun catcher.

Friday, February 15, 2013

Valentine's Day Sun Catchers

My friend, Kim, first told me about this sun catcher craft two years ago as a Valentine's project, and we have made many, many sun catchers since then such as these shamrocks, these Dr. Seuss-inspired fish, these Easter sun catchers, these autumn sun catchers, and these Christmas sun catchers, to name a few. Interestingly enough, this was actually the first time we made them for Valentine's Day. Anyway, I decided that it would be a nice project to do with the kindergarten class for Mia's classroom party. This was one of those times when I got into the thick of it and realized I may have bitten off more than I could chew. It's not a hard project, but it does require plenty of adult prep, and trying to make enough for 25 kids plus a few extras (I planned for a total of 30 Valentine's Day sun catchers), takes awhile. Thankfully, the kids loved it, the parents were impressed, and the teacher and para-pro thought it was the perfect craft: no glue, no glitter, no kids running with scissors... what's not to love from their perspective, right? I thrive compliments, so it made me feel good that my time was well-spent.

One mom asked me if they really do shine through and look pretty in the windows, and I told her that they definitely do. It's a bit like stained glass. Plus, they hold up decently well. We pack ours away and bring them out again at the next year's holiday. There is some fading, but they still look attractive from one year to the next. So, I think this craft is a winner, all around.


Materials:
  • construction paper (red, pink, and purple)
  • scissors
  • clear Con-tact paper
  • colored tissue paper (red, pinks, purples, other heart or similar patterned papers)
  • paper trimmer (optional)
  • clear tape (for hanging)


Directions:
  1. Cut colored tissue paper into small squares. Older kids can do this themselves, but I did all the prep work myself before the party. I used approximately 1 inch squares, but you could make yours bigger or smaller depending on the age of the children. Tip: To make this process go faster, layer a couple of pieces of tissue paper together, cut into smaller rectangles, and then cut the rectangles into strips, re-layering as needed. Put as many strips together as you can comfortably cut before cutting smaller squares.
  2. Fold a piece of construction paper in half like a hamburger. 
  3. Fold the paper in half again, hamburger style, and use scissors to cut half a heart shape along the fold. Open the paper up. You should have two identical heart shapes cut onto one piece of paper that is still folded in half, hamburger style.
  4. Cut two pieces of clear Con-tact paper (I used both a paper trimmer and scissors for this.) so that they are at least 1/2 to 1 inch larger than the construction paper all the way around. Tip: Do not remove backing from contact paper until you are ready to use it.
  5. Adhere one side of the paper to the clear Con-tact paper so that there is a border of at least 1/2 inch all around the paper. Tip: Slowly peel the Con-tact paper away from the backing as you smooth the construction paper down onto the contact paper. This way you don't end up with "bubbles."
  6. Have your child stick tissue paper squares onto the Con-tact paper heat shape until it is filled. Tip: You can use two different colors or shades of the same color (pink, purple, etc.) of tissue paper to give the sun catcher a more complex design. It looks especially nice where the two colors have overlapped in places.
  7. Layer the other half of construction paper on top of the first, making sure that the heart shapes line up.
  8. Add the second piece of Con-tact paper over the top, smoothing it down as you go. Trim away excess if desired, but don't trim too much or the sun catcher will not stay together. 1/4 inch is the minimum border I would recommend.
  9. You can display your sun catcher in a window using clear tape. Another option is to use a hole punch to make two holes near the top, thread some ribbon or yarn through the holes, tie it off, and then hang your sun catcher.


If you are making this with a large group such as a kindergarten class, here are a few more tips:
  • Do your preparations in an assembly line fashion. Get all of the construction paper folded and cut, then cut all tissue paper, and lastly, cut all Con-tact paper to size (2 pieces per sun catcher).
  • If you have a paper trimmer, and if you Con-tact paper will fit into it, this will save you time. Otherwise, it is fortunate that it is printed with guidelines for you to follow with your scissors.
  • To get the project ready for the group, press hearts onto the Con-tact paper and lay out sticky side up on a table. 
  • I set out different colors of tissue paper in plastic bowls, which worked well.
  • The class did this project on the floor and that worked fine except for the occasional bit of dirt or something that got stuck to the Con-tact paper. It wasn't really a big deal, though. They just didn't have much extra table space available since they were eating ice cream sundaes.
  • Have kids write their names before starting to add tissue paper.
  • Do not peel off backing from the additional sheets on Con-tact paper until kids have finished their projects.
  • Have fun. You did all the "hard" work beforehand.

Friday, July 27, 2012

Beaded "Sun Catchers"

Here is a project Mia and I recently did on a rainy day. The goal was to create "sun catchers," but since our beads were more opaque than translucent, we just ended up with decorative ornaments. I found this idea here. The original directions said to bake for 20 minutes, but I found that ours took a bit longer, more like 30 minutes. I suppose this depends on the size of the beads you use.


{Make a single layer of cheap plastic beads inside an oven-safe dish. I think ours were from Walmart. We used ceramic ramekins, but muffins tins, cake pans, mugs, or glass dishes would all likely work. Note: I first lined ours with parchment paper to protect the ceramic in case this didn't work; I didn't want plastic melted to something I use for food.}

{Once the dishes are filled, bake at 400 degrees for 20-30 minutes, checking every so often. Note: This may be slightly smelly while the plastic melts, so I turned on the fan.

{Remove from the oven and allow to cool. This does not take very long. Once the plastic is cool, overturn the dish and the sun catcher should pop right out. Peel off and discard the parchment paper if you used it to line your dish.}

{Thread fishing line through the finished project to display. For the top one, I found a pin hole already there, but the bottom one required that I use a cordless drill and make one.}

Thursday, October 13, 2011

Autumn Sun Catchers

{Apple Sun Catcher by Mia, Age 4}
 We started making sun catchers back in March and have continued through the summer and into the fall. I don't see why not. Sun catchers aren't just for spring and summer. Shapes we tried included an apple, a pumpkin, Indian corn, and an oak leaf. I like doing sun catchers because they are simple enough for toddlers to do provided that you have done some gotten your materials cut in advance.

Materials:
{Leaf Sun Catcher by Mia, Age 4}
  • pencil 
  • clear tape
  • scissors
  • clear contact paper
  • construction paper
  • tissue paper 
  • paper trimmer (optional)
  • hole punch (optional)
  • yarn, string, ribbon, etc. for hanging (optional)
Directions:
  1. If you are making a shape that is symmetrical, fold your paper in half like a hot dog before drawing and cutting out your shape. This makes it go a bit faster, and hopefully it creates less frustration, too. If you are making a shape that isn't symmetrical, simply draw (or trace) your shape and cut it out on two pieces of paper. Tip: If you are using two pieces of paper, you will need to make sure they stay together so that you get identical fall shapes.
  2. Cut two pieces of clear contact paper (I used both a paper trimmer and scissors for this.) so that they are 1/4 inch larger than the construction paper all the way around. Tip: Do not remove backing from contact paper until you are ready to use it.
  3. Adhere one piece of paper to the clear contact paper so that there is a border of 1/4 inch all around the paper. Tip: Slowly peel the contact paper away from the backing as you smooth the construction paper down onto the contact paper. This way you don't end up with "bubbles."
  4. Have your child stick tissue paper squares onto the contact paper fall shape until it is filled. (Mia has created her own technique for filling in small spaces: crumpling up the tissue paper into balls. It makes the sun catcher a bit bulkier, but it does work, and I think it adds a bit of visual interest to the design.)
  5. Layer the second piece of construction paper on top of the first, making sure that the fall shapes line up.
  6. Add the second piece of contact paper over the top, smoothing it down as you go. Trim away excess if desired, but don't trim too much or the sun catcher will not stay together. 
  7. You can display your sun catcher in a window using clear tape. Another option is to use a hole punch to make two holes near the top, thread some ribbon or yarn through the holes, tie it off, and then hang your sun catcher.
{Pumpkin Sun Catcher by Logan, Age 2}

{Indian Corn Sun Catcher by Mia, Age 4}


Monday, October 3, 2011

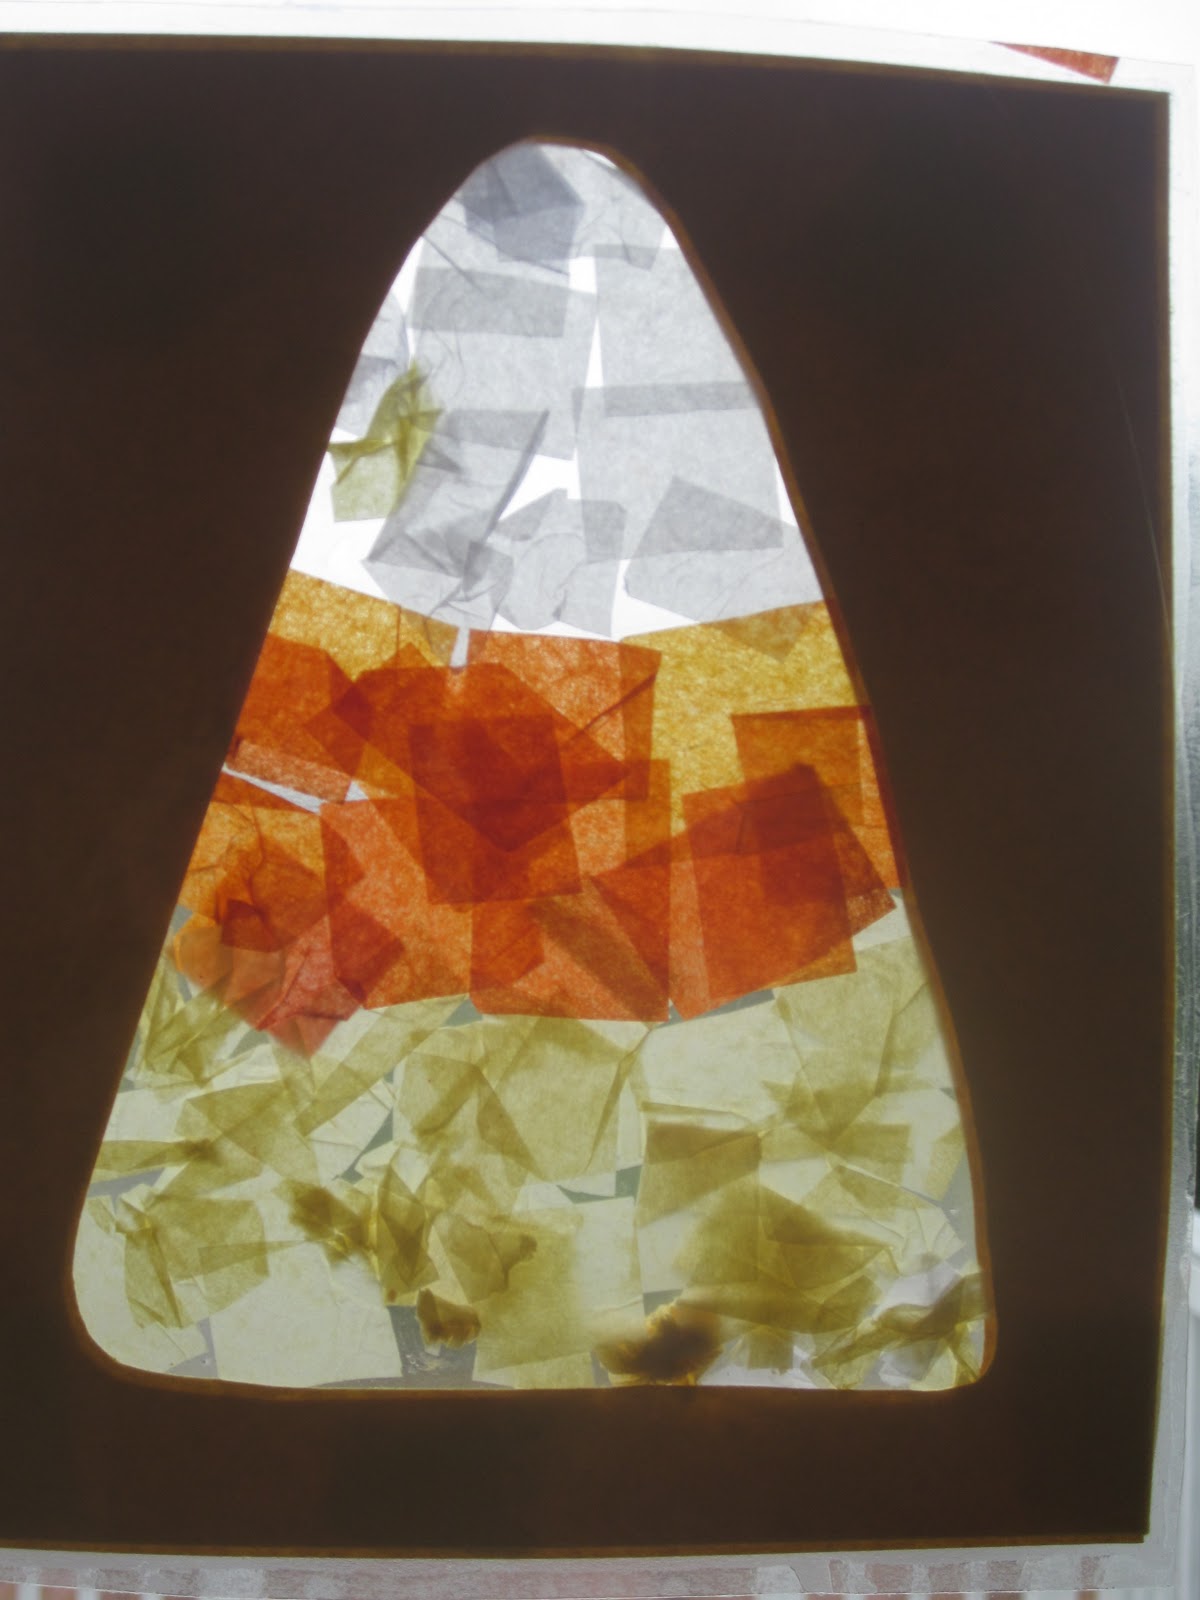
Candy Corn Sun Catcher

{By Mia, Age 4}
Materials:
  • pencil 
  • clear tape
  • scissors
  • clear contact paper
  • yellow construction paper
  • tissue paper (yellow, orange, white)
  • paper trimmer (optional)
  • hole punch (optional)
  • yarn, string, ribbon, etc. for hanging (optional)
Directions:
{By Logan, Age 2}
  1. fold your paper in half like a hot dog before drawing and cutting out your shape. This makes it go a bit faster, and hopefully it creates less frustration, too.  Tip: If you are using two pieces of paper, you will need to make sure they stay together so that you get identical candy corn shapes.
  2. Cut two pieces of clear contact paper (I used both a paper trimmer and scissors for this.) so that they are 1/4 inch larger than the construction paper all the way around. Tip: Do not remove backing from contact paper until you are ready to use it.
  3. Adhere one piece of paper to the clear contact paper so that there is a border of 1/4 inch all around the paper. Tip: Slowly peel the contact paper away from the backing as you smooth the construction paper down onto the contact paper. This way you don't end up with "bubbles."
  4. Have your child stick tissue paper squares onto the contact paper candy corn  shape until it is filled. (Mia has created her own technique for filling in small spaces: crumpling up the tissue paper into balls. It makes the sun catcher a bit bulkier, but it does work, and I think it adds a bit of visual interest to the design.)
  5. Layer the second piece of construction paper on top of the first, making sure that the candy corn shapes line up.
  6. Add the second piece of contact paper over the top, smoothing it down as you go. Trim away excess if desired, but don't trim too much or the sun catcher will not stay together. 
  7. You can display your sun catcher in a window using clear tape. Another option is to use a hole punch to make two holes near the top, thread some ribbon or yarn through the holes, tie it off, and then hang your sun catcher.

Tuesday, April 5, 2011

Easter Sun Catchers


These are the sun catchers that we made for Easter. There are lots of fun shapes that you can make for Easter, both religious and secular, and some that are a combination of both. The Easter egg, for example, was originally a Pagan symbol of fertility and new life, but has since become incorporated as a symbol of the resurrection of Christ. The chick is another symbol of new life or re-birth. The life cycle of the butterfly is used to represent Jesus' life. The first stage, the caterpillar, symbolizes His life on Earth. The cocoon stage represents the crucifixion and burial, and the adult butterfly is used to symbolize the resurrection. The cross, of course, stands for the crucifixion but also for Christ's victory over death. The Easter bunny is one I'm not too sure about. I've read that its origins are somewhat like Santa Claus, but it is also a symbol of abundant life. In my opinion, the idea of a benevolent being who brings joy to children can't help but seem to fit into Christianity in some way, although I'll admit I'm stretching a bit here. Additional symbols that you could make sun catchers for include Easter baskets, flowers (particularly Lilies), hot cross buns, palm branches, Easter bonnets, candles, and lambs. You can make these sun catchers as simple or as complex as you like, and I have found that they can be done with toddlers on up with some parent prep. I think they are beautiful for spring, and they remind me a bit of stained glass windows, which is a lovely thought during the Lenten season. John 11:25-26
Jesus said to her, "I am the resurrection and the life. He who believes in me will live, even though he dies; and whoever lives and believes in me will never die. (NIV).


{Chick and Easter Egg Sun Catchers by Logan, 19 Months}
Materials:
  • pencil 
  • clear tape
  • scissors
  • clear contact paper
  • colored paper
  • tissue paper (any color)
  • paper trimmer (optional)
  • hole punch (optional)
  • yarn, string, ribbon, etc. for hanging (optional)
Directions:


{Bunny by Mia, Age 4}
{Butterfly by Mia, Age 4}
  1. Cut tissue paper into small squares. Older kids can do this themselves. We used approximately 1/2 inch squares, but you could make yours bigger. 
  2. Fold a piece of construction paper in half like a hamburger (or use two pieces of construction paper if you would like to make a larger sun catcher).
  3. Draw an Easter shape (or trace around a cookie cutter or a picture from the Internet) onto one half (or one piece) of the paper, and cut out the shape. Do not draw your design too close to the edges of the paper. Cut paper in half along the fold. You should now have two pieces of paper with identical cut-outs.  Tip: When making symmetrical shapes such as the butterfly, cross, or Easter egg, you can gently fold your paper in half like a hot dog before drawing and cutting out your shape. This makes it go a bit faster, and hopefully it creates less frustration, too.  Tip: If you are using two pieces of paper, you will need to make sure they stay together so that you get identical Easter shapes.
  4. Cut two pieces of clear contact paper (I used both a paper trimmer and scissors for this.) so that they are 1/4 inch larger than the construction paper all the way around. Tip: Do not remove backing from contact paper until you are ready to use it.
  5. Adhere one piece of paper to the clear contact paper so that there is a border of 1/4 inch all around the paper. Tip: Slowly peel the contact paper away from the backing as you smooth the construction paper down onto the contact paper. This way you don't end up with "bubbles."
  6. Have your child stick tissue paper squares onto the contact paper Easter shape until it is filled. (Mia has created her own technique for filling in small spaces: crumpling up the tissue paper into balls. It makes the sun catcher a bit bulkier, but it does work, and I think it adds a bit of visual interest to the design.)
  7. Layer the second piece of construction paper on top of the first, making sure that the Easter shapes line up.
  8. Add the second piece of contact paper over the top, smoothing it down as you go. Trim away excess if desired, but don't trim too much or the sun catcher will not stay together. 
  9. You can display your sun catcher in a window using clear tape. Another option is to use a hole punch to make two holes near the top, thread some ribbon or yarn through the holes, tie it off, and then hang your sun catcher.

Monday, April 4, 2011

April Showers Bring May Flowers Sun Catchers

I've been on a sun catcher kick lately so these umbrella and flower sun catchers were the perfect craft for this dreary day. Mia enjoyed them too, and she asked if we could make some more. Their bright colors look cheerful in the window even if there isn't any sun, so she may have the right idea! It seems like spring is never going to arrive...

{Sun Catchers by Mia, Age 4}

Materials:
  • construction paper (any color)
  • scissors
  • clear contact paper
  • tissue paper (any color)
  • pencil 
  • clear tape
  • paper trimmer (optional)
  • hole punch (optional)
  • yarn, string, ribbon, etc. for hanging (optional)
Directions:
  1. Cut tissue paper into small squares. Older kids can do this themselves. We used approximately 1/2 inch squares, but you could make yours bigger. 
  2. Fold a piece of construction paper in half like a hamburger (or use two pieces of construction paper if you would like to make a larger sun catcher).
  3. Draw a flower or umbrella shape (or trace around a cookie cutter or a picture from the Internet) onto one half (or one piece) of the paper, and cut out the flower or umbrella shape. Do not draw your design too close to the edges of the paper. Cut paper in half along the fold. You should now have two pieces of paper with identical fish cut-outs.  Tip: If you are using two pieces of paper, you will need to make sure they stay together so that you get identical flowers or umbrellas.
  4. Cut two pieces of clear contact paper (I used both a paper trimmer and scissors for this.) so that they are 1/4 inch larger than the construction paper all the way around. Tip: Do not remove backing from contact paper until you are ready to use it.
  5. Adhere one piece of paper to the clear contact paper so that there is a border of 1/4 inch all around the paper. Tip: Slowly peel the contact paper away from the backing as you smooth the construction paper down onto the contact paper. This way you don't end up with "bubbles."
  6. Have your child stick tissue paper squares onto the contact paper flower or umbrella shape until it is filled. (Mia chose pink and purple for the flower petals and green for the leaves and stem, and she decided that the umbrella should have rainbow colors. She came up with her own technique for filling in smaller spaces like the umbrella handle: crumple the tissue paper into balls. This makes it a bit bulkier, but it still works, and it gives it some visual interest.)
  7. Layer the second piece of construction paper on top of the first, making sure that the flower or umbrella shapes line up.
  8. Add the second piece of contact paper over the top, smoothing it down as you go. Trim away excess if desired, but don't trim too much or the sun catcher will not stay together. 
  9. You can display your sun catcher in a window using clear tape. Another option is to use a hole punch to make two holes near the top, thread some ribbon or yarn through the holes, tie it off, and then hang your sun catcher.

Wednesday, March 23, 2011

One Fish Two Fish Red Fish Blue Fish Sun Catchers

{Blue Fish by Mia, Age 4}

{Red Fish by Mia, Age 4}
Materials:
  • red or blue construction paper
  • scissors
  • clear contact paper
  • red or blue tissue paper
  • pencil 
  • clear tape
  • paper trimmer (optional)
  • hole punch (optional)
  • yarn, string, ribbon, etc. for hanging (optional)
Directions:
  1. Cut red or blue tissue paper into small squares. Older kids can do this themselves. We used approximately 1/2 inch squares, but you could make yours bigger. 
  2. Fold a piece of red or blue construction paper in half like a hamburger (or use two pieces of construction paper if you would like to make a larger sun catcher).
  3. Draw a fish shape (or trace around a cookie cutter or a picture from the internet) onto one half (or one piece) of the paper, and cut out the fish. Do not draw your design too close to the edges of the paper. Cut paper in half along the fold. You should now have two pieces of paper with identical fish cut-outs.  Tip: If you are using two pieces of paper, you will need to make sure they stay together so that you get identical fish.
  4. Cut two pieces of clear contact paper (I used both a paper trimmer and scissors for this.) so that they are 1/4 inch larger than the construction paper all the way around. Tip: Do not remove backing from contact paper until you are ready to use it.
  5. Adhere one piece of paper to the clear contact paper so that there is a border of 1/4 inch all around the paper. Tip: Slowly peel the contact paper away from the backing as you smooth the construction paper down onto the contact paper. This way you don't end up with "bubbles."
  6. Have your child stick tissue paper squares onto the contact paper fish shape until it is filled (or nearly filled like Mia's).
  7. Layer the second piece of construction paper on top of the first, making sure that the fish shapes line up.
  8. Add the second piece of contact paper over the top, smoothing it down as you go. Trim away excess if desired, but don't trim too much or the sun catcher will not stay together. 
  9. You can display your sun catcher in a window using clear tape. Another option is to use a hole punch to make two holes near the top, thread some ribbon or yarn through the holes, tie it off, and then hang your sun catcher.

Wednesday, March 9, 2011

St. Patty's Day Sun Catcher Craft

This craft was inspired one that my friend Kim did with her kids. They made hearts for Valentine's Day and called them V-Day Sun Catchers. This craft requires a bit a parent prep, but it is simple enough for toddlers to do once you have prepared. Kids about 8 and up can most likely do this craft on their own.
{Shamrock Sun Catcher by Mia, Age 4}

Materials:
  • green construction paper
  • scissors
  • clear contact paper
  • green tissue paper
  • pencil 
  • clear tape
  • paper trimmer (optional)
  • hole punch (optional)
  • yarn, string, ribbon, etc. for hanging (optional)
Directions:
  1. Cut green tissue paper into small squares. Older kids can do this themselves. We used approximately 1/2 inch squares, but you could make yours bigger. Tip: We used two different shades of green tissue paper to give the sun catcher a more complex design. It looks especially nice where the two colors have overlapped in places.
  2. Fold a piece of green construction paper in half like a hamburger (or use two pieces of construction paper if you would like to make a larger sun catcher).
  3. Draw a shamrock shape (or trace around a cookie cutter or a picture from the internet) onto one half (or one piece) of the paper, and cut out the shamrock. Do not draw your design too close to the edges of the paper. Cut paper in half along the fold. You should now have two pieces of paper with identical shamrock cut-outs.  Tip: If you are using two pieces of paper, you will need to make sure they stay together so that you get identical shamrocks.
  4. Cut two pieces of clear contact paper (I used both a paper trimmer and scissors for this.) so that they are 1/4 inch larger than the construction paper all the way around. Tip: Do not remove backing from contact paper until you are ready to use it.
  5. Adhere one piece of paper to the clear contact paper so that there is a border of 1/4 inch all around the paper. Tip: Slowly peel the contact paper away from the backing as you smooth the construction paper down onto the contact paper. This way you don't end up with "bubbles."
  6. Have your child stick tissue paper squares onto the contact paper shamrock shape until it is filled (or nearly filled like Mia's).
  7. Layer the second piece of construction paper on top of the first, making sure that the shamrock shapes line up.
  8. Add the second piece of contact paper over the top, smoothing it down as you go. Trim away excess if desired, but don't trim too much or the sun catcher will not stay together. 
  9. You can display your sun catcher in a window using clear tape. Another option is to use a hole punch to make two holes near the top, thread some ribbon or yarn through the holes, tie it off, and then hang your sun catcher.