Showing posts with label preschool crafts. Show all posts

Monday, August 11, 2014

Painting with Magnets

This was a project that Logan did a few weeks ago at the library with Mrs. D., and I am so in love with the cleverness of it! If you have followed my blog for any amount of time, you probably know that I love kids' painting projects, and we have done many, many, many of them, but this was completely new to me. I love that it mixes art and science, too!

Materials:

  • round metal cake pan/pie plate
  • white paper (card stock works well)
  • pencil
  • scissors
  • magnet
  • paper clips
  • paint (tempera works well)


Directions:
  1. If planning to make more than one of these, you will want to first make a round template for tracing. Place some paper inside your cake pan/pie tin and draw around the inside. Cut out this circle and use it for tracing all your other paper circles. Cut them out.
  2. Place a paper circle inside of your cake pan or pie tin.
  3. Add some paper clips (Mrs. D. had everyone use two large, plain, metal clips).
  4. Next, pour in a little bit of paint. Mrs. D. let each child select two colors. Logan chose yellow and blue.
  5. Give your child a magnet (preferably one that is not small enough to be swallowed! Ours were wand-style and were perfect for this.) and show him how to move it around on the bottom of the cake pan or pie tin. (You might need to help hold the pan, too.) This will move the paper clips around. Tell him to move the clips into the paint and then spread them all over the paper, using the magnet. (Help as needed, and make sure that magnets are nowhere near his mouth.) Talk about the process. What do you notice happens? Logan saw that the two colors mixed together to make green.
  6. Once the painting is complete, allow it to dry before displaying.

Sunday, August 10, 2014

Tool Box Stamping

Do you ever find yourself so far behind that you don't even know where to begin? That's how I feel about blogging. I know I want to, but... It's just so long since I have done these things that I wanted to write about. Anyway, hope they make some sort of sense, because I felt it was worth sharing, once upon a time. This project was something that I found for our Sunday school kids to do as a wind-up for our VBS, which took place ages ago, right after school got out in June! (Don't even get me started on how fast this summer has flown by. I swore that school seemed like it was NEVER going to end, and then once it did... Oh, boy!)

So, I found the inspiration for this craft here. The main difference is that she has used paint and I wanted something less messy for our Sunday school kids (for reasons I am sure you understand). My solution? Stamp pads. We have plenty in our resources at church, so I had my two kiddos test it out at home with assorted nuts, bolts, screws, and nails, and it worked splendidly.

{Finished Tool Box Prints}

Materials:

  • paper (we used white card stock)
  • stamp pads in assorted colors
  • various nuts, bolts, screws, nails (careful about ages of children and whether or not you allow sharp points)
  • paper trimmer/scissors (optional, for cutting paper smaller)
  • something to clean up with: damp towel/paper towels/baby wipes 

Directions:
  1. I used a paper trimmer to cut our 8 1/2" x 11" card stock into quarters, making the pieces about postcard size. This is not necessary.
  2. Set out paper, assorted tool box items, and stamp pads.
  3. Have kids press nuts, bolts, screws, or nails (flat side recommended, although Mia did discover that the threading on a screw makes an interesting design if you twist it over the paper) onto a stamp pad and then onto paper to make a print. Repeat as desired.
  4. Allow ink to dry completely before displaying your projects. These would make fun greeting cards or wrapping paper, should you choose to stamp them on say, a roll of Kraft paper (which can be found at Dollar Tree).


Saturday, April 26, 2014

Easter Bunny Nose & Whiskers Craft

Here's a super easy project that you can quickly make with your kids. Older kids can do this on their own and little ones can do it with some assistance. Mia made this all by herself last week when we were at church on Good Friday. It's not exactly a mask, but it's the same idea, and it's way too cute not to share!

{Cute and Simple Easter Bunny Craft!}


Materials:
  • craft stick
  • pom pom
  • three pipe cleaners
  • white glue

Directions:
  1. Glue a pom pom (your choice of color) to the end of a craft stick.
  2. Wrap a pipe cleaner (your choice of color) around the center of the craft stick, below the pom pom, so that there it each end sticking off of the craft stick is approximately the same length. Repeat with two more pipe cleaners, one at a time. You can trim the pipe cleaners if desired. (Alternatively, you can switch the order of the first two steps and glue the pom pom on TOP of the twisted pipe cleaners. Your choice.)
  3. Allow glue to dry before modeling the bunny nose and whiskers.

Thanks for stopping by. Don't forget to enter to win my giveaway sponsored by Path Publishing, which runs through Monday, April 28, 2014!

Friday, March 21, 2014

Very Hungry Caterpillar Hat

March is Reading Month, so Logan's preschool class did an author study on Eric Carle. Yesterday, he came home with this cute Very Hungry Caterpillar hat to share with his sister. It's a quick and easy craft to do with little ones.

{Celebrate Reading Month with this Fun Hat!}


Materials:

  • construction paper (red, yellow, green, black)
  • scissors
  • paper trimmer (optional)
  • glue stick
  • stapler

Directions:

  1. Cut two strips of red paper about 3-4 inches wide. Staple one piece to the other, end to end. Wrap the extra long strip around your child's head for size, and then cut off the excess. Tip: A paper trimmer is nice for this, but scissors will work, too.
  2. Cut two yellow circles for eyes. Ours are about 2 1/2" wide. Cut two green circles, slightly smaller (Ours are about 1 1/2" wide), and have your child glue them to the yellow circles. Glue the eyes to the center of the red paper strip. Note: Circles do NOT need to be perfect!
  3. Cut two narrow strips of black paper, about 1" wide, for antennae. Tip: Again, a paper trimmer is helpful, but you can use scissors if you don't have one. Staple these to the red paper strip, on either side of the eyes.
  4. Staple the ends of the red paper together to finish the caterpillar hat, which your child can now wear!


Wednesday, March 19, 2014

"Magic" Starry Night Painting

{Magic Starry Night Painting}

A couple of weeks back, the story time theme of the week was "Night Sky." Mrs. D., of course, had a great craft project to go along with that: "magic" crayon resist painting. All of the kids got a kick out of seeing stars magically appear when they applied water color paint to what looked like plain white paper!

Materials:

  • heavy weight white paper (water color or card stock works best)
  • white crayon
  • water color paint (black, dark blue, or purple)
  • paint brush
  • yellow paper
  • scissors
  • glue stick
  • paint shirt/smock (optional)
  • something to protect work surface (optional -- vinyl tablecloth, newspaper, cereal box liner)
Directions:
  1. With a white crayon, draw stars on a piece of white paper. (Older kids can do this themselves, but you will need to do it for little ones.)
  2. Give your child some night-sky colored water color paints and a paint brush. Have him cover the paper to "magically" reveal the stars! Set the painting aside to dry. (Tip: You might want to protect clothing and work surfaces before having children paint.)
  3. Cut a moon shape from a scrap of yellow paper. Have your child glue this to the night sky painting using a glue stick. That's it! Your child's "magic" night sky painting is now ready to be displayed.

Friday, February 21, 2014

Less Mess Finger Painting

I am not sure of the origin of this idea, but I am pretty sure it was floating around on Pinterest. The basic concept is to cut up a sponge into smaller pieces and let kids use them as ink pads for finger painting. Here is what I did for this less messy version of finger painting, which could also be considered printmaking or stamping of fingers, depending upon how the child uses the tools. No matter how you do it, this is a brilliant that gets two thumbs (or fingers) up from this crafty mama!

  1. I originally cut my sponge (brand new) into six pieces, one per color of paint: red, orange, yellow, green, blue, and purple. Then, I thought better of that idea and cut each section in half again so that each child would have a set! (Also, cutting it into twelve sections produced segments that were just the right size for fingers so there was little waste.)
  2. After cutting the sponge, I began completely soaking each section in a color of tempera paint, before realizing that only the top section of the sponge needed to be saturated with paint. Once I realized that, I added less paint to each piece of sponge. As I soaked each section of sponge, I then set it on a Styrofoam tray which became the paint palette. 
    {Sponge Paint Palette}
  3. I laid a cereal box liner on my table to protect it (like free wax paper!). Then, I set some finger paint paper on top.
  4. Mia put on her paint shirt and dipped pressed a finger or two onto the paint-laden sponge and then applied the paint to the paper. (It turned out that Logan was not interested at this time, but I will have the sponges for another time, and can easily add more paint as needed.) When she was done, she had barely any paint on her fingers, so the clean-up was a breeze! As a bonus, I didn't have a messy tray to rinse off because the paint was contained in the small sponge pieces. Overall, this is brilliant, and gets two thumbs (or fingers) up from this crafty mama.
    {A Finger Painted Flower Garden}

Wednesday, January 29, 2014

Toilet Paper Tube Stamping

Today was snow day #3 and this was the second activity we tried since we were trapped indoors. The first one was science experiment. As another aside, just once I wish we would have a "snow day" during which the kids can actually be allowed to go outside and, you know, play in the snow! These insanely cold no-school days are getting quite old.

Happily, the kids were much more enthusiastic about this stamping project than yesterday's potato prints, which we tried kind of late in the afternoon when they were tired and crabby. I was smart enough to introduce this craft earlier in the day before they had a chance to get cranky. This idea (from Pinterest) is super simple and it's a perfect way to use up some of those toilet paper tubes that you have saved up (if you're anything like me you have a large stash of them -- They are such great craft items and they are completely free!) It reminds me a bit of the toilet paper tube octopuses that we made before, but I really love this one even more than those fellows. Plus, this one can be done with any age group from toddlers and up.

{Here are our stamps before paint was added...}


Materials:
  • empty toilet paper tubes
  • scissors
  • paper (finger print paper works nicely)
  • tempera paint
  • paint trays (or bowls or plates)
  • black Sharpie marker (optional)

Directions:
  1. Cut notches along one end of a toilet paper tube. They can be any size or shape: rectangles, triangles, rounded "petals," or whatever else you can think of. My cuts were all around 3/4" to 1 1/2" long.
  2. Protect kids' clothing and work surfaces, if desired. My children each have their own paint shirts, which are just old t-shirts that used to belong to me. I use a clothespin to secure Logan's at the back of his neck. For the table, they each had a vinyl place mat to work on.
  3. Pour some paint onto trays. We used six colors: red, orange, yellow, green, blue, and purple, with two colors on each Styrofoam tray. Note: In retrospect, I think this would have worked better if there was more room per color, meaning that I should have only used one color per tray.
  4. Have kids dip the toilet paper tubes into the paint and then press them onto the paper to make impressions. Note: They can also invent their own techniques for painting. For example, Logan liked to swirl the tubes around on the paper and Mia discovered that she could used the tips of the cut-outs to make smaller designs. Both of them figured out that the paint was occasionally drippy so they used that in their paintings, as well.
  5. Let paint dry completely before displaying their artwork. Note: I used a black Sharpie to write their names and ages before they were finished. This is mostly so I won't forget who made each one! Note: Kids may also wish to go back after paint has dried and add more details with markers. I know Mia mentioned adding green stems to the "flowers" and some faces to the ones that reminded her of a lion's mane.


And, if you haven't done so already, please check out the Livingston Parent Journal's crowdfunding page! There are just a couple days left to contribute to a very worthy cause.

Tuesday, January 28, 2014

Easy Cookie Cutter Potato Prints

Here's an oldie, but a goody: potato prints. I am not sure where I came up with the idea to use cookie cutters to make this process even quicker and easier, but it came in handy today when I was trying to prep for dinner and needed something to keep the kids occupied! Getting some potatoes out for roasting reminded me that I had just purchased some new cookie cutters that I found on clearance at Walmart -- a total steal, 6 of the little ones that are meant for fondant or something along those lines, and they were just $1.50. (Shhh! Don't tell Brett. I'm supposed to be cut off from buying any more.)

Have I mentioned that cookie cutters are one of my most favorite craft items? Really, they have so many great uses! I have always thought the small metal kind were nice for cutting cute cheese and fruit shapes, and, of course, for crafts. It turns out that they are quite handy for making potato stamps with precise edges in no time flat. Yep. Cookie cutters. What's not to love?!

{A finished potato stamp and a stamp in progress...}

Materials:
  • potatoes
  • small knife
  • small cookie cutters (metal preferably)
  • Styrofoam trays to hold paint (or plates)
  • paper (finger paint paper works well)
  • tempera paints
  • paper towel/damp cloth
  • paint shirts/smocks (optional)

Directions:
  1. You may wish to protect clothing and work surfaces. My kids each have an old paint shirt that they wore. Plus, each of their work areas was covered with a vinyl place mat. If messes don't bother you, proceed to the next step.
  2. Cut potatoes in half. I used 4 small red potatoes.
  3. Press a cookie cutter into each potato half. You don't have to press it entirely into the potato, but you can press it that deeply if you want. Remove the cookie cutter, and use a knife to carefully cut away the outer edges, leaving the shape of the cookie cutter. It's faster and more precise than trying to freehand the shape! (We used a star, some hearts, some fall leaves, and an apple.)
  4. Pour some paint onto Styrofoam trays and let kids dip their potato stamps into the paint and then press it onto paper. Tip: You can sterilize Styrofoam meat trays by running them through the dishwasher on the top rack. Tip: If you have more than one child, it is helpful to give each one his own tray. I just sat them next to each other so that they could share paint colors and potato stamps. Tip: It is helpful to have paper towels or a damp cloth handy for wiping the stamps off before switching colors (unless they want the colors to get mixed). Plus, you will need this for wiping hands when they are all done stamping.
  5. Let paintings dry completely before displaying them. This technique can also be used to making greeting cards or gift wrap.


Here are 10 More Fun Uses for Cookie Cutters:
By the way, please stop by the Livingston Parent Journal's crowdfunding site and see if there is a way that you can help them with their mission! Thanks ever so much.


Monday, January 27, 2014

Make Your Own: Kool-Aid* Finger Paint

If you have been reading my posts for any length of time, you likely know that I adore homemade art supplies, particularly paints! I had wanted to try out this recipe for a few months and with the weather we have been having... Well, you know, no time like the present, right? (On a side note, was there ever such a thing as a polar vortex when we were kids? Doesn't seem like it to me. It's cold, people! I don't know if we need a special term for that. I believe it is used to be known as "winter.") So, back to the topic at hand. You need a "winter" weather activity to do with the cooped-up kids who don't have school again? This ought to do the trick!

{Little Man experiments with color mixing.}

Notes about the recipe: 
#1 I halved everything from the original (link above).
#2 When I say Kool-Aid*, I just mean any powdered drink mix. I used Kroger brand and made two batches, one with orange flavor and one with tropical punch flavor.
#3 Yes, this sounds a lot like a play dough recipe. This is almost all of the ingredients that we use to make Kool-Aid* Play Dough, although the proportions are different.
#4 It smells really nice.
#5 The paints have great vibrant colors! (And, I LOVE bright color, as you may know.)
#6 Despite sounding like play dough, the consistency is very good for a finger paint. In fact, I think I prefer this to the previous homemade finger paint recipe in that it is not at all sticky.
#7 This paint wipes up super easily with just a damp cloth, which earns high marks from this mama! (In case the other reasons stated above don't convince you to try it.)
#8 The only potential downside is that it makes quite a lot of paint, more than we need for just two kiddos. I plan to just share some with other families, so that solves that. It would work great for a daycare or a preschool class, also.

{Left: Orange, Right: Tropical Punch}

Ingredients:
  • 1 cup flour
  • 1 package unsweetened Kool-Aid*
  • 1/4 cup salt
  • 1 1/2 cups boiling water
  • 1 1/2 tablespoons oil (I used EVOO. Whatever cooking oil you have on hand will work.)

Directions:
  1. Place dry ingredients in a medium or large bowl. (I used two different bowls since I was making two batches.)
  2. Add oil and boiling water and stir to combine. (I would say adults only since this involves boiling water.)
  3. Use paint right away. (Don't worry. I checked and it was cool enough to the touch.) Finger paint paper is ideal, of course, but I imagine you could use any paper you have at hand. (I finally found that roll of paper that eluded me!)
  4. The only thing I am not sure about is how long this lasts. Currently, we have it in sealed containers, and given its similarities to homemade play dough I am inclined to say it should last for several weeks or even months. (Our current batch of homemade play dough is 5 months old and still working great. Yes, you read that correctly. MONTHS! Really, I can't talk homemade play dough up enough!)
{My little realist creates jack-o'-lanterns.}

Thursday, January 23, 2014

Winter Mittens Paper Craft

Here is another cute and simple preschool craft created by our wonderful library lady, Mrs. D.! Logan always enjoys using the paint daubers, so this was a hit. (Note: If you don't have paint daubers at home, you can buy Bingo markers at Dollar Tree that work very well for dot-eriffic projects.)


Materials:

  • construction paper
  • pencil
  • scissors
  • hole punch
  • yarn
  • Bingo/paint daubers

Directions:
  1. Draw and cut out a mitten shape. Use this as a template to create a matching mitten, and cut it out. (Tip: If you want a sturdier template to use again and again, consider making one out of boxboard -- like a cereal box.)
  2. Punch a hole in each mitten.
  3. Cut a length of yarn. Thread each end through the holes and tie knots to secure.
  4. Give your child paint or Bingo daubers and let him decorate the mittens. Allow paint to dry before displaying the mittens.

11 more Bingo marker project ideas for the rest of the year:

Tuesday, November 26, 2013

Cupcake Liner Owl Craft

This cute craft is brought to you by our lovely library lady. During story time, Logan (my kid who is actually not all that into crafting) happily produced this cheery bird. I think that he loves Mrs. D., so she motivates him to be creative, which is great. The cupcake liner eyes are perfectly adorable, and I only wish that I had thought of it myself!

{Cupcake Owl by Logan, Age 4}
Mia liked this feathery fellow, too, so we made a few more to hang in the window. For most of them, I just traced the original to get the body's shape. However, she wanted one baby owl, so I drew a smaller body.

Materials:
{Red Owl by Logan}
  • construction paper
  • pencil
  • scissors
  • glue (tacky glue works best)
  • 2 googly eyes (or paper circles)
  • feathers (or paper strips)
  • 2 cupcake liners (we used both regular size and mini)

Directions:
  1. Draw and cut out the owl body. If you are making several, you may want to keep the first cut-out and use it for a template. The basic shape is an oval. On one end, instead of rounding it, create a pointed triangle shape. Fold this down for the owl's head. (My kids ended up wanting these to hang out like a flap instead of being secured, so I am not sure that is what Mrs. D. intended, but it wasn't worth arguing.)
  2. For feathers, Mrs. D. had cut several strips of construction paper in brown, black, tan, gray, and white. If planning to use paper feathers, cut these in advance and curl them around your finger or a pencil.
  3. Cut diamond shapes for the beaks. To make several, I first cut a strip of paper, then cut smaller rectangles. I folded each rectangle in half (hamburger fold) and then cut a triangle, leaving the fold in tact. Once unfolded, these formed the beaks. We used yellow and orange construction paper. Mrs. D. had also cut out brown construction paper feet, which we skipped. If you don't want to use googly eyes, cut black paper circles.
  4. Have your child assemble his owl. Glue two cupcake liners to the head to make the eyes. Then add the googly eyes or paper circles to the centers. Next, glue down the beak. If you are including feet, now is a good time to glue them to the bottom of the owls' body, either on the front or the back. Then, add feathers. We used actual feathers, which is why tacky glue worked the best, but the paper strips can be adhered easily using school glue or a glue stick. (Glue stick is the least messy.) 
    {One of Mia's owls, which I call "Showgirl."}
  5. Allow glue to dry before displaying your owl craft. 
    {Mama & Baby Owls by Mia, Age 6}
Other Ideas: I decided that it would be fun to perch the owls on actual twigs, and I envisioned using pipe cleaner legs to secure them. However, Mia was happy to make owls without feet so I never mentioned this. I also came up with the idea to use paper (or fabric) flowers for the eyes, and Mia made one very showy owl that had pink feathers and paper flower eyes with jeweled centers (from my scrapbooking supplies), which ended up being her absolute favorite.

Sunday, August 11, 2013

Easy Flower Printing Project

This idea isn't exactly original. In fact, there are plenty of variations floating around the internet already. Anyway, Mia gave me a Mother's Day card she made at school using this stamping method, and it is super-simple to replicate at home with very few supplies. (The hallmark of a good kids' craft project, in my opinion!) So, on a rainy day awhile back, when she wanted a craft to do, this is what I pulled out.

We don't buy a lot of things that come in single-serve plastic bottles, so I have been saving these for a bit. Mia got the water bottles at school and from a birthday party. These worked okay for making flowers. The Sierra Mist was purchased to enjoy mixed with our Bacardi that we brought back from Puerto Rico. If you want the prints that most resemble flowers, these bottles make adorable five-petal daisies. The Powerade bottles are the only ones that we normally have on hand since Brett likes to drink it after long runs, however, these were not the best for producing "flower" prints. They really just made a circle, which can certainly be used for print-making, but it just takes a little creativity to make them look like flowers. My kids ended up using the bottle caps as well, so that could be the centers of the flowers, if desired.

This printmaking project is a craft that is simple enough to be done with any age of children from toddlers on up. I think it was especially nice for Mia's kindergarten class, but I think it would work well, for preschool, too. P.S. Don't be surprised if this turns into a finger painting project. This tends to happen at my house, anyway, and it did with this craft, as well!

{Finished Prints by Mia, 6, and Logan, 3}

Materials:
  • tempera paint
  • empty plastic bottles (water, pop, Powerade, etc.)
  • Styrofoam trays
  • paper (heavier paper is recommended, but any will work)
  • paint brushes (optional)
  • cereal box liners (to protect work surface, optional)
  • old clothes/paint smocks (optional)
Directions:
  1. Old clothes are suggested for this. My kids each wear an old t-shirt of mine for paint projects. Logan's is quite large around the neck so I secure it in the back with a clothespin. You might also want to protect your work surface. I like using the liners from cereal boxes, but you can also use newspaper or a vinyl table cloth that you are not worried about messing up. Tip: If you have more than one child, set up a paint station for each kid. This makes things a lot easier when they each have their own space and materials to work with!
  2. Pour some tempera paint onto a Styrofoam tray. We used powdered tempera paints that I mixed up before getting started, but ready-made paints would work, too. Tip: Styrofoam trays can be sterilized in your dishwasher so you don't have to worry about germs from meat! Tip: If you don't have any Styrofoam trays, use a plate. I don't suggest bowls, because you need a flatter surface to make this easy for kids. Tip: Unless you enjoy mud colored paintings, limit the number of paint colors that each child uses. I let my kids pick up to 3 colors for their tray. You can also choose colors that go with your decor if you think these will end up in frames. I let mine use yellow, red, and purple, knowing that they would mix the red and yellow together to get orange.
  3. Let kids dip their bottles into the paint and then press it onto paper. We used construction paper and white card stock, and the card stock was my preference for this project. It produced clearer, more vibrant colors, and the heavier weight withstood the wetness of the paint, which got applied quite heavily in some places. Tip: Paint brushes are optional. You might want them if you would like your flowers to have stems, for example. Or you can use the brushes to apply the paint to the bottles if dipping them into the paint isn't getting the desired coverage. 
  4. Allow paint to dry completely before displaying the prints. Or, you can use it to make a card like Mia did for Mother's Day. Tip: I like to let paintings dry on the cereal box liners, which can easily be moved from one location to another, if for example, you need to use your table or counter for meals. Tip: Keep a black Sharpie on hand, and once kids have finished their prints, label them with name and age or date that they were created. This is much easier to remember right after doing the project and it looks nice in a frame, or relatives always appreciate this sort of thing, if you are running out of room for keeping your kids' artwork.
{Clever kids made use of both sides of the bottle.}

Monday, July 15, 2013

Making Mosaics with Styrofoam Tiles

This idea came from Pinterest, and I am pretty happy to have found it. Styrofoam is one of the few recyclable materials that the recycling center we go to will not accept, to it is wonderful to find another use for it (and I was pretty much tapped out, for the time being). In addition to a neat craft idea, this website taught me a new trick for getting Styrofoam extra clean: putting it in the dishwasher! I never realized that was possible, without melting it, but now that I have tried it there is no reason to fear germs when re-using Styrofoam from meat packaging, for example. This project was one that I prepped one day, and then pulled out on another morning when my kiddos were asking for a craft project. It helps to plan in advance, but this is easily one you could do in an afternoon, with less than an hour of prep work. And, it's a craft that the littlest ones on up to the big kids (think intricate designs) can accomplish.

{Styrofoam Mosaics by Logan, Age 3 and Mia, Age 6}

Materials:
  • black card stock (or another color you prefer)
  • glue (We used Aleene's Tacky Glue.)
  • scissors
  • Styrofoam (from food packaging)
  • acrylic paint (We used red, orange, yellow, green, blue, and purple.)
  • paintbrushes (Foam brushes work well.)
  • something to hold paint (more Styrofoam or a plate/bowl)
  • something to protect work space (cereal box liners, vinyl table cloth, newspaper)

Directions:
  1. First make sure your Styrofoam is well-cleaned. I always used to hand-wash mine before I learned this handy Tip: Run it through the dishwasher for extra sanitizing power. What could be simpler? I put mine on the top rack, just to be on the safe side.
  2. Next, trim off the outside edges of the Styrofoam. You will have a flat, rectangular piece now. I trimmed my rectangle into strips before painting, about an inch in diameter, but that is optional.
  3. Protect your work surface and clothing since acrylic paints can stain. (Tip: I like using the liners from cereal boxes as "wax" paper. You can re-use them, too, but if they get really messy, I don't feel bad about tossing them.)
  4. Pour some acrylic paints onto another piece of Styrofoam (or onto a plate/into a bowl). Use one paintbrush per color and coat each strip or piece of Styrofoam. Tip: I found that using foam paintbrushes worked very well and I applied a thin coat in one direction. Let the paint dry, about 20-30 minutes. You don't have to rinse your brushes or paint "palette" in between coats. Although the paint on the Styrofoam will dry, the paint on the "palette" remains usable for the second coat. Tip: If having kids do this step, you may want to limit their color choices to 3 for simplicity's sake. Also, if you would like them to create art to fit with your decor, you can select 3 colors that go well, and only offer those color choices from the tiles you pre-painted.
  5. Apply a second thin coat of paint. Tip: I found that applying the paint in brushstrokes of the opposite direction from the first application made for good, even coverage with little streaking. Again, let the paint dry, about 20-30 minutes.
  6. Once the paint is totally dry, cut the Styrofoam into square tiles (or other shapes if you prefer). Personally, I believe that mosaics are typically made from square tiles, so this is what I did, although not all of them are the same size. (And that's okay!) Tip: This is also a step that children can do, especially if you want them to have scissor skills practice. (I just chose to do it myself because I was prepping for a future project, not one we were doing right then.)
  7. Now, it's time to create some mosaic art. (Note: Technically, mosaics should fill up the space as well as possible to create a design, and tiles should be placed tightly together with only a small amount of space in between. My kids did their own thing, and I didn't feel the need to "correct" them. Have fun with it!) Again, I laid down the cereal box liners for each child's work space, then I gave them some Styrofoam tiles and Aleene's Tacky Glue. (You could most likely use a regular white glue, but I felt that since this was a more heavy-weight item than paper, this would be an ideal craft glue. It's held up well so far.) We used black card stock for our art paper. Any color would work, but I thought black would help the bright colors to pop out. You could also use cardboard or box board (from a cereal box). Tip: If you don't want your kids to use too much glue (or they are not adept with the bottles) or you're working with a group, you may want to put glue into small bowls and let them apply it using Q-tips. This cuts down on excess glue and some of the messiness.
  8. Once kids are done making their mosaics, let the glue dry thoroughly, and then display their masterpieces. I am planning to look for frames the next time I am out garage saling, because these are much too pretty to not earn a permanent place on our walls (and this is coming from someone whose kids do crafts pretty much all the time).

{She rolled out of bed and asked for a craft. Good thing I was ready!}

{He's a bit notorious for using too much glue, but getting better.}

Wednesday, April 24, 2013

Caterpillar on a Leaf Craft

Here is another cute and simple idea that I got from our Story Time lady, Mrs. D. Yesterday, Logan made this caterpillar out of pom poms that he stuck onto the leaf, which had already been made for him. If you like thematic craft projects, this could easily go along with a study of butterflies and caterpillars, which was the theme for this week. Or it could be used in conjunction with the study the letter "C."

One nice thing about this craft is that it requires few materials. If you don't have pom poms on hand, you will, of course, need to purchase them. However, pom poms are an affordable craft staple. You can pick them up at Dollar Tree, Wal-mart, or any craft store. I would suggest Dollar Tree if it's not out of your way because we got a package of 80 pom poms there recently, and this is enough to last us quite awhile, even with frequent crafting.

{Caterpillar by Logan, Age 3 1/2}
Materials:
  • green construction paper
  • scissors
  • decorative scissors (optional)
  • colored paper (or pipe cleaner)
  • pom poms (any color)
  • glue (Glue Dots are optional)
  • markers
  • hole punch (optional)
  • googly eyes (optional)
Directions:
  1. Cut a leaf shape from green construction paper. If you do not want to draw it free-hand, there are lots of templates available online. I like this one, for example. Mrs. D. had already drawn veins on the leaf using a green marker, which made the craft look more complete. Tip: You can also cut the leaves with decorative scissors like zigzag or scalloped edges if you wish. Tip: If desired, you can use a hole punch to make it look like the caterpillar has chewed the leaf. This may be hard to see in the photo, but the edge is "chewed." You could also punch holes in the interior of the leaf since caterpillars love to eat!
  2. Have your child glue some pom poms to the leaf to make the caterpillar's body. We used Glue Dots for this. Tip: If using Glue Dots, it is easier to stick the pom pom to the Glue Dot rather than trying to peel off the Glue Dot and then stick it to the pom pom.
  3. Give your child a narrow strip of colored paper that has been folded in half. Have him or her glue this to one end of the caterpillar to make the antenna. Tip: You could also use a section of pipe cleaner for this.
  4. Add a face if desired. Logan used a marker to draw eyes, which didn't show up very well. Tip: I suggested that we could glue on googly eyes, but he wasn't too interested, so we left it as is.
  5. Make sure the glue is dry before you move the caterpillar to its display spot.

Tuesday, April 16, 2013

Play Dough Ring Stacker/Counting Activity


{This is a look of intense concentration.}

Before spring break started, I picked up a couple of kids' craft books from the library, just in case. Although we did not do this over break, it still was a good one to try out. This simple activity was inspired by The Little Hands BIG FUN Craft Book by Judy Press.


Materials:
  • play dough (see recipe)
  • wooden skewer (you could also use a stir stick/thin straw)
  • Cheerios (or other "O" cereal)
Directions:
  1. Make a small mound of play dough on a table. Tip: If you want, you can do this on a place mat.
  2. Insert the skewer, pointed side down. Tip: If you are out at a restaurant, grab a stir stick or thin straw if they have them. This would also work if you are concerned about the sharp end of the skewer.
  3. Let your child stack the Cheerios onto the skewer. Older kids can use this as counting activity. Toddlers can just use it for motor skills practice. Be prepared for a few Cheerios to get broken while children are sliding them onto the skewer. Don't worry, though, you child knows what to do with these! Note: The play dough does end up with some crumbs in it. I just brushed them away before we put the play dough back in its designated peanut butter jar. If it really bothers you, be prepared to toss some play dough. This is yet another reason to have homemade play dough. It saves you money, so it's harder to feel bad about it out as needed.

Friday, April 5, 2013

A Busy Bag Activity

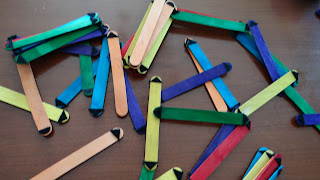
Recently, I put together these "busy bag" sticks so that the kids would have something to do while we are waiting at places like restaurants or doctor's offices or just because it's spring break and I have heard "I'm bored" more often than I should. This was another brilliantly simple idea that I saw on Pinterest. These were easy to put together one evening while watching "The Voice" at the same time. I bought a package of colored craft sticks at Michaels, the large size that resemble tongue depressors, which cost me about $2. I used some round Velcro stick-on tabs that I had at home, plus a new package of square ones from Wal-mart, which cost about $3.80. So, in total, I spent less than $6.00 and I made over 50 of these activity sticks. That is enough for both kids to play with and both kids have enjoyed these! We did lose a handful of the sticky tabs, but it has not made much of a difference in the entertainment factor. Anything that both a three-year-old and a six-year-old agree on is all right by me.

Materials:
  • large craft sticks
  • scissors
  • self-adhesive Velcro tabs
  • bag or bin to contain craft sticks

Directions:
  1. If using circle Velcro tabs, cut them in half to get more bang for your buck. If using square tabs (I believe mine were 1" squares, but I don't know for sure.), cut them into quarters. I cut mine diagonally to make 4 triangles. If you prefer not to cut the tabs, this will save you time, but you won't be able to make nearly as many activity sticks.
  2. Peel the Velcro tabs off of their backing and adhere them to the ends of the craft sticks. The way I did this was to put on "hook" tab on one end of the craft stick and the "loop" tab on the other end. Then, I flipped them over and did the same thing on the other side, only I reversed the positions of the tabs. My belief was that they would be able to do more different types of building activities this way, but who knows, I may just be anal retentive.
  3. That's it! Your busy bag is now ready for action. We store ours in a ziplock bag, but you could also use a pencil pouch, pencil box, aluminum can, or whatever else you have that is handy.
{Some building fun!}

Tuesday, April 2, 2013

Easter Egg Sun Catchers

I feel like I am behind on posting since Easter has come and gone, but really, it felt a bit early this year. Anyway, here is a project we did on Sunday. We've done plenty of these sun catchers over the past couple of years. It's so easy and relatively mess-free, that once you have made them you find occasions to make more. Plus, it helps if you already have a stock-pile of pre-cut tissue paper squares in an assortment of colors. I prepped a few paper eggs and Con-tact paper rectangles and then took the whole bunch along to Grandma and Grandpa's house so that all the kids could make them, if they chose.

{Pink Egg by Mia, Age 6 & Yellow Egg by Logan, Age 3}
Materials:
  • colored tissue paper
  • scissors
  • pencil
  • construction paper
  • clear Con-tact paper 
  • scrap paper (optional, for making egg template)
  • paper trimmer (optional)
  • clear tape (for hanging finished sun catchers)
Directions:
  1. Cut colored tissue paper into small squares. I used approximately 1 inch squares, but you could make yours bigger or smaller depending on the age of the children. Tip: To make this process go faster, layer a couple of pieces of tissue paper together, cut into smaller rectangles, and then cut the rectangles into strips, re-layering as needed. Put as many strips together as you can comfortably cut before cutting smaller squares. Tip: I save all of the cut tissue paper from previous projects, and store it in zippered baggies according to color. Tip: You don't need to go out and buy nice, new tissue paper. We re-use all the crumpled pieces that come in gift bags.
  2. Fold a piece of construction paper in half like a hamburger. 
  3. Fold a piece of scrap paper in half, hamburger-style, draw one half of an egg shape, and cut it out. Make sure that your template will fit within the borders of your folded construction paper, with about an inch or more border all the way around. Tip: You could also find an egg template online if you prefer. Tip: If you are only making one egg sun catcher, you can save this step by simply folding your paper in half a second time, drawing your egg shape, and then cutting it out. You should end up with two corresponding egg shapes on either original half of the folded paper.The template is just handy if you know you will be making several sun catchers.
  4. Lay your egg template onto the construction paper, trace it with a pencil, and then cut it out so that both sides of the folded paper have a corresponding egg shape removed from the center.
  5. Cut two pieces of clear Con-tact paper (I used both a paper trimmer and scissors for this.) so that they are at least 1/2 to 1 inch larger than the construction paper all the way around. Tip: Do not remove backing from contact paper until you are ready to use it. Tip: If you have leftover pieces of Con-tact paper, save them for future projects. For example, I find that the long, somewhat narrow strip left after making several of these sun catchers is just the right size for "laminating" labels onto jars of homemade play dough, which we give as gifts. The smaller remnants are also good for hanging leaves in the fall.
  6. Adhere one side of the paper to the clear Con-tact paper so that there is a border of at least 1/2 inch all around the paper. Tip: Slowly peel the Con-tact paper away from the backing as you smooth the construction paper down onto the contact paper. This way you don't end up with "bubbles."
  7. Have your child stick tissue paper squares onto the Con-tact paper egg shape until it is filled. Tip: You can use multiple different colors or shades of the same color (pink, purple, etc.) of tissue paper to give the sun catcher a more complex design. It looks especially nice where the two colors have overlapped in places.
  8. Layer the other half of construction paper on top of the first, making sure that the egg shapes line up. Tip: If you wish for the project to have a name and date, add this to the back before sealing up the sun catcher.
  9. Add the second piece of Con-tact paper over the top, smoothing it down as you go. Trim away excess if desired, but don't trim too much or the sun catcher will not stay together. 1/4 inch is the minimum border I would recommend.
  10. You can display your sun catcher in a window using clear tape. Another option is to use a hole punch to make two holes near the top, thread some ribbon or yarn through the holes, tie it off, and then hang your sun catcher.

Monday, February 11, 2013

Q-Tip Snowflake Craft


Here is what we did this morning since it is another "snow day." This craft idea was one Logan and I learned at story time last month, and it seemed like a good time for a repeat since it was easy to quickly pull it together.I say "snow day" because most of the snow melted during last night's rain, and I am not 100% sure why school was cancelled. I assume the back roads were impassable due to a combination of ice, mud, and wind-blown nastiness. I am not about to go outside to figure out exactly why, though. The wind is really whipping right now and the kids are happily watching The Lion King.

Materials:
  • construction paper
  • white glue
  • Q-Tips
  • scissors
  • small bowls to hold glue
Directions:
  1. I started by folding the paper in half (hamburger fold) and then cutting it. You can use a whole piece of paper if you prefer.
  2. Pour a small amount of white glue into a bowl. (Tip: One bowl per child makes life easier.)
  3. Set out Q-Tips. (Tip: You can first cut some in half to give kids a little more variety, but this is not necessary.)
  4. Have kids dip Q-tips into the glue and then arrange onto the paper to form snowflake designs. These can be as simple or as intricate as they want. Allow glue to dry completely before displaying the snowflakes.

Tuesday, December 20, 2011

Toilet Paper Tube Christmas Tree

Mia made a similar project at church using rolled pieces of green paper, but it didn't hold up very well. This seems to be a sturdier alternative. If you don't have pom poms, try sequins, glitter glue, or beads for the ornaments.
{By Logan, Age 2}


{By Mia, Age 4}
Materials:
  • 3 toilet paper tubes
  • glue
  • scissors
  • stapler (optional)
  • green paint
  • tray to hold paint
  • paintbrush (optional)
  • newspaper
  • pom poms
Directions:
  1. Cut 3 toilet paper tubes in half so that you have 6 tubes. (If you prefer, you can start with 6 whole tubes, but we found this harder to work with.)
  2. Protect your work surface with newspaper. Pour green paint onto a Styrofoam tray (or bowl or plate), and coat the tubes with paint. We used 3 different shades of green. Paintbrushes are optional; Mia figured out that you can just roll the tubes on the tray and that is faster than using a paintbrush. If you wish, you can paint the insides of the tubes, but my kids chose not to. Leave tubes on newspaper to dry completely.
  3. Glue or staple your painted tubes to form a pyramid shape: 3 on the bottom, 2 in the middle, 1 on top. (If you are using whole tubes, staples are highly recommended. Otherwise, glue works fine.) Allow glue to dry before decorating your tree.
  4. Trim your TP tube Christmas tree by gluing on pom poms for ornaments. Allow glue to dry completely before moving your project.

Friday, November 11, 2011

Bottle Cap Stamps

Got milk? If you're like me, you save all the bottle caps in case you need them for a project. Here is a fun way to get some use out of all those milk bottle caps you have collected. (Caps from pop, water, or juice bottles will work, too.) I found this idea on Pinterest and decided we had to try it. The blogger who originated this says to use self-adhesive foam, but we had more of the regular foam shapes, so we just applied them with glue. This turned out to be ideal for making letter stamps, which are the perfect crafting tool for a preschooler.


Materials Needed:
  • bottle caps
  • craft foam shapes
  • glue (unless using self-adhesive foam)
Directions:
If using self-adhesive foam shapes, simply peel off backing and adhere to the back of a bottle cap. If using regular foam, apply a small amount of glue and then affix to the bottle cap. Allow glue to dry before trying out your stamps. 

Tips:
  • If you want to use foam letters (or numbers), I recommend not using the self-adhesive kind. Unless you want your letters to be read backward, you will need to apply glue to the front of the letter (or number) --as you would normally see it-- and then attach to the bottle cap. This way you will get the reverse (correct) image of your letter (or number).
  • While ink pads are the simplest way to use your newly created stamps, you can also try them with paint or even markers. (With markers, you have to work quickly, before the pigment can dry. Breathing some little "huffs" of hot air on the ink can temporarily re-moisten it if you need a bit more time.)
  • Can't find craft foam shapes that you like? Purchase adhesive foam sheets from a craft store and create your own shapes.
  • For more ideas on DIY craft foam stamps, see my previous post.