Showing posts with label pumpkin crafts. Show all posts

Monday, October 14, 2013

Easiest Ever Pumpkin Craft

I recently learned how to make these at our local library, and I am very pleased with how mine turned out. Really! I am not making this up. This is the easiest pumpkin craft ever, and you need absolutely NO craft skills to pull it off. Also, you barely need any materials, and these pumpkins are really quick to craft. So, it's basically a perfect craft, even for beginners.

If I had any complaint, it would be that this is a little bit more expensive up-front than many other craft projects that I have made. That said, you will have plenty of duct tape left over, so it is really just a general craft investment. (And for the record, I can't complain, because all of my materials were provided by the library. Love!) I am sure I will be making more cool duct tape pumpkins... as soon as the faux pumpkins start going on clearance at the craft stores.


{Happy Halloween Crafting!}

Materials:

  • foam pumpkin (I recently saw some small ones at Dollar Tree!)
  • 1-2 rolls of decorative duct tape (I have found small rolls in the dollar section of Target.)
  • scissors (optional)

Directions:

  1. If using more than one roll of decorative duct tape, decide which design/solid color will be used for your stem and which will be used for the body of the pumpkin. Tear (or cut, but honestly, I found it easier to just tear it with my hands) off small sections and cover the stem. You can even tear the tape in half to have easier to work with strips if you stem is on the small side. Don't worry if the base looks messy because you will end up covering it later. Tip: If your stem is too long or awkward to work with, cut it with your scissors. I found this to be really helpful!
  2. Now, cover the base of the pumpkin with strips of duct tape. The best way to do this is to start at the top near the stem and then slowly smooth the tape down along the pumpkin. You will want to leave space in between each strip of tape, and then come back later and fill in the gaps. Tip: I decided to tear off several strips and lay them along the edge of the table to make the process go more smoothly. I just eyeballed them to see that they were the approximate length that I needed. Tip: Don't worry about making your pattern (if your tape has one) line up perfectly! I could have made myself insane trying to get those chevron stripes to line up just so, but I saved myself the worry, and it came out fine. The eye just tells me that it lines up (for the most part) even if it really doesn't.
  3. Find a place to display your spooktacular pumpkin craft. See, I told you that was easy, right?

Sunday, October 28, 2012

Paperback Pumpkins, Apples, and Pears

I learned how to make paperback pumpkins at our local library recently, and I was so excited by the first one that I quickly returned to buy a stack of books to make more pumpkins. Once I knew the basic steps, I was also able to make apples and pears so now I have a total of 7 fruit shapes on top of my kitchen cabinets. They are very festive for fall.

{The paperback pumpkin that started it all...}
 Materials: 
{Paperback Apple}
  • paperback books
  • scratch paper
  • pencil
  • scissors
  • sponge (I used an old kitchen sponge cut in half.)
  • acrylic paint (I used orange, yellow, red, and green.)
  • tray/plate to hold paint
  • cup of water
  • sticks/twigs
  • curling ribbon, twine, or other ribbon
  • hot glue gun
  • newspaper to protect work surface


Directions: 
1.) Gather some old paperback books, the more beat up the better.

{These teen books were just ten cents each at our library.}


2.) Decide which shape you want to make (apple, pear, pumpkin). Fold a piece of paper in half like a hamburger. (I re-used some printer paper for this.) Draw your shape on one half, cut it out, and unfold it. Make sure it looks the way you want, or make changes if desired. (Note: Definitely be sure that your template will fit the pages of your book.) Now is also a good time to warm up your glue gun.

{Some of the titles are pretty funny: Help! I'm Trapped in My Gym Teacher's Body.}

3.) Tear off the front cover and then begin tracing the template onto the first page using a pencil. Cut out a small section (say 20 pages or so, depending on the sharpness of your scissors and how many pages you can comfortably cut). Continue tracing and cutting small sections until the entire book has been done. Tear off the back cover and any remaining parts of the cover on the spine. (Note: I would start cutting at the bottom, work my way up to the top, and once I got close enough, just tear off the remaining section to the point where it meets the spine, which saves some cutting.)

{Tracing my first pear...}


{Cutting out a pumpkin}

4.) Now for painting. This step takes the longest. First, protect your work surface with newspaper. You may also want to wear old clothes since acrylic paint will stain. Pour some paint onto a tray or plate (I used old Styrofoam meat packaging at home and a paper plate when I made my first one at the library.) Dip you sponge into the cup of water, then dip it into the paint, and dab it onto your tray/plate so that you are applying thin coats only. Sponge paint both sides of each page. I did just outside edges, leaving white space in the centers of each pear, apple, or pumpkin shape. (Note: Thin coats of paint work best because it dries faster and the pages are less likely to stick together. On my first apple, I experimented with a sponge brush in place of a sponge. It worked, but the paint went on much, much wetter and took forever to dry -- over 24 hours and that was with the help of a hair dryer -- so I don't recommend this method because once you start, you want to finish.)

{Sponge painting the pear}

{This apple I painted with a sponge brush, but it was not my preferred method.}

5.) Use a generous amount of hot glue along the spine of the book and then fold the book backward pressing the spine together. The pages should now fan out. Fold parts or individual pages back and forth as needed to get the look you want. (Note: As I made more of these, I just started folding the book back and forth along the binding before even starting the paint process because looser bindings seem to be easier to work with. Sometimes you just have to keep playing with it until it looks the way you want. If it isn't perfect, that's okay, the final step really makes it look finished. Plus, if there are sections pages that lay open and don't look the way you want them to, you can just point this toward the back of your display, unless it is your table centerpiece.) 
 
{A Finished Pear}
6.) Put the finishing touches on your pumpkin, apple, or pear. Add a stick to the center (or wherever you can get it to fit) using hot glue. If needed, glue a page or two around it. Green curling ribbon looks nice for a pumpkin and really makes it look special and finished. I had some wide sparkly green ribbon that I thought would make nice "leaves" for my apples so I just tied that around the stem and cut each end on an angle to resemble stylized leaves (without trying to make them really look like leaves). For my pears, I tied bows with cute green and brown pear ribbon that I happened to have. I thought they turned out cute. For one pumpkin, I used twine instead of curling ribbon to give it a more authentic look. I am not sure if I love it, but it is one option and something different. (Note: My first pumpkin would not stand up straight so I tried trimming the bottom of the pages to make them flatter. When that did not do the trick, I added some cardboard to the bottom, which stabilized it.)


{My First Finished Apple}


{Finished Pumpkin with Wider Curling Ribbon}

{Finished Pumpkin with Twine}

{My Finished Fall Display!}


Sunday, October 21, 2012

A Super Simple Pumpkin Craft!

{The "Finished" Results}
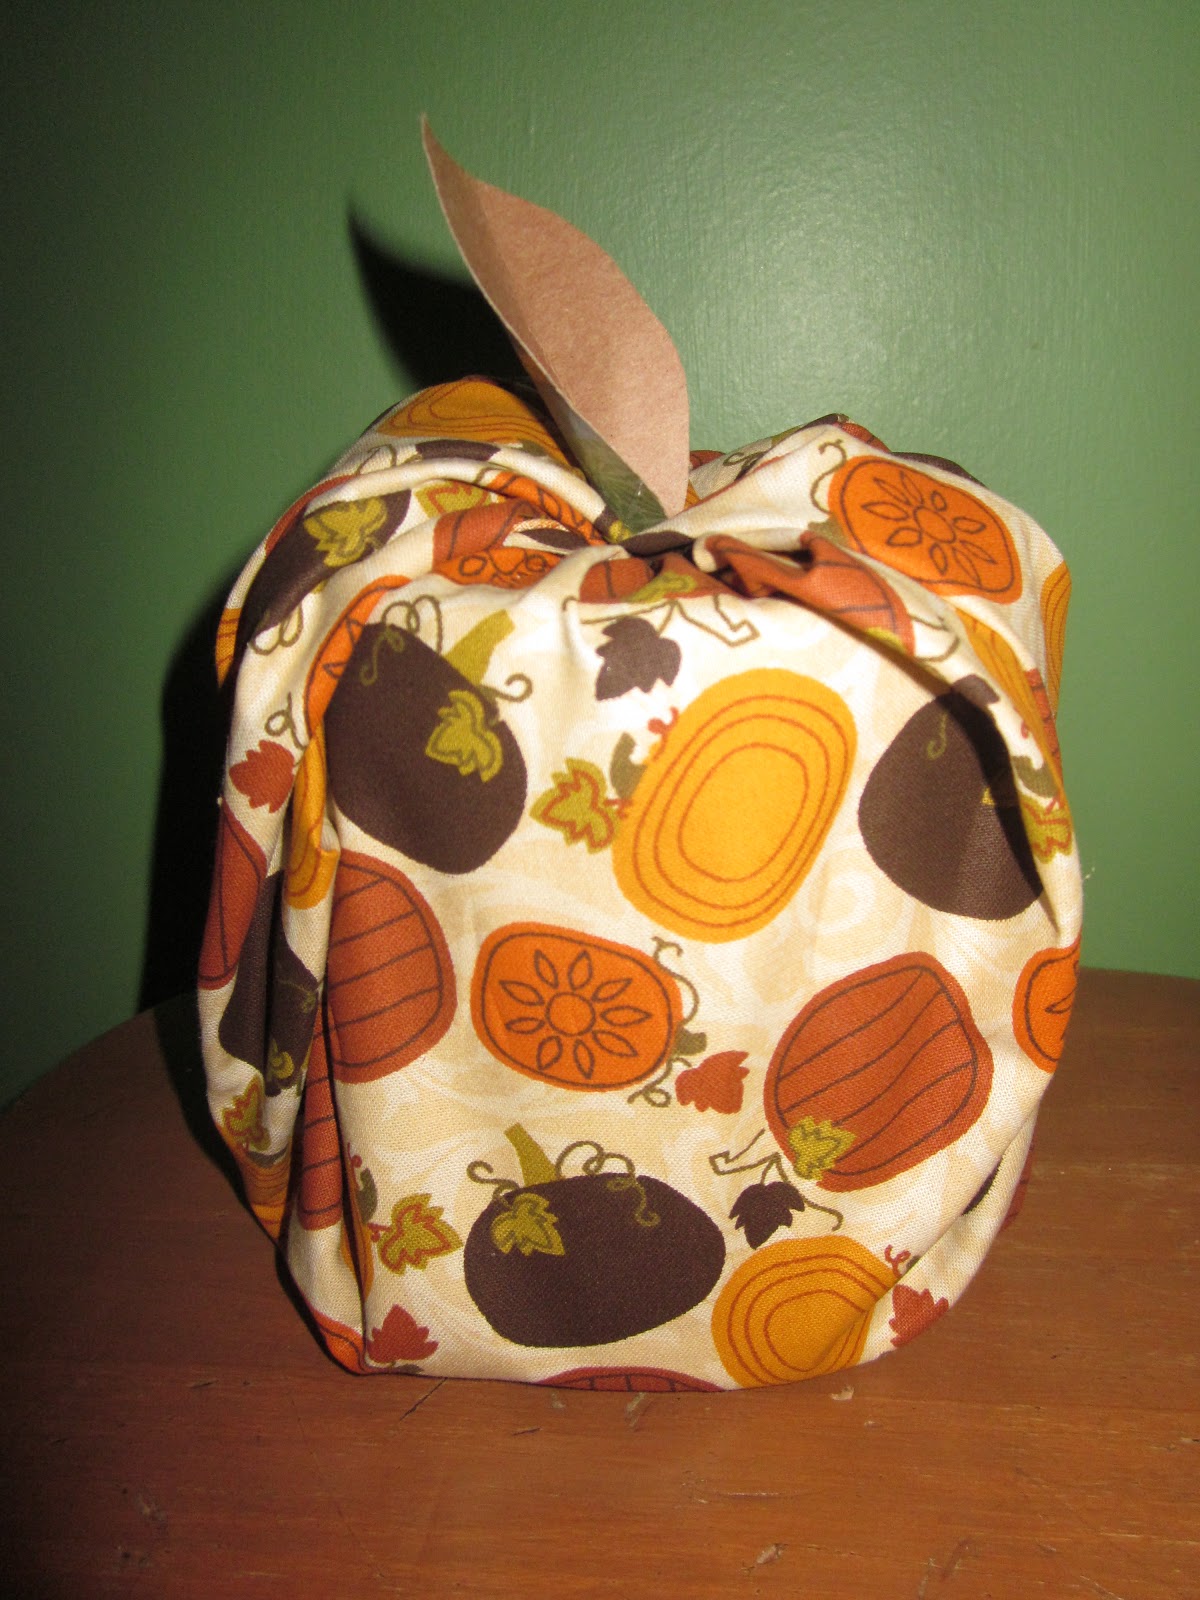
 One thing I love about my new MOPS group is that I always get to do a craft project at the end. (Bonus: I don't even have to come up with it or find the materials to create.) At the last meeting we made this really, really easy pumpkin out of a roll of toilet paper and a piece of fabric. (Yes, you read that correctly. It's a roll of actual toilet paper, not just the cardboard tube. That's a new one, right?) There was batting available for making a fuller pumpkin, but I decided to go with the basic pumpkin. This is so simple even a crafting novice can do it. Put your roll of TP down on your fabric and then bring up all the edges and stuff them into the center of the tube at the top. There were paper leaf shapes available, and we stuck them into the top and called it done. (See photo below.) After a few days of looking at this and thinking it didn't look quite "finished," I decided to add a stick from the yard to make a stem for my pumpkin. I hot glued the paper leaf to it because it kept falling out of my pumpkin. Lastly, I tied a bow with some twine. Raffia would have worked for the country cute look, too, but I had twine so that is what I used. I am happy with how it turned out. This is sitting up high on top of a green glass candle holder atop my kitchen cabinets with my other fall display items (cornucopia, pumpkins, apples, gourds, leaves) and looking just right for fall, however, I know where to look if we are ever running low on toilet paper...

{Before adding the stick and twine... It's just missing a little "something."}

Thursday, October 18, 2012

No Tricks, Just a Healthier Halloween Treat

Finding a healthy Halloween treat for Mia's class party turned out to be a tricky proposition. I thought if I just turned to the trusty Internet, I would find TONS of great ideas. Not so, but I did eventually come across this idea for mandarin orange cups made to look like jack-o'-lanterns, which I decided I needed to borrow. It really was the only remotely healthy snack idea I could find. Normally, we don't buy a lot of canned fruits because it is tricky to find them in juice or water instead of syrup, but I decided this was still better than cookies, candies, cupcakes, and so on. I am sure the kids are going to get plenty of those treats on Halloween. Before shopping, I saved all the coupons I could find and then ended up purchasing the Kroger store brand with my catalina coupon since it was the best deal. The best part about this craft is that it's very simple because all you need are mandarin orange cups and a black Sharpie marker. If you can draw a basic jack-o'-lantern face, you can do this project. If you are feeling creative, you can even make different faces for all the mandarin orange cups. If I weren't worried about costs, or if I knew we would have very few trick-or-treaters, I would even consider making these to pass out for Halloween treats. For now, though, I hope Mia's kindergarten friends enjoy their healthier classroom treat.

{I am excited for my healthy and cute classroom treat!}


Friday, October 28, 2011

Jar-o'-Lanterns

I love these cute glass jack-o'-lanterns from Disney FamilyFun Magazine so much that I wish I had thought of them myself. Here's why: 1) They are quick and easy to make. 2) It's a nice way to re-purpose something that might otherwise get thrown away. 3) If you like to do crafts, you probably have the materials on hand already (glass jars, masking tape, scissors, paintbrush, orange acrylic paint-- or blend your own with yellow and red if you don't have orange). 4) The end result is super cute. (Obviously, this is the most important thing in a craft project.) You and your kids can whip up several of these in time for Halloween.

We attempted fancier faces than the directions suggested, and I think they came out fine. You, of course, can stick with simple triangles if you prefer. Mia told me what she wanted and I did my best to cut the shapes out of masking tape. I think having a variety of sizes and types of jars makes a nice little display, just like real pumpkins (although we haven't even carved ours yet). Not having any of those flameless tea lights available, I used regular tea lights. While the fake kind would probably be safer since they aren't a fire hazard and they wouldn't make the jars get hot, the way I see it, these are glass jars, and I don't plan to keep them where kids can get at them anyway. (This is really my only complaint with this craft; it's intended for small children, and realistically, glass isn't an ideal material for little ones to work with. That said, I know Mia well enough to know she could handle it at age 4 1/2 so I wasn't concerned.) So, for the photo, I took them out to the porch and then put them back on the counter where they have been since Mia made them a few days ago.

Thursday, October 13, 2011

Autumn Sun Catchers

{Apple Sun Catcher by Mia, Age 4}
 We started making sun catchers back in March and have continued through the summer and into the fall. I don't see why not. Sun catchers aren't just for spring and summer. Shapes we tried included an apple, a pumpkin, Indian corn, and an oak leaf. I like doing sun catchers because they are simple enough for toddlers to do provided that you have done some gotten your materials cut in advance.

Materials:
{Leaf Sun Catcher by Mia, Age 4}
  • pencil 
  • clear tape
  • scissors
  • clear contact paper
  • construction paper
  • tissue paper 
  • paper trimmer (optional)
  • hole punch (optional)
  • yarn, string, ribbon, etc. for hanging (optional)
Directions:
  1. If you are making a shape that is symmetrical, fold your paper in half like a hot dog before drawing and cutting out your shape. This makes it go a bit faster, and hopefully it creates less frustration, too. If you are making a shape that isn't symmetrical, simply draw (or trace) your shape and cut it out on two pieces of paper. Tip: If you are using two pieces of paper, you will need to make sure they stay together so that you get identical fall shapes.
  2. Cut two pieces of clear contact paper (I used both a paper trimmer and scissors for this.) so that they are 1/4 inch larger than the construction paper all the way around. Tip: Do not remove backing from contact paper until you are ready to use it.
  3. Adhere one piece of paper to the clear contact paper so that there is a border of 1/4 inch all around the paper. Tip: Slowly peel the contact paper away from the backing as you smooth the construction paper down onto the contact paper. This way you don't end up with "bubbles."
  4. Have your child stick tissue paper squares onto the contact paper fall shape until it is filled. (Mia has created her own technique for filling in small spaces: crumpling up the tissue paper into balls. It makes the sun catcher a bit bulkier, but it does work, and I think it adds a bit of visual interest to the design.)
  5. Layer the second piece of construction paper on top of the first, making sure that the fall shapes line up.
  6. Add the second piece of contact paper over the top, smoothing it down as you go. Trim away excess if desired, but don't trim too much or the sun catcher will not stay together. 
  7. You can display your sun catcher in a window using clear tape. Another option is to use a hole punch to make two holes near the top, thread some ribbon or yarn through the holes, tie it off, and then hang your sun catcher.
{Pumpkin Sun Catcher by Logan, Age 2}

{Indian Corn Sun Catcher by Mia, Age 4}


Friday, October 29, 2010

Jack-o'-Lantern Pizza

Last night's dinner was a family project.


I saw a picture of something similar made by my friend Katie last year, so I decided we would try making our own jack-o'-lantern pizza for dinner. It turned out pretty cute and tasty.
Materials Needed:
  • pizza crust mix (We used Betty Crocker)
  • pizza sauce
  • shredded mozzarella cheese
  • pepperoni
  • pizza pan
  • kitchen scissors
  • flour
  • rolling pin (optional)
Directions:
  1. Prepare pizza dough according to package directions.
  2. Flour counter top and hands before working with dough. You may also want to add some flour to the dough so it is easier to work with. (We like to use a floured rolling pin to form the dough into the shape we want, picking dough up often so it doesn't stick to the counter.)
  3. Add dough to pizza pan and reshape as desired.
  4. Top with pizza sauce.
  5. Add shredded cheese. (We use mozzarella, but there are pizza cheese blends you can also try.)
  6. Cut pepperoni to look like eyes, nose, and mouth. (We were running short on time and only cut a triangle nose. The rest of the pepperoni we used in its original round shape.)
  7. Decorate pizza with pepperoni to form the jack-o'-lantern's face.
  8. Bake according to package directions. Enjoy!
Note: If you want to save time, you could use a frozen cheese pizza and add pepperoni.

Wednesday, October 27, 2010

Pumpkin Seed Pictures

Materials Needed:
  • dry pumpkin seeds
  • paint (various colors, depending on your design) 
  • paintbrushes (not needed if you use a zippered baggie)
  • paper plate or bowl (or zippered baggie) 
  • wax paper
  • paper
  • glue
  • Witch drawn by Mama and filled in by Mia, age 3 1/2
  • pencil
Directions:
  1. Paint pumpkin seeds. You can do this on a paper plate or in a shallow bowl. (You could also put the seeds in a zippered baggie along with paint and shake it up. I felt that this was the most efficient and least messy of the ways that we tried.) Lay seeds on wax paper to dry. (We used a separate piece of wax paper for each color, which worked well.)
  2. While pumpkin seeds are drying, draw your design on paper.
  3. Glue seeds onto paper to fill in the design (in the style of a mosaic).
I made my jack-o'-lantern on black paper and skipped filling in the eyes, nose, and mouth.
Note: We tried coloring the seeds with markers instead of paint for a less messy option, but regular markers did not work well on the seeds. Permanent markers may work better, but we didn't try this.
This craft was inspired by this site.

    Monday, October 25, 2010

    Mummy Jack-o'-Lantern

    I found this idea in a book called Halloween Pumpkins & Parties: 101 Spooktacular Ideas, published by "Better Homes and Gardens."


    Materials:
    • smooth white pumpkin
    • carving tools (or knife and spoon/ice cream scoop)
    • 2 black marbles
    • 2 flat toothpicks
    • pen (I used a pencil)
    • adhesive that will work on glass
    • candle
    • newspaper (optional)
    Directions:
    1. Set pumpkin on newspaper and cut off top of pumpkin.
    2. Scoop out seeds. If desired, save for roasting or another project.
    3. Cut two eyes, making sure they are large enough to hold the marbles. Cut a nose and a mouth. Working your way around the pumpkin, carve additional curvy pieces to look like mummy wrappings. (If you are concerned about getting your design right, draw it with a pencil or pen before starting to carve the pumpkin.)
    4. Insert a toothpick into each eye hole. (Mine were too long, so I shortened them by breaking them.)
    5. Using a strong adhesive (I used Super Glue), glue a black marble to each toothpick, making the eyeballs. (I didn't have black marbles so I used clear glass pebbles, which I colored the back side of using a permanent black marker. I think these might have been better, anyway, since they have a flat side, which made them easy to glue to the toothpick. You can get these at any craft store.)
    6. Add a candle (or flameless "candle"), replace the top of the pumpkin, and you are set to spook some trick-or-treaters! (Use caution if using a candle.) 

    Tuesday, October 12, 2010

    Paper Bag Pumpkins

    Paper Bag Pumpkins by Mia, Age 3 1/2
    Here is a cute and simple craft for kids of all ages. You can easily make a whole patch of pumpkins (or jack-o-lanterns) to decorate your home for Halloween! I expanded this craft idea from the following: http://www.crayola.com/crafts/detail/paper-bag-pumpkin-patch-craft/

    Materials Needed:
    • paper bag
    • orange crayon
    • black construction paper
    • green construction paper
    • green curling ribbon
    • newspaper
    • glue or tape
    • scissors
    Directions:
    1. Using an orange crayon, color the paper bag, leaving about 2 inches at the top plain brown. (Removing the paper from the crayon and using the side of the crayon makes coloring large areas go faster.)
    2. Crumple newspaper and use it to fill the orange part of the bag.
    3. Twist the brown section of the bag to form the stem. 
    4. Cut leaves from green construction paper and glue (or tape) them to the stem.
    5. Cut a length of green curling ribbon, tie to stem, and use blade of scissors to curl the ribbon. (If you don't have curling ribbon, you could cut strips of green paper and use scissors to curl it OR use pipe cleaners.)

    Wednesday, October 6, 2010

    Jolly Jack-o-Lantern Craft

    By Mia, Age 3 1/2 (felt cutting by Mama)


    Materials Needed:
    • paper plate
    • orange paint
    • glue
    • scissors
    • black felt
    • white crayon
    • paint brush
    • tape
    • brown or green pipe cleaner
    Directions:
    1.  Paint paper plate orange.
    2. While paint is drying, use white crayon to draw eyes, nose, and mouth on black felt. I had Mia tell me what shapes she wanted, how many teeth in the mouth (and what shape) since she struggles with making shapes and cutting them the way she wants. (You could also use black construction paper or craft foam.)
    3. Cut out felt shapes.
    4. Glue felt to paper plate, crayon side facing down.
    5. Twist pipe cleaner around your finger so that it looks like a spring, leaving about an inch straight. 
    6. Tape straight part of pipe cleaner to the back of the paper plate.