Showing posts with label FamilyFun Magazine. Show all posts

Thursday, April 24, 2014

Easter Eggs for the Birds

I found this idea in the the April 2014 issue of FamilyFun magazine (page 36) and it reminded me of the hanging birdseed treats we had made over the winter. The recipe includes the same ingredients, but in slightly different proportions. I had the idea to make these eggs into hanging treats, but the embroidery floss didn't stick in them very well because when we opened the plastic eggs to take the treats out, the embroidery floss came out as well. Not a big deal, though. We just found places to set them and make an Easter egg hunt for our feathered visitors. (I can't help but wonder if this would have worked with the recipe used for the hanging birdseed treats? We may have to try it some other time.)

{An Egg Hunt for the Birds}


Materials:
  • 2 packets of unflavored gelatin mix (We used Kroger brand.)
  • 1/2 cup hot water (I used boiling water.)
  • 2 1/2 cups birdseed
  • cooking spray
  • 12 plastic Easter eggs

Directions:
  1. Dissolve the gelatin in hot water.
  2. Mix in the birdseed. (Kids can help measure, pour, and stir.)
  3. Spray the insides of plastic Easter eggs well with cooking spray.
  4. Spoon the birdseed mixture into the eggs and press down firmly, filling both sides of the eggs. (Kids can do this step.)
  5. Snap the eggs shut and let them set overnight. (We placed ours on a cookie sheet and left it in the refrigerator like we did with the cookie cutter birdseed treats mentioned above, but this may not be necessary.)
  6. In the morning, remove the birdseed eggs and place outside where you can watch the birds enjoy them. (Kids will love helping with this step!)
{Happy Easter!}


Don't forget to head over to my review and giveaway to win a free blank book from Path Publishing. (One book that you can win is the Kidisms journal, where you can record all the cute and quirky things that the kids have to say.) The giveaway goes through April 28, 2014, so you still have time to enter!

Friday, February 21, 2014

Valentine's Projects - 2014

I've recently chatted with a couple other people about how I do not make the kids' valentines. (That may actually surprise you since I like to make just about everything else!) For what they are, though, and considering how little time children actually spend appreciating them, this is not worth it to me. (I do understand what a friend said, though, about a child wanting a certain theme or character that wasn't readily available. It was smart of her, in that case, to make them herself!) For my kids, I just run out after Valentine's Day,-- when stuff is on clearance -- and pick up one or two boxes that I know they will like to set aside for the next year.

This year, for example, Mia had a choice of Disney fairies or princesses and she selected the fairies. (I found her a box of princess valentines that came with suckers to use next year. I figure suckers don't really go bad. Any other candy I would worry about, but suckers should be fine.) Logan chose Cars, so he will have either the Toy Story ones or the Hot Wheels that I just picked up the other day. They still get choices, but I don't have to spend 20 minutes in the store while they debate among a million options. So far, it has worked for us. (And for the record, I'm not knocking anybody's choice to make the cutesy homemade kind. I have seen some really awesome ones! It's just not something I care to do as long as my kids are fine with the current system.)

That said, we did do a few Valentine's Day related crafts this February. Mia's teacher sent home a note a few days before their class party that said they needed to have a valentine holder of some sort. I was trying to figure out what sort of box to use when I remembered the cute felt envelopes featured in the February issue of FamilyFun magazine. We had everything we needed at home, so this was a good choice. I showed Mia the picture, and she loved it, so it was decided. I downloaded the Special Deliveries Envelope pattern and then traced it onto some pink felt that I had left over from making the poodle skirt. (My only complaint is that they don't tell you how much felt you need, so let me tell you. I measured it to be about 41" by 28.5" so allow a bit extra, just in case my measurements are slightly off.)

{Finished valentine holder is 91/2" x 141/2"}


For embellishment, we added a red felt heart, and Mia selected 2" blue self-adhesive felt letters. (We didn't have a "M" so she decided an upside down "W" would work in its place.) I skipped the step for cutting holes and threading ribbon through to make this a chair back valentine holder since I wasn't sure if they would fit the chairs at school, and this seemed like unnecessary effort. It turned out great, and she was very happy. I was also glad that it could easily fit inside her backpack for the bus ride home, which would not have been the case if we had gone with a box of some sort!

{This is the great heart garland!}


As Valentine's Day approached, Mia felt that we needed some extra decorations and I showed her how I had made some heart-shaped chains inspired by this blogger's photo that I had seen on Pinterest. Her directions are great, and I wish I had actually read them first. One important step that I missed was starting with folded paper to get that nice edge at the bottom of the heart. I just gave Mia some 1" strips of red and pink construction paper and showed her how to invert them before stapling (as opposed to overlapping them for traditional chain links). Then, I suggested that she pinch the bottom segment to form the base of the heart. Mostly, she skipped that so her hearts are rounded and sweet-looking instead of crisp and precise. She was happy with the results, so I couldn't have cared less. Besides, they looked kid-made, and that was the point! Mia quickly used up the red and pink and asked me to make more strips out of purple and blue paper. By the time she was done, we had a garland that draped nearly all the way from one side of the dining room to the other. (Some of the chain links were regular circles interspersed among the hearts.)

{Close-up of Heart Chains}


Today was yet another snow day. (Well, technically, it was an ice day.) Anyway, I had some project ideas in mind and one was stamped hearts from toilet paper tubes, which came from this blogger. (I had wanted to try this before Valentine's Day, but then Mia's school needed lots of TP tubes for science night and I sent in all that I had at the time, around 50!) Mia was not interested, but Logan happily created some stamps with the heart-shaped tubes that I made. We had two tubes to work with since I no longer had a big stash of them: one to dip in pink paint and one to dip in purple paint, both of which I poured onto a Styrofoam tray. These stamps were quick and easy to make using the directions found on the Rust & Sunshine blog. My only suggestion would be that you could also cut the tubes in half to make more if you wanted to do this with more kids but were short on tubes.

{Art in Process...}


{Finished Stamped Art}

{Close-up of Tubes, After Stamping}

Tuesday, July 16, 2013

You Put Your Right Foot In...

{I didn't realize how many pairs of shoes he had...}

For little ones who like to put on their own shoes but who struggle with getting them on the correct feet (read: all toddlers/preschoolers), here is a quick and easy solution that I picked up by reading FamilyFun magazine (June/July 2013, page 112b). Just take a permanent marker (I used a black Sharpie) and draw arrows on the insides of the shoes. Make the left shoe's arrow pointing right and the right shoe's arrow pointing left. Now, when the shoes are correctly laid out in front of the child's feet, the arrows point toward each other. Brilliant, simple, cheap, quick, and absolutely no-skills-necessary = the perfect parent hack! This works for all types of shoes and boots. And, the fact that the you see results right away doesn't hurt either. I only wish I had known about this when Mia was younger.

Monday, May 20, 2013

DIY Window Clings

About three weeks ago I came across a book published by FamilyFun called Wintertime Fun: Warm and Cozy Treats and Crafts. It was in the Wal-Mart clearance bin for $1, and I was sure it would contain enough good ideas to be worth that price, so I snagged it. The first thing that Mia honed in was making our own window clings. Being a winter craft book, the idea was to make glittery snowflakes, which is pretty cool, I will admit. However, I didn't really want to add any snowflakes to our windows at the end of April. So, I encouraged her to make other shapes, and she ended up with free-form hearts and butterflies that sort of resemble those things. She seemed a bit disappointed by this.

I then went back to Wal-Mart and purchased a greater variety of puffy paint colors. I ended up selecting a 12-pack of neons/brights for $9.99, which is not all that expensive, if you thing about how many different projects these will be used to make. In the future, I want to try this again using glue and food coloring or glue and paint, but for now, here is how we made these with store-bought paint.

I had the idea window clings might turn out more the way she hoped if we first started with templates. Over this past weekend, I printed off a few templates including a monarch butterfly, a horse, and some ladybugs, and we tried again. One good thing about using templates, besides the obvious one of saving yourself the time needed to hand-draw something, is that you can paste them into Microsoft Word and then re-size them as desired.

Filling in the forms made for larger, more colorful window clings. They don't look perfect, but being home-made, I don't expect them to. There are some areas where the paint didn't cover, so there are little gaps poking through once they are in the window, but I think this is okay. It's surprisingly simple to make your own window clings, and I see this having lots of possibilities for party decorations, party activities, kids' room decor, Mother's Day gifts, rainy day fun, and so on. Plus, they're completely personalized, which is always a bonus! Of course, we can always make those glittery snowflakes, too, just not in the spring...


{My ladybug, Mia's horse, Mia's free-form shapes}
Materials:
  • puffy paint
  • wax paper (cereal box liners work well)
  • scissors
  • template (optional)
  • Sharpie marker (optional)
Directions:
  1. If using a template, either print one from the Internet or find a coloring page or clip art to trace. If you want to make free-hand drawings, you can just skip this step.
  2. Trace your template or draw your design onto wax paper using a permanent marker such as a Sharpie. I did this step for Mia since the horse had a lot of details and small areas. Tip: We used cereal box liners, and they worked great. You can't beat free supplies! Tip: You may want to trim your wax paper into smaller sizes to fit more window clings. Tip: Remember that permanent markers will stain clothing, so dress kids accordingly if they will be using Sharpies.
  3. Fill in your outline or the entire shape using puffy paint applied to the wax paper or cereal box liner. You want to make sure all of the lines of paint are connected or the window cling will not stay together. (You can probably still make it work in the end, though, so don't stress over this too much. My ladybug's antenna tore off, but I just stuck it back together on the window, and you would never know the difference.) At the very least, your lines of paint should be 1/8 to 1/4 inch thick. Tip: Puffy paint will also stain clothing, so be mindful of this before starting.
    {The final product looks a bit different, but it's all good.}
  4. Allow paint to dry completely. Drying times will vary according to how much paint has been used. The first batch that Mia made by drawing free-hand shapes were left to dry overnight and this was fine. My filled-in ladybug was also dry when left overnight. However, Mia's horse had super-thick globs of paint on it and it needed another day to dry thoroughly. Don't rush this process or you will make a mess.
    {This horse took about a day and a half to dry.}

  5. Carefully, peel paint away from wax paper (or cereal box liner) and adhere to a window. Yes, they really do stick! The original ones have been up for three weeks and have shown no signs of falling down. Cool, huh?


Friday, February 8, 2013

Feed the Birds...

Anybody else hear that old lady from Mary Poppins singing now? Okay, good. My work here is done. But seriously, this mama decided that a good snow day activity would be making bird feeders. Since it's me we're talking about, good old-fashioned pine cones were not enough. We had to make three more varieties in addition to the pine cone bird feeders. So, I think you can trust me when I tell you which ones are easier and less messy to make. I have ordered them from my personal favorite to my least favorite.

#1 Here is my top pick for a simple, mess-free bird feeder project that even a young child can do. We learned about this one from the story time lady at the library, and it is too good not to share. All you need is a pipe cleaner and some Cheerios or similar o-shaped cereal. Have the child string the cereal onto the pipe cleaner, leaving at least 1/2" on each end, twist it together to make a ring, and hang on a tree branch.


#2 The next best option is the cardboard tube bird feeder, which I had seen on Pinterest some time back. I took a cardboard tube that was left over from an empty aluminum foil package and used a serrated knife to cut it into two pieces (mainly because I have two kids, but also this makes it easier to work with since it was a tad on the long side). I gave each of the kids a piece of wax paper, a small bowl of peanut butter, and a knife to spread the peanut butter on the tubes. After I had to help both of them, Mia informed me that they had done this last year at preschool, but they had rolled the tubes in peanut butter on a plate. Had I known that beforehand, I would have had them do it that way. Once the tubes were coated with peanut butter, I gave them some birdseed to sprinkle/roll onto the tubes on a plate. This was a bit messy, but still very doable, especially now that I know the rolling trick. Plus, most people can scrounge up an empty toilet paper tube or paper towel tube without too much searching.

{Bird Feeders from left to right: pine cone, cardboard tube, cardboard cut out}

#3 Here is an old stand-by that I am sure everyone remembers doing as a kid: the pine cone bird feeder. This one is not at all complicated, but it is pretty messy. Mia tied her own yarn on first, and I tied Logan's yarn onto his pine cone. Again, my kids, ages 6 and 3, were frustrated by using a knife and these don't roll the best. Plus, the yarn got gloppy with peanut butter. We would not have even used pine cones if Mia hadn't located the pine cones that I had stashed away months ago in the event that we needed them for a craft project. (The pine cones would have all been buried under the new snow so you do need to plan ahead for this one.) So, this is definitely not the best option out there for home-made bird feeders.

#4 The last one is not something I would try again any time soon, to be perfectly honest. It was inspired by the latest issue of FamilyFun Magazine ("Birdseed Cafe" on page 18). They used corrugated cardboard cut in a star shape, with a circle cut in the center. Mia chose to make a (thankfully) simpler circle, which she did all on her own by tracing a bowl and cutting it out. We used a lighter weight cardboard, somewhere between boxboard and corrugated cardboard, but I don't know if there is a name for it. Logan chose a square, which I cut for him. We used baking sheets to hold the cardboard while I spread one side with peanut butter and then the kids sprinkled them with birdseed. Then, we flipped them over, I did the peanut butte again, and they did the birdseed. When we hung these outside, they immediately started spinning in circles since it was windy. Maybe the heavier cardboard would have been a better choice, but I still don't see how the birds are supposed to eat from this very easily. I guess that is why they cut a hole in the middle, but that seemed like a pain to me. I wanted a project the kids could mostly do on their own, and this is not it. The best tip I got from this one was using the baking sheets to help contain the mess.

Thursday, February 7, 2013

Groundhog Day Goodies


Did anybody else see this idea in the latest issue of FamilyFun magazine (page 30)? I thought these Punxsutawney Phil pudding cups looked really cute. I already had some pudding mix and a bag of mini Oreos on hand that I had gotten when things were on sale of couple of weeks ago. (Mia has been wanting to make dirt cups, and we haven't done it yet.) Then, I picked up the Milano cookies yesterday while Logan and I were doing our weekly Kroger run. They were 1/2 off, so I figured that it was meant to be. Mine didn't come off quite as nicely as the magazine photos, but truly what recipe ever does? Also, I was a few days behind schedule, so what difference did it make at that point if they were not perfect.

I did make a couple of changes. The first couple were just common sense in my opinion. Instead of store-bought pudding cups which taste like what? Really, I am asking you because I don't know what they are supposed to taste like, it's a flavor I can't quite place, but it is surely not chocolate. Also, I make my pudding with whole milk. I know, I know, all you health-conscious types are going to hate me for saying that, but it makes the best pudding, hands down. The cookies crumbs are the mini Oreos, which I put in a baggie and crushed up with the base of a metal water bottle, not the chocolate wafers suggested by the magazine. Again, why would I purchase something that tastes like paper. Oreos are not exactly healthy, so I buy them only about once per year, but really, wafer cookies are just blech, so I wasn't about to use those.

I had sliced almonds and peanut butter chips on hand, so that was fine. One thing I will say, though is that cutting the almonds is not as simple as they make it sound. Getting the tops cut off for the semi-circle ears is not a big deal, but the direction "trim another almond into teeth as shown" should have a parenthetical addition that reads "easier said than done."

My biggest downfall, it seems, was ignoring the direction to use chocolate frosting for gluing the face together. Instead, I decided I would try piping peanut butter from a baggie. I don't know if it would have worked better with regular peanut butter, but I have been buying only natural peanut butter for the past few months, and it was a bit runny. Since I didn't have the chocolate frosting, I used the peanut butter to glue on mini chocolate chips for the eyes and nose. The faces kind of melted downward after being assembled. I told my husband I was serving "Franken-gophers" for dessert, which he found amusing. So, my Groundhog day treats didn't look magazine worthy in the end, but they did taste really good, and you have to admit, that is what really matters in a dessert.

Monday, September 10, 2012

DIY Pull-String Lightning McQueen Pinata

This is the second in a series of posts about the crafts projects I made in preparation for Logan's 3rd birthday party, which had a Cars theme. I had seen an article in Disney FamilyFun magazine that showed great crafts to make with cardboard, including a castle-shaped pull-string pinata. ("Crazy for Cardboard," p. 55, March 2012) I took that thought and combined it with this basic plan for making a car from a cardboard box, and amazingly, I created a very cool pull-string pinata that looked like Lightning McQueen.


Materials for Basic Box Car:
  • cardboard box (mine was 14.25" x 9.25" x 5.25")
  • pencil
  • scissors (or box cutting tool)
  • tape (I used both clear packaging tape and masking tape)
Additional Materials for Lightning McQueen Pinata:
  • acrylic paint (red, white, yellow, orange, turquoise)
  • black Sharpie marker
  • ruler
  • Mod Podge
  • clip art/printouts of decals, tires, etc.
  • newspaper to protect work surface
  • paint brushes (foam works well for Mod Podge and large areas to be painted)
  • Styrofoam tray/s to hold paint/Mod Podge (plates or bowls also work)
  • red curling ribbon
  • clear tape
  • pinata fillers (I used Cars themed toys and crayons and candy from Dollar Tree.)
Directions for Making Basic Box Car:
  1. Flatten your box. Draw the basic shape on one of the long sides of the box. There are two sections you will cut out: the front (hood and going up the windshield) and the back end (with slant going up for the tail fin). Do NOT cut the front end of the car (short box side), top of car (which meets up with another long side), or the back of the car (other short side).

{After cutting out sections from both sides of car}

2.  Flip the box over and using a pencil, trace around the areas you have cut out to make the car shape. Repeat cut-out process from step 1.

3.  Once the top of your box car shape is formed and secure, cut a "trap door" into the bottom of the box. I just used the inside edge of one of the flap and then cut 3 sides to form a square shaped flap. Glue or tape one piece of curling ribbon to the trap door. Do NOT tape the bottom together yet.

{Close-up of "trap door"}

4. This next step is harder to explain. I folded, shaped (bending a bit at times when necessary), and taped as I went along starting with the tail fin, then the first side, the second side, the top center (where I had to overlap the box flaps somewhat to get them to fit for some reason) to form a 3-D car that looks like the diagram. Note: There was one section that didn't fit together (from where I had cut pieces out) so I had to cut a strip from the extra part of the box, tuck it under the rest of the box, and tape that into place.

{Starting the process of taping the box car together}


{Close-up of tail fin as it was taped together}

{Front view after being taped}
{Race car box all formed and taped!}
Directions for Decorating Lightning McQueen Pinata:
  1. Paint the paint with red acrylic paint, leaving the area for the eyes blank. Allow paint to dry and apply additional coats as needed. (It took about 3-4 coats to get good coverage over some of the writing on the box.)


2.  Once the base coat of paint is dry. Work on the facial details. I used a pencil to draw the eyes and eyelids freehand. Then I traced a bottle cap twice for the eyeballs, after which I traced a button twice to make the pupils. I used white acrylic paint and turquoise acrylic paint to fill in the eyes. Once it was dry, I outlined them and filled in the pupils with black Sharpie marker. I added touches of white paint to the pupils and moved on to the mouth. Again, I drew it freehand with a pencil. I filled in with white paint for the "teeth" and once the paint was dry, outlined and filled in the rest with black Sharpie. The headlights I drew freehand, then I painted the side parts with yellow acrylic paint and the front with white acrylic paint. After that dried, I outlined with black Sharpie. The final detail (other than touching up paint as needed) was to draw the hood outline with the black Sharpie. Once this was all done, I felt like it really had the personality of Lightning McQueen and the rest was just details.


3.  For Lightning McQueen's tail end, I drew the tail lights and filled them in with orange and white acrylic paints, and then used the black Sharpie for outline work once the paint dried. To make the design on the back I used a pencil and a ruler. The line in the center is about 3 1/2", the ones on either side of it are about 3 1/4", and the outside ones are about 3". They are staggered in a sort of "V" formation. I drew over them 2-3 times to make them thicker and made triangular shapes on the tops and bottoms to give it more definition.

 4. Okay, I promise this is the icing on the cake, and truly not hard at all. The decals are what makes this pinata look finished, and I found everything online and adjusted sizes as needed in Microsoft Word before printing them. For tires, I printed 4 of this image and cut them out. Here is the Rust-eze logo I used for the hood. This is the Rust-eze logo for the tail fin. (It requires a little bit more intricate cutting out.) I used a this number 95 for the top of Lightning McQueen after enlarging it. I enlarged this this lightning bolt for one side of the car, printed it, and cut it out. For the other side of the car, I didn't want it to be backward, so I flipped it in Microsoft Word and printed it out. I knew the 95 would be backward, so I printed off another plain number 95 and cut it out. I had to cut out some of the extra yellow and orange background from the lightning bolt and paste it all together to make it look like the lightning bolt logo (not perfectly but close enough. I used Mod Podge to adhere all of these printouts and then applied extra Mod Podge over top of them all to ensure a good protective seal.

{Top view}

{Decorating is done, and it just needs to be made into a pinata.}

5. Punch holes on either side to allow a string for hanging. (Don't make the mistake I made of trying to do this after filling your pinata.) To make holes, I decided on placement and then pushed a push pin through, following that with a pencil to make the holes wider. Then I knotted one end of a length of curling ribbon, reached inside the box, threaded it through making sure that the knot caught on the inside, brought the ribbon around the outside, threaded it through the other hole, and then knotted it off on the inside of that hole.

6.  Now add your extra strings for the pinata. (These are not actually attached; only the one string from before is actually attached to the trap door, so only that one string can pull it open.) Make sure you have at least one or two strings per child (I think I made about 20) and cut them around 18-24 inches. Bundle several strings together and slip them into the box along the edge of the trap door so that an inch or so will be held inside -- just enough to keep them in place. I had to do this three or four times to get them all of my ribbon lengths in. Then, carefully close the trap door to make sure that all of the ribbons are inside.

7.  Fill the pinata and then seal the trap door well enough to hold the treats, but not so well that it won't get pulled open. I used clear packaging tape for this. You are now ready to hang the pinata and have some fun. (Brett hung this one from our swing set.)


Here is the pinata after it was opened. Everything went really fast, and I didn't get too many pictures. At least it was nice to know that after spending approximately 3 hours on this project, it wasn't going to get smashed with a bat. Logan loved his pinata, and now he has something that can "live" in his bedroom and remind him of his fun Cars party.


Monday, July 16, 2012

Play with Your Food

I have been out of sorts today. I returned from a trip to the hospital feeling a bit grumpy because the tests should have given me answers, but instead I only have more questions. The one good bit of news that I have to keep reminding myself is that if they couldn't find a solid mass, then it probably can't be the really scary c-word. Unfortunately, it wasn't a cyst either, so who knows what the painful lump is? I have to follow up with my doctor tomorrow and go from there... Anyway, I was grouchy with the kids (which was pretty unfair to them) and so I tried to make up for it by serving a fun lunch. They're very forgiving, so I think we're good now.

{Make a watermelon sandwich: 1) Cut a piece of bread into a wedge. 2) Spread on strawberry jelly. 3) Add raisins for "seeds." 4) Cut green grapes in half and arrange to make the "rind." 5) Serve to a couple of cute kids. (Don't be surprised if they pick off the raisins and say, "eww." It doesn't stop me from trying to serve raisins every now and then.) Thank you, FamilyFun magazine for a yummy idea!}

{And now, have an "octapple".}

{Isn't it cute? I made one for each kid. 1) Cut a granny smith apple in half. I cut out the seeds and inside stuff as best as I could. 2) Arrange more halved green grapes to me the tentacles. 3) I used two dollops of Cool Whip for the eyes (since I didn't have a mini marshmallow on hand). Then I topped the Cool Whip with two mini chocolate chip eye balls. 4) Spread 6 mini chocolate chips with peanut butter to adhere the mouth. 5) Serve to a couple of cute kids. (Don't be surprised if they won't eat the green apple. It is tart, after all.) Thanks again, FamilyFun magazine.}


Thursday, July 12, 2012

Red, White, and a Little Bit Blue

So once again this summer, I feel like I am "behind" with my blogging. I know, it probably didn't affect too many people because I can't imagine too many people were worried by my lack of posts, right? And really, it's not that big of a deal because I have been busy doing what's important: making memories with the kids (and trying not to be a grouch in the process, if I am being completely honest, because sometimes I have all of these ideas and trying to do all of them and have fun at the same time ends up being kind of challenging at times.)

Also, in case anyone is wondering whey there haven't been more craft ideas lately, there are two reasons for this. The first one I mentioned. It is summer. We are enjoying life -- outdoors -- as much as possible. And the rest of the time? If Mia wants to do a "project," as she calls them, she comes up with her own almost every time, which is a welcome break, in a way. (And Logan does not like to get messy with paint and other crafty materials. Now dirt, sand, mud, ... totally another story. He's definitely a boy.)

Oh, and one more thing. I got my stitches out this morning so I am just now getting full usage from my left thumb (amazing how much I rely on that digit and never knew it until recently) after slicing into it with a serrated kitchen knife on July 3. I was attempting to cut a cantaloupe in half while apparently distracted by a couple of kids who were begging me to frost sugar cookies that weren't yet cool, and this was supposed to keep them occupied for a bit. This caused me to panic a bit. The first thing I did was call Brett to tell him that I might need him to come home a little early (it wasn't quite 3:30) since I cut myself and might need stitches. I was running it under water because I freaked myself out and couldn't think straight enough to remember what to do next. Thankfully, Brett reminded me to put pressure on it. See, that's why I keep him around, that and he is pretty good at folding laundry (even without being asked).

First, I tried a paper towel but it was sticking to the wound, so I spent the next half hour with a damp washcloth wrapped around the injured thumb, while continuing on with the important business of frosting star-shaped sugar cookies. Yes, I somehow figured out a way to hold a cookie in my bad hand and frost it at the same time. (Thankfully, it was my non-dominant hand that got hurt.) You didn't think I was going to let the kids down did you? So, Brett came home while we were finishing that up, and I was not nearly as worried once I realized the bleeding had stopped.

{These were supposed to have red popping candy on them like the ones in FamilyFun, but it turned out that the stuff we had at home was pink, so we just used red and blue sugars.}

Still, it didn't look the best, sort of purplish-reddish, and I wasn't really sure how deep it was so I wondered if it would get infected. So, I did what seemed logical at the time. I decided to do as many chores as humanly possible (three loads of laundry, dishes, cleaning the stove top, finally cutting that melon and putting it away, etc.) to see how this affected my day-to-day life. This, folks, is apparently how a stay-at-home-mom gauges the severity of an injury. I decided that getting it wet probably wasn't the best thing for healing purposes. Then, I showed my cut to Brett, and he informed me that it made him queasy just looking at it. So, obviously, I turned to my friend the Internet to determine the next course of action. When I Googled "how to tell if a cut needs stitches," two of the three first websites suggested that if I hadn't had a tetanus shot in over 5 years, I would want to get that and have the doctor examine the laceration at the same time to determine whether or not stitches were needed.

I decided I did not want to go to the ER to sit forever and wait while all of the crazy people who were undoubtedly setting themselves on fire (hey, it's been insanely dry lately, and fireworks are just plain dangerous, so of course it makes perfect sense for the state to legalize them this year...), so once I determined that the Urgent Care was open, that is where I went. I got there around 8:00 pm and was just leaving at 9:00 pm when they were closing. I will skip over the details of how I nearly passed out when I got the shot of lidocaine ... and just let you know that I was looking very festive for the 4th of July when I left (with two lovely blue stitches on my previously reddish thumb which was then wrapped in a yard or so of white gauze). Good thing I went when I did, because it turned out that they were closed the next day.

My sense of humor seemed to be intact during this ordeal. I remember apologizing about turning green and breaking out in a sweat, saying that I "always think I can do this." The nurse later asked me how much of the melon I had gotten cut, and I told her it was the first slice, and after I finally tasted it later in the night, it had turned out not to even have been worth cutting. Ha! I also remember telling her that I was glad that it had happened to me and not one of the kids. While walking out the door, I told the receptionist to have a nice holiday and thankfully didn't jinx us by informing her that I had gotten our holiday crisis out of the way early, so we were good, right? She agreed that we should be in the clear. (In an unrelated note, this was the last time I have had a break from the kids. I really know how to celebrate "me time," huh?)

After I got home, I thought it was a good thing that I had made and hung these paper stars before cutting myself.


The next day, I was determined to make these Lady Liberty crowns (from the June/July 2012 issue of FamilyFun Magazine), and fortunately, I was still able to do some crafting even with my thumb being useless. They turned out pretty well, too.


I was feeling ambitious after that, so I made these red, white, and blue strawberries using my Dove Chocolate Discoveries Chef Series white chocolate (with some help from the tempering unit). They looked good and more importantly they were very yummy.


Then, I made these red raspberry, strawberry, and blueberry parfaits for dinner. This was another idea from FamilyFun, but I couldn't find the starfruit for garnish, and ours aren't in fancy glasses. And mine look much messier. There is definitely a technique to this, but the article didn't tell what it was. The best we came up with was putting the Cool Whip into a baggie, snipping off the end, and piping in in. (I would have used my DCD pastry bag but then I would have had to wash it by hand and I wasn't really up for that with my injury, which I was trying to keep as dry as possible.)


At the fireworks, Mia gave us a running account of the names of the fireworks. So funny! Here are some of my transcribed notes. She mentions the "Cheer Colors," and then tells me that she already told me "all the kinds of fireworks," but after I asked her to tell me again (so I could try to get it recorded) she says that one is called a "Dribble Blop." She goes on to describe something "kind of like angels or fairies or something. It's just gold. It's beautiful!" The next part I caught was, "Wow! That was bright. That is called 'Bright Blossom.'" When I asked her to tell me about another type of firework she replied, "Well, the 'Puffball' ones are round and big." A bit later she says, "That was called a 'Gold Hanger'. I've never seen 'Gold Hangers' before." She concludes by saying, "That was a 'Cherry Tree.' I'm getting tired of telling you fireworks."

{How cute are we?}

{I had to include this one just for the look on her face.}

After looking at my thumb on Friday when I got to switch from gauze to a plain band-aid, I noted that it was red, white, and blue: white stripe where the band-aid had been, red "boo-boo," and blue stitches. So festive. And it was funny to see me at the beach, I am sure, with my latex glove secured with a rubber band which cut off circulation somewhat but did the trick for keeping the are dry. Fortunately, it healed well. I kept it amazingly dry despite a few showers, and one bath in cool vinegar water. I got sunburn in a few spots like my shoulder and upper thigh, and hilariously, parts of my tummy where I apparently did a lousy job of applying sunscreen. I was the only one in the family who had this problem so I will just go ahead and blame my injury and not the fact that it was the first time wearing a bikini in approximately forever. By the way, if you get a sunburn, a 15 minute soak in a lukewarm bath with 2 cups of apple cider vinegar really does help. I got that tip straight from Green Grandma's Vinegar Fridays. I think I took the glove off for this photo, but you can sort of see how I am holding it upward to prevent any possible wetness from Lake Michigan. So, it looks like I am giving a thumbs up for the fun we had with Daddy home for 5 whole days.


{Seeing these two together was my favorite thing about the beach.}

{Logan loved when Daddy picked him up...}

{Except that he kept losing his shoes!}


Wednesday, February 8, 2012

Rose Bouquet Print Project

{Bouquet by Logan, Age 2}
The inspiration for this project comes from the current (Feb. 2012) issue of Disney "FamilyFun" magazine ("Pretty Produce" on page 18). At first, we just made cards with the end of the celery stalk like the article suggested. Here's Logan's -------------------->
Then, after the kids started stamping all over the paper (which is fine, of course), I realized that we could take it a step farther and make bouquets. They're perfect for Valentine's Day, but would also make nice Mother's Day gifts.

Materials:
  • construction paper
  • tempera paint
  • Styrofoam tray to hold paint (or plate or bowl)
  • foam paintbrush
  • end cut from bunch of celery (Ours was about 2 in. long.)
  • cardboard (Ours was a cereal box.)
  • scrapbooking paper
  • pencil
  • scissors
  • glue
  • newspaper to protect work surface
  • optional items for decorating: rhinestones, pom poms, ribbon, etc.
Directions:
{Bouquet by Mia, Age 5}
  1. Pour a small amount of paint onto a Styrofoam tray (or similar). Dip paintbrush into paint and spread on the cut part of the celery. The child will stamp this repeatedly onto the paper to make a cluster, adding paint as desired. Tip: I think it looks nice if you make a few impressions before adding more paint because this gives variation in the color. Let paint dry completely.
  2. Draw a vase shape onto one side of an empty, flattened cereal box. Cut out. Trace this same shape onto a piece of decorative paper and cut out. Glue paper on top of cardboard. Let glue dry.
  3. Once painted flowers are dry, cut around the bunch leaving some colored paper border. Glue the flowers onto your cardboard vase. Another option would be to make stems from paper, pipe cleaners, or drinking straws. Affix to the back of the vase and then glue or tape the printed flowers on top of the stems.
  4. Decorate as desired. Mia added self-adhesive (a lot of) rhinestones and some pom poms.

Friday, October 28, 2011

Jar-o'-Lanterns

I love these cute glass jack-o'-lanterns from Disney FamilyFun Magazine so much that I wish I had thought of them myself. Here's why: 1) They are quick and easy to make. 2) It's a nice way to re-purpose something that might otherwise get thrown away. 3) If you like to do crafts, you probably have the materials on hand already (glass jars, masking tape, scissors, paintbrush, orange acrylic paint-- or blend your own with yellow and red if you don't have orange). 4) The end result is super cute. (Obviously, this is the most important thing in a craft project.) You and your kids can whip up several of these in time for Halloween.

We attempted fancier faces than the directions suggested, and I think they came out fine. You, of course, can stick with simple triangles if you prefer. Mia told me what she wanted and I did my best to cut the shapes out of masking tape. I think having a variety of sizes and types of jars makes a nice little display, just like real pumpkins (although we haven't even carved ours yet). Not having any of those flameless tea lights available, I used regular tea lights. While the fake kind would probably be safer since they aren't a fire hazard and they wouldn't make the jars get hot, the way I see it, these are glass jars, and I don't plan to keep them where kids can get at them anyway. (This is really my only complaint with this craft; it's intended for small children, and realistically, glass isn't an ideal material for little ones to work with. That said, I know Mia well enough to know she could handle it at age 4 1/2 so I wasn't concerned.) So, for the photo, I took them out to the porch and then put them back on the counter where they have been since Mia made them a few days ago.

Monday, October 17, 2011

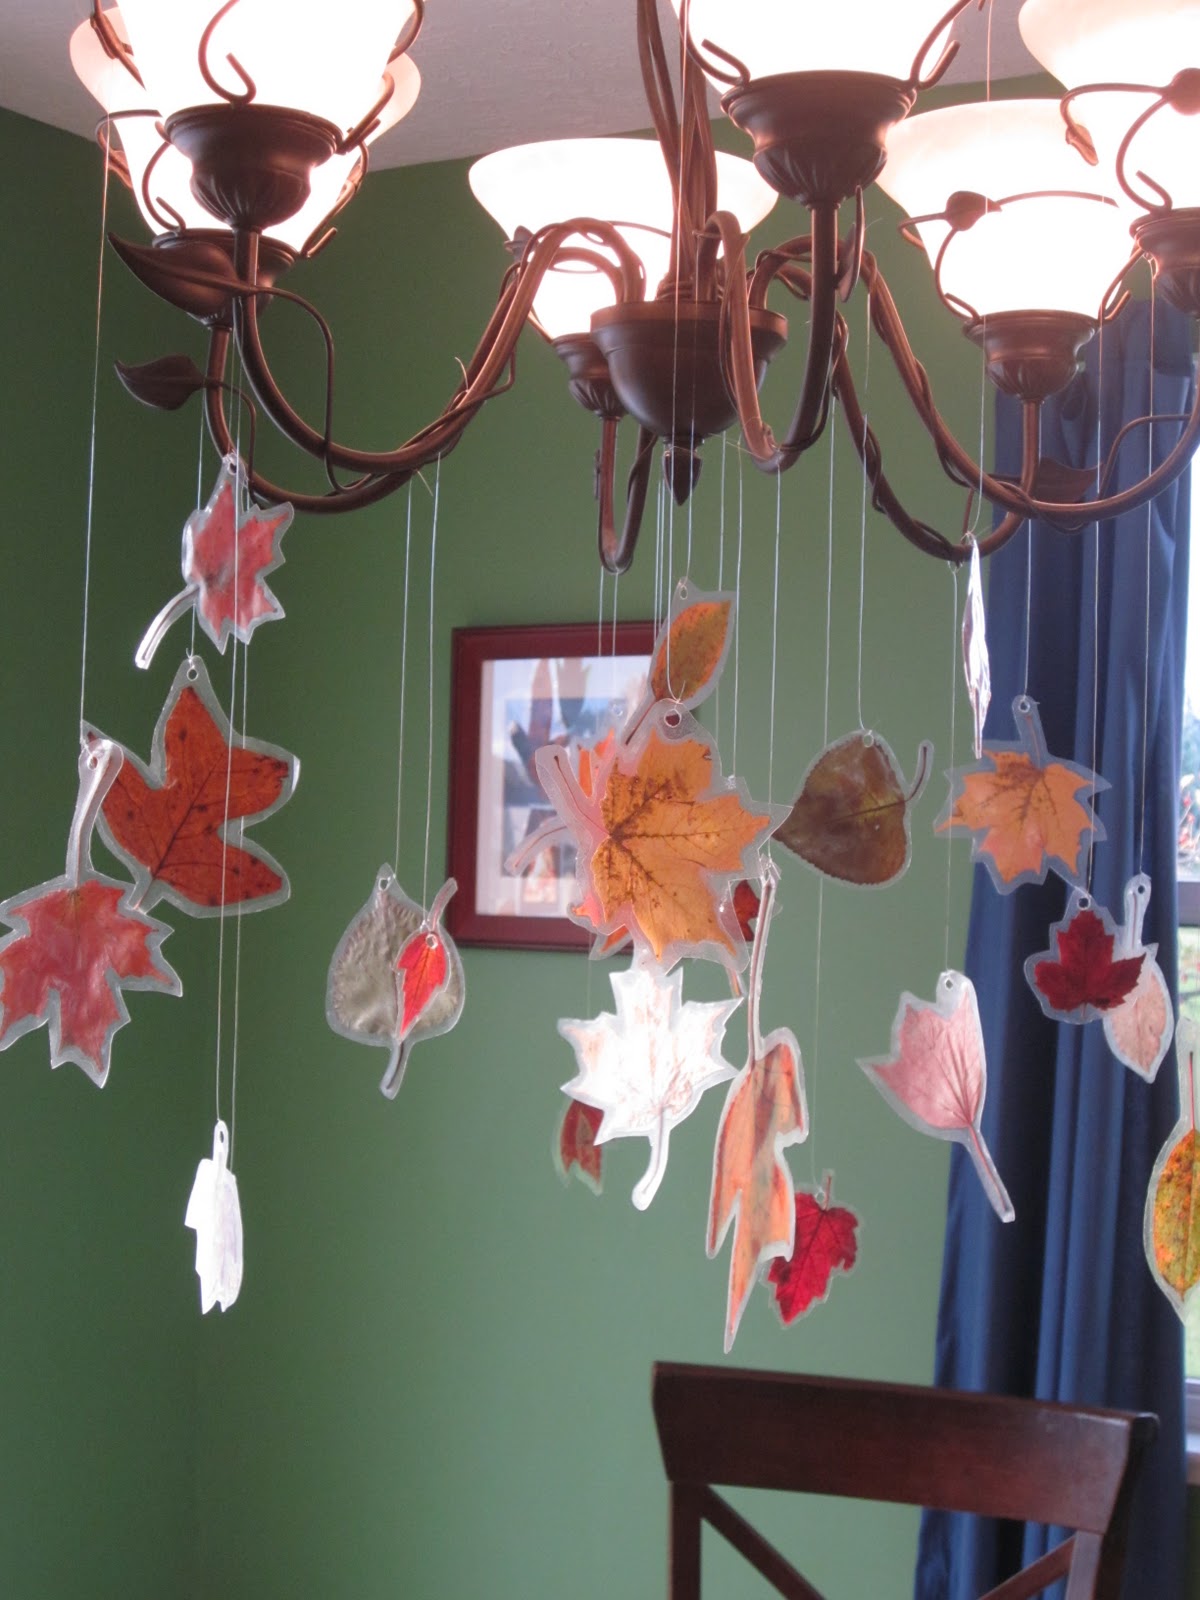
Falling Leaves Decoration

This idea was inspired by Disney FamilyFun Magazine's Leaf Mobile craft. We changed it a bit to hang from our dining room light fixture instead of branches since it was rainy, and Mia wasn't interested in using branches, anyway. The end result is festive and I love how the leaves sway gently whenever someone walks by. It's a beautiful way to keep the best part of fall around just a little while longer, even though the trees are rapidly becoming bare.

Materials:
  • actual leaves
  • heavy book/s (for pressing leaves)
  • clear contact paper
  • hole punch
  • scissors
  • fishing line
  • paper trimmer (optional)

Directions:
  1. Collect colorful fall leaves and press them between the pages of a heavy book (we used two) for a day or two.*
  2. Using a paper trimmer or scissors, cut various sizes of squares and rectangles of clear contact paper that are about an inch wider than the leaves. You will need two identical contact paper squares per leaf.
  3. Peel the backing off of one contact paper square and place sticky side up. Lay a leaf on top and press down gently. Peel the backing off of the second contact paper square and place sticky side down on top of the first square, lining them up as best you can.
  4. Punch a hole for hanging, and then trim away excess contact paper, leaving about 1/4" border all the way around the leaf.
  5. Cut lengths of fishing line and tie one to each leaf. Tie the leaves to your light fixture (or branches if you prefer.)
*Note: Yesterday I read in the paper that you can preserve fallen leaves using glycerin. It is supposed to help them retain their colors and not become as brittle. I have not tried this before, but I am curious about it. If you have experience with this technique, I would love to hear about it. Martha Stewart says that you should do the following to preserve your fall leaves:
  1. Wipe away dirt or moisture.
  2. Mix two-parts water with one-part glycerin.
  3. Layer the leaves in a pan and pour the solution over them so that they are completely immersed.
  4. Use a plate to weight the leaves down and keep them covered for 4-5 days.
  5. Remove leaves and wipe clean with a soft, dry cloth.