Showing posts with label decorations. Show all posts

Tuesday, December 30, 2014

A Homemade Christmas Ornament Idea

To be perfectly honest, I wasn't really in the Christmas spirit this year. I have a goal to get back to writing more often, so I am sure I will be sharing more about the reasons behind that, but for now all you need to know is that Christmas was pared down from the past. We didn't do a lot of of crafts. In fact, I think this is the only one that we created, and mostly it was because we were given a plain glass ornament at church and asked to decorate it for the tree there. Sadly, this wouldn't have happened otherwise, and it would have been a shame, because this was fun to make.

The inspiration for this ornament came from the December issue of FamilyFun magazine. I have made a few changes, partially due to what materials we had on hand and partially due to personal preference for what seemed sturdy. (I really couldn't see making this with tacky glue, for example, and then having it come undone. Yes, this would have been more kid-friendly than my adhesive of choice: hot glue, BUT you have to agree that mine is going to hold up, and that was what I was going for.) Anyway, we were all pleased with the results.

{Our Family's Christmas Ornament - 2014}


Materials:

  • clear glass ornament
  • small pom poms (round beads are what was suggested in FamilyFun)
  • toilet paper tube 
  • scissors
  • tacky glue
  • hot glue gun
  • card stock (whatever colors you like -- we used blue and silver)
  • pipe cleaner (optional, for trim)
  • clothespins (optional, but recommended)
  • permanent marker (optional, for personalization)

Directions:
  1. Remove the top of a clear glass ornament and hold it while the kids add some colorful "gumballs." (Note: Anything that is small enough to fit inside the opening could work. We used pom poms because we didn't have beads on hand. Perhaps real gumballs would fit?)
  2. Cut a section of a toilet paper tube to make the base of the gumball machine. Wrap it in colored card stock (Logan picked blue.) and adhere with tacky glue. Add a small rectangle of another color card stock for the gumball machine opening. (We used silver.) Again, apply with glue. Now, here's a handy tip: Secure two clothespins, one on either end of the tube, and leave on until the glue has dried. This helps the curved paper stay put until the glue is set!
  3. Find a base for your gumball machine. Ours is a lid (Thankfully, in the color Mia wanted: red.) from a peanut jar. FamilyFun suggested using a large button. (I don't know about you, but I don't have huge buttons laying around my house, however, I do have a good assortment of plastic lids at any given time.)
  4. Assemble the gumball machine. I used a hot glue gun (adult use only) instead of the suggested tacky glue. I made a ring around one end of the tube section and then applied it to the bottom of the glass bulb. Then, I made another ring of hot glue around the other end of the tube and pressed the plastic lid onto it, securing the base. For a finishing touch, I used two scrap pieces of red pipe cleaner to cover up the hot glue. (I wish I had thought to do this when it was first hot, but better late than never. The tacky glue would have been less goopy looking and wouldn't have needed the "finishing touch," but I am still asserting here that my way is going to hold up for the long haul. And that is what we want since we're going to be displaying this year after year.
  5. For a little extra personal touch, I took a black Sharpie and wrote our family name plus the year on the back. This was an easy (and totally free for us!) craft that we were able to make together.

Friday, April 25, 2014

Spring Wreath Craft

Mia recently made this wreath at church, and I wondered why we had never made a wreath with tissue paper before. We have made a few wreaths in the past including this hand traced one for fall, this egg wreath for Easter, and this toilet paper tube holly wreath. This version is both beautiful and very simple, making it perfect for even toddlers to help create!

{Pretty Easter Wreath by Mia, Age 7}


Materials:
  • paper plate
  • scissors
  • white glue
  • tissue paper (in your choice of colors)
  • ribbon/yarn for hanging
  • hot glue gun (optional, for attaching ribbon/yarn)

Directions:
  1. Cut the inner circle out of a paper plate. Do not discard it because it makes a perfect glue holder.
  2. Cut tissue paper into small rectangles. (Tip: If you want your child to practice scissor skills, she may be able to help with this step. If you are doing it with a large group, it is best to do this in advance. Another option is to have kids tear off pieces of tissue, but again, it's often best to prepare in advance.) Our pieces of tissue paper were about 2" x 2" I believe, but you can make yours bigger or smaller, depending upon your preference and the ability of your child. (Tip: Don't buy new tissue paper! Just reuse that old stuff that came in gift bags. If you have to buy tissue paper, though, don't spend a lot. You can find it at Dollar Tree and most grocery stores.)
  3. Pour a small amount of glue onto the inside circle. Have your child bunch the tissue paper up, dip it into the glue, and the apply it to the paper plate ring. She will keep doing this until it is filled up (or until she gets bored and decides it's finished).
  4. Cut two lengths of ribbon (or yarn). Tie one into a bow and use a glue gun to apply it to the front of the wreath. Ours it at the bottom, but you can place it wherever the child wants. Make the second piece of ribbon into a loop and adhere it to the back of the wreath for hanging. (Tip: If you don't have a hot glue gun or you don't want to use it around young kids, you can also use glue dots or a stapler. I wouldn't recommend white glue for this job, though, since it's not really sturdy enough.)
  5. Let all glue dry before displaying the wreath.

Since you're here anyway, please check out my review and giveaway, sponsored by Path Publishing! The giveaway goes through Monday, April 28, 2014, which means that you still have plenty of time to enter to win your very own blank book. With lots of options to choose from: recipes, kidisms, gardening, and more, you will definitely find something to make your life a bit easier. Thanks for visiting.

Monday, February 17, 2014

A 7th Birthday Puppy Paw-ty

For Mia's 7th birthday party, she requested a puppy theme. This sweet and simple party was one of my favorites to plan, and it was a big hit with the guests and the birthday girl alike. The colors were primarily brown and white with touches of red and black. I made everything myself, and it was very inexpensive to pull together. Outside of food, I don't think I spent more than $10!

My favorite part was that in lieu of gifts, we asked for donations to the local Human Society.  Despite it being quite snowy on that particular Saturday, several friends turned out with doggie-friendly donations. This seemed to go over well, and now we have a large stash of items to deliver when the weather gets better.

{Friends brought donations for the Humane Society.}

The Invitations:
Being a planner, I made these invitations and sent them out about 3 weeks prior to the party.

{Puppy Paw-ty Invitations}

The Food:
I did not serve a full meal. (Go, me! Way to keep it "simple" -- at least for me!) For snacks, we had a bowl of "pupcorn," which was just air-popped popcorn. I did add some melted butter and salt, but that was not enough to tempt people when "puppy chow" was an alternative snack. (Note: I was running low on powdered sugar after making the cake, so I just made a half batch, and that was the perfect amount.) To round it out with some slightly healthier choices, I made up a tray with crackers, cheese, carrots, and cucumbers. At about 5 minutes to party time, I decided these looked bare and needed to be dressed up, so I grabbed some left over kraft paper and rubber stamps and made little placards that read "pupcorn," "puppy chow," and "bone appetit." (Yes, I know that "bone" is spelled incorrectly, but you know what I'm going for, right?). We also had the stamped napkins, good ole IKEA plates and bowls, and Capri Sun juice pouches. (I typically come up with a themed drink with an appropriately themed name, but I just didn't have anything for this one, so I made it easy on myself.)

{Simple Puppy Paw-ty Food}


The Decorations:
{Easy Centerpiece}
I made a table runner out of kraft paper and hand-stamped it with a homemade paw print stamp. (Directions can be found here, but I later discovered that Dollar Tree carries a roll of wrapping paper that is pretty doggone similar, if you're not into DIY projects!) Also for the dining room, I made these adorable puppy balloons, which I taped to the chandelier. For a quick and simple centerpiece, I just filled a canning jar with dog biscuits -- two items I already had on hand for everyday life.
{Paw-ty Decor}
To welcome guests, I made this front door decoration, again using the homemade paw print stamp on kraft paper. After cutting out each paw print, I "laminated" them all between two pieces of clear contact paper. For the wording, I typed "The Paw-ty is Here!" in Microsoft Word using the free Puppy Bellies font. Then, I cut out each word, affixed it to kraft paper, and "laminated" them all with contact paper. I taped all the pieces to the outside of the front door with clear tape.

{Front Door Decor for a Puppy Paw-ty}

The Cake:
The cake that was served for this party with friends was actually the third batch of puppy-themed baked goods that I made. Mia requested a white dog, to look somewhat like our dog, Ritzy. (My first attempts were these kind of complicated chocolate "pupcakes" that I served at the family shindig. After that, I simplified and went with these paw print cupcakes for school.) This puppy cake was not actually the way I had envisioned it due to what could have been a cake catastrophe when one of my rounds broke apart as I tried to get it out of the pan. I was planning on making a cake similar to the Care Bear cake from last year, but I think this turned out even better than I previously imagined! My brilliant husband suggested that the broken round pieces could still be used for something so they turned into floppy ears.

{The cake turned out cute!}

To make this cake, I did a double batch of my favorite white cake and a batch of my favorite buttercream frosting. I made two round, one that was 7" and one that was 8" (the one that broke apart), plus a half dozen cupcakes. The small round became the face and the broken round was trimmed to make the ears, which were attached with frosting. Then, I frosted it all with my angled spatula. For one cupcake, I removed the wrapper, frosted it all, and stuck it to the face. The nose is a mini peanut butter cup and the "freckles" are brown mini M&Ms. The eyes are brown Reeses Pieces and the eyebrows and mouth are piped with black decorating gel.

At this point, it was looking somewhat like a deranged Easter bunny and very little like a dog. Then, two cupcakes were frosted and bumped up against the bottom of the face to make paws. To show definition of toes, I just piped some lined with black decorating gel. The remaining cupcakes were decorated with paw prints made from mini peanut butters cups and brown mini M&Ms. This started to help make it look like a puppy. Then, I realized that I had a red bow left over from Christmas that might look right, and fortunately, it really helped. The addition of the bow made it look more and more like a dog, or at least not like a weird looking lop-eared rabbit.

One final addition did the trick. The tongue is cut from a strawberry Fruit Roll-Up. This last touch was what truly made it look like a puppy. I am thankful to my little man for asking, "Where's the tongue?" on the morning of the party!

{The bow hides the indentation -- bye-bye rabbit ears!}

In case you're wondering, my cake board is just a scrap of cardboard. I covered it with my roll of kraft paper and taped it to the back. In the past I've used aluminum foil for this, which doesn't show grease as much, but the brown went with the party colors better. Plus, it covered easily without having to use multiple pieces.

The Games and Activities:
I had other ideas, but decided to keep it fairly low-key this go-round. We had the dog house photo prop which worked overtime as decor, party activity, and souvenir photo included in the thank you cards.


{Inside of the Thank You Card}

The only game I did was Puppy Bingo. (The rest of the time, they played, so this was just fine.) I created 6 Bingo cards on white card stock. I made the blank template myself in Microsoft Word, but in retrospect I probably could have found one online and saved myself some time! For the pictures, I found various clipart on the Internet, pasted it into Word, printed 7 copies, and cut them all out. (Tip: A paper trimmer saves you time.) One set I kept in a baggie to the the calling cards. The rest, I glued onto the cards, making each one different. There were a few extra images, so I just omitted different puppies from each card. I "laminated" all of the Bingo cards between two pieces of clear contact paper. The Bingo markers were just squares of kraft paper that I made with a 1" square craft punch. We played for fun, so there were no prizes awarded. (I figured they already got enough sweets and they were getting these homemade puppy ears as a take-home gift -- simple!)


{Homemade Puppy Bingo Game}

Extra Credit Points:
Oh, and just for fun, Brett wore his Snoopy costume (without my even asking him to). This was, of course, cute and sweet. What a good daddy!


Tuesday, February 11, 2014

DIY Doghouse Photo Prop

This is the type of project that I debate whether or not to share. Not because I don't want to share. I do! I just don't want people to feel like they should be able to make this themselves. (Not that you can't. I'm sure you're very crafty!) You know what I mean, right? This is not the type of easy-peasy kids' craft that I often post here. That said, it really wasn't that hard to make, so it's totally do-able if you are planning a puppy paw-ty of your own.

{Ritzy and I get a turn in the doghouse.}

This photo prop turned out nicely and helped set the theme for Mia's 7th birthday paw-ty. Besides being fairly simple to make, it was virtually free! (My favorite kind of project, in case you didn't know.) All I had to buy was a 59 cent bottle of paint since I ran out after the first coat.

As soon as guests arrived, they received a pair of puppy ears. Once they were ready, I had them pose in the doghouse. The photos will be used in the thank-you cards (more on those later!).


Materials for Making Doghouse:
  • large cardboard box
  • scissors
  • pencil
  • ruler
  • hot glue gun
  • black Sharpie marker
  • red acrylic paint
  • white acrylic paint
  • black acrylic paint
Directions for Making Doghouse:
  1. Deconstruct the box and lay it flat. Using a pair of sharp scissors (or a box cutter, if you are more intrepid -- and less accident-prone than myself), cut along a seam so that you now have 2 pieces of cardboard. Each one is two sides of the box. Trim away the smaller flaps from one piece. (In case you are wondering, my cardboard measured 35 1/2" wide by 43" tall at that point.)
  2. Using a ruler, find the center point of the piece of cardboard. Mark it with a pencil. Next, use the ruler and pencil to make vertical and horizontal lines, dividing the cardboard into quadrants. (This is not necessary, but I found it helpful). Tip: Make all marks on the "outside" of the cardboard: the part that has printing on it. Then, when you flip it over, you will have a perfectly clean piece of cardboard to work with.
  3. This was the point when I decided how the roof line should look. I decided to make a horizontal line about 1/3 from the top, all the way across, because that looked right visually. Then I used my ruler to draw angles from the outside edges of that line, meeting at the top. (Remember, I already had a center line, so this is why it was handy.) I used scissors to cut along the lines and ended up with a triangular point on top of the house.
    {The basic shape}
  4. Next up, I made the doggie door. I decided the top of the door would be my center point. I didn't want it to be very wide, just enough for kids to pop their heads through, otherwise there might be clutter in the background of the photos. I measured 10" for width, 5" on either side of the vertical center line, and then drew lines. To get the curve at the top, I traced around the rim of a large plastic bowl. Then, I cut it all out with my scissors. Tip: Since I wasn't worried about how the part I was cutting away looked, I was free to cut it into smaller chunks. For some reason, I have found small triangles to be easier to work with rather than one large semi-circle.
  5. After getting the basic doghouse shape, I flipped my cardboard over to the "clean" side and laid in on a layer of newspaper. I used a foam paintbrush to apply a coat of red acrylic paint, let it dry, and then added a second coat of paint. 
  6. Once the second coat dried, I took a strip of cardboard (one of my discarded pieces), which was the same width as my doghouse and about 2 inches tall and used this as a straight edge to make lines across the entire house with a black Sharpie. This made it look like wooden boards. I added two "nails" per board along the outside edges. These were just small black hand-drawn circles. I also outlined the rest of the doghouse with black Sharpie for a more finished look.
    {Adding the "boards"}
  7. It didn't look finished, so I took two more strips of cardboard (again about 2 inches wide) and cut each one at a 45 degree angle so that they would meet up to make the roof. These, I painted with black acrylic paint and once they were dry, I adhered them with my hot glue gun. 
  8. To personalize the doghouse, I cut an oval out of some scrap cardboard and painted it with white acrylic paint (two coats). After the paint had dried, I outlined it with black Sharpie and then added another oval set about 1/4" in from the outline. Then I typed "Mia" using this free font and printed it out, trimmed it to size, and glued it the the placard. Lastly, I hot glued the oval to the front of the doghouse.
    {Finished!}
  9. Before displaying the photo prop, I took two extra scraps of rectangular cardboard and hot glued them to the back of the doghouse on either side of the door. I had noticed it was a bit flimsy (likely because I used more then one side of a box to create it), and this served as a necessary reinforcement. To hang it, I used twine which was not elegant, but it fit with the theme just fine. I cut two lengths and used plenty of masking tape to adhere them "stitches" fashion. Then, I taped both lengths of twine to the mantel with clear packaging tape. It had just enough distance between the prop and the fireplace for the kids to kneel behind it for photos. (Note: I had taped a small section of white plastic table cover behind the opening to the doghouse, and I later wished I had covered the whole area the way I did for the Care Bear photo prop from last year. Despite not thinking of that sooner, it looked pretty good.)

Tuesday, February 4, 2014

DIY Stamped Napkins for a Puppy Paw-ty

I have done a post about DIY themed napkins before (Shark party) but I figure it is worth mentioning again. This is a super quick, easy, and inexpensive way to coordinate with any party theme. Most everything else I use is reusable: cups, plates, bowls, but for kids' birthday parties it seems like a necessity to have napkins on hand.

To make my own, I simply bought a package of 30 white napkins from Dollar Tree. Then I used dog stamps and ink pads that I already owned (in red and brown) to personalize them for Mia's recent puppy paw-ty. Mia helped choose which stamps to use, although I narrowed it down some based on the size of the stamp and whether or not it looked right on the napkin. In the end, we chose 5 designs, so each one was used 6 times.

{Easy DIY Napkins for a Puppy Paw-ty!}

Wednesday, January 8, 2014

Colorful Ice Shapes

I found this idea here and I had been waiting for the right time to give it a try. While this would probably make more sense if I had done it in February, another snow day (third in a row!) was the ideal time for creating these pretty outdoor decorations. Plus, I had heart-shaped molds, so that was what we used. This was simple and fun for the little ones and for me, too. The finished ice molds are quite lovely, and they seem to sparkle and shimmer in the sunlight.


Materials:
  • silicone muffin cups (or a candy/brownie mold -- aluminum would also work)
  • water
  • food coloring
  • fishing line (Dental floss will also do the trick!)
  • clear tape
  • scissors
  • cake pan or cookie sheet (optional, but very helpful)

Directions:
  1. Cut several lengths of fishing line (or dental floss), one for each mold. Make each one into a loop and then secure it inside the bottom of your silicone (or aluminum) mold using clear tape. Tip: We used 12 heart-shaped muffin cups, so I placed them in a cake pan for easy transport. If you are using a candy mold, you might wish to place it on top of a cookie sheet for the same reason.
  2. Add colored water to each mold. We had snow paint at hand, so we didn't need to do any mixing. I just poured some from each bottle into small paper cups so that the kids could easily fill the molds. If you don't already have colored water, just place some water in each mold and then add a drop or two of food coloring to each one. Tip: I don't recommend filling them more than 2/3 of the way if you are using muffin cups. Full cups were a bit bulky and took considerably longer to freeze than the ones that were only 1/2 - 2/3 full. 
  3. Place your molds outside to freeze. (Alternatively, you can put these in your freezer, but with cold winter temps, it just made more sense to use the outdoors.) The shallower ones were set up in about 3 1/2 hours, while the fuller cups were done in about 6 hours.
  4. Remove the colored ice from the molds. With silicone, it is simple to just peel the mold away from the ice. For aluminum, it may be easier to run some warm water on the bottom of your pan to help release them. Remove and discard any left over tape.
  5. Hang your colorful ice shapes outside and admire them! 


Thursday, December 19, 2013

Sandpaper Gingerbread Family Craft

For the past few years we have kept an Advent calendar. In the beginning, I used to put small candy such as Hershey's kisses inside each box, but last year I decided to get away from that. I typed up various activities (make hot cocoa, drive around and look at lights, watch a Christmas show, read a Christmas book, write a letter to Santa, etc.) and put the slips of paper into each box. This way, we are doing things as a family instead of just eating junk food.

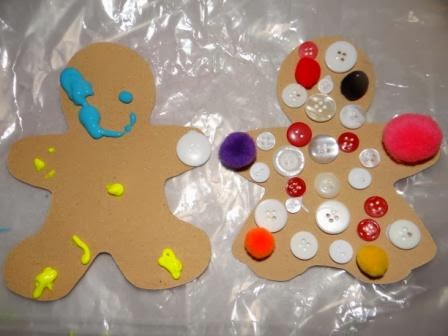
Admittedly, my kids are not always thrilled about this. For example, they just plain ignored the slip that said, "make a list of our blessings." Fortunately, they were happy the other day when it said "do a Christmas craft." I didn't really have anything planned, but I had remembered pinning this idea ages ago. So I pulled out my sandpaper (purchased from Dollar Tree for this project) and my cookie cutters and we got to work.

The original craft that I was inspired by involved a lot of puffy paint (cute, but not exactly young child-friendly!) and it was intended to be used as invitations for a cookie exchange. This sounds very cute, too, but here is how I modified the craft to make a more appropriate project for my two kids.

{Gingerbread Boy and Girl by Logan, Age 4}
(Can also be captioned, "why puffy paint should not be placed in the hands of preschoolers!"
Although, his wasn't too bad. It was actually dry by the following morning, which surprised me.)

Materials:
  • sandpaper
  • gingerbread boy and girl cookie cutters
  • pen
  • scissors
  • tacky glue
  • embellishments: buttons, feathers, pom poms, beads, pipe cleaners, craft foam, felt, markers, yarn, sequins, etc.
  • puffy paint (optional -- not suggested for preschoolers and toddlers!)
  • something to protect work surface (recommended -- I like cereal box liners.)
  • old clothes/paint shirts (optional -- strongly recommended if using puffy paint!)

{Our Sandpaper Gingerbread Family by Mia, Age 6}

Directions:
  1. Flip sandpaper over to the non-textured side. Place a gingerbread boy or girl cookie cutter on top and trace around it using a pen. Repeat as many times as desired. I found that we could fit 5 gingerbread people per sheet of sandpaper. (2 large and 3 small) Cut out the gingerbread people.
  2. (If desired, protect work surface and kids' clothing before decorating gingerbread people.) Allow kids to decorate their gingerbread people by using tacky glue to apply whatever embellishments you have at hand. We used many craft staples that you likely have at home: buttons, yarn, pom poms, pipe cleaners, and regular markers. There are many, many, many possibilities. For example, Mia used buttons in the traditional fashion to make a shirt and Logan used them just for decoration all over an entire gingerbread girl. She also used feathers in more than one way -- to make a skirt and also cut and shaped to make hair. (Note: If you are brave enough to let your kids use puffy paint, remember that it will stain clothing and plan accordingly. Also, it is very tricky to "pipe" it neatly, as you can see from my own example with the blobby outline around the head, so that may be frustrating for little ones.)
  3. Make sure that glue dries completely before displaying your gingerbread people. 

 {Brett came home and asked, "Where's Mama's?" Now I have one, too.}

Other Ideas:
  • I think it would be cute to string several of these together to make a garland.
  • Since we have both boy and girl cookie cutters in both large and small sizes, Mia decided that she would make one gingerbread person to represent each member of the family. This would a cute thing to do as a family or as a class: everyone decorates a gingerbread person to look like himself.
  • These could also be made into ornaments by punching a hole and then adding ribbon, yarn, bakers twine, or a pipe cleaner. The only downside is that the sandpaper is kind of flimsy, so you may want to first reinforce these with a layer of card stock. A more durable option would be craft foam.
  • In fact, if you don't have sandpaper, craft foam would be fine for this project. You just will not have the textural aspect unless you find a way to create it. One way would be to add a layer of glitter, but this is going to be messier than sandpaper, by far.
  • To make these into puppets, add a craft stick like we did here.
  • I really do like the idea, too, of using these as invitations to a cookie exchange. In the past, I made my own apron invitations for an exchange, but these would be a bit easier to mass produce.
  • If you don't have a gingerbread cookie cutter, don't run out and buy one! (unless they are already on clearance, in which case feel free to share where you are finding them -- not that I need any more...) You could also use a teddy bear or a puppy or any other item that would look good in brown.
  • Looking for more ideas of things that you can do with cookie cutters? You might also like: cinnamon applesauce ornaments, gingerbread men paper dolls, craft foam ornaments (page 20), and Christmas sun catchers.

Wednesday, December 18, 2013

Painted Christmas Tree Craft

Logan started this project at the library last week and then finished it this week. This shouldn't be too hard to do in an afternoon so long as you let the paint dry in between the painting and decorating steps. (Just give your child an empty cardboard box to play with. Those always seem to keep my kids occupied...) My favorite part of this craft is the clever and fun painting technique: using an actual limb from an evergreen tree or shrub in place of a paint brush! I also like that Mrs. D. added a small magnet to the back so that we can display the tree on the refrigerator (or the dishwasher or the back door -- we've got options.) It's definitely beginning to look a lot like Christmas around our house!

{Finished Tree by Logan, Age 4}
Materials:

  • white card stock (or green)
  • scissors
  • fresh evergreen branches
  • green tempera paint
  • container to hold paint (I like Styrofoam trays.)
  • brown construction paper
  • glue stick/glue
  • something to protect work surface (optional -- I like cereal box liners.)
  • yellow construction paper
  • stickers or foam stickers
  • self-adhesive magnet (optional)

Directions:

  1. Cut a large triangle out of white (or green card stock) to make the tree. Mrs. D. added simple branches by cutting notches out of the sides, which is simple and quick to do.
  2. Cut a trunk from brown construction paper. Adhere the trunk to the base of the tree. (Tip: If doing this project with more then one child, you may want to write names on the back sides of the trees before moving on to the next step.)
  3. Collect some fresh evergreen branches.
  4. (Protect work surface and clothing, if desired.) Pour some green tempera paint into a bowl or onto a plate or Styrofoam tray. Let your child paint the tree using evergreen branches. Once he is done painting, set the tree aside so that paint can dry completely.
  5. Decorate the tree! Cut a star out of yellow construction paper and let your child glue it to the top. Then, let him add stickers, regular or foam, for the ornaments.
  6. To make it magnetic, simply add a self-adhesive magnet to the back of the tree. Your child's creation is now ready to be displayed on any magnetic surface. (Tip: If you don't have magnets, you can tape this just about anywhere. Or you can display it on a clothesline style art display. Ours came from IKEA.)
Other Ideas:
  • You could make wintry trees in place of Christmas trees. Just substitute white glue "snow" in place of the sticker "ornaments."
  • If you don't have stickers, trim the tree with whatever you have at hand: buttons, pom poms, sequins, beads, ribbon, yarn, pipe cleaners, rhinestones, feathers, etc.
  • Mrs. D. displayed several plain green trees on the white board to make a winter scene. A few well-placed lines with a black dry erase marker, and it looked like the trees were standing in a snowy meadow -- very simple but pretty for a classroom display!
  • Painting with evergreen branches could also be used to make wreaths. Just use a paper plate for the base and have your child finger paint on some read berries. Add a red or gold bow for hanging.
  • Or skip the tree altogether, and just use the branches for paint brushes for a tactile experience. My little man is not always excited about crafts, but he loves painting in new ways, so he found this one to be very fun.

Wednesday, November 27, 2013

Turkey Table Toppers

Here's an easy craft to keep the kids busy this Thanksgiving. Once again, this idea is brought to you by our wonderful library lady, Mrs. D. (I hope she isn't offended that I love her ideas and run with them!) These turkey table toppers are fairly quick and easy for little ones to create without too much parent prep. I think that it would be cute to have child-made place cards for everyone by simply adding names to the tail feathers. That would surely make for a happy Thanksgiving table.

The good news is that most of the items needed for this project are things you likely have at home. The only item you may not have are the Bingo markers. I assume that the library ordered these Bingo daubers, but my suggestion is that you save yourself a lot of money and get some from Dollar Tree! I bought ours there over two years ago and they are still working great. (I normally see these in the school supply aisle.) We have red, orange, green, blue, and purple. The only color I have seen at Dollar Tree that I did not purchase was black since I figured that would have limited craft possibilities. Personally, I think this was a great investment for kids' crafts so I would definitely recommend getting some!

{Turkeys by Logan, 4, and Mia, 6}
Materials:
  • TP tube
  • small paper plate
  • scissors
  • tacky glue (or school glue)
  • yellow/orange construction paper
  • brown construction paper
  • pencil
  • 2 googly eyes (or eyeball stickers)
  • Bingo markers (or regular markers)
  • red pipe cleaner (or construction paper)
  • something to protect work surface (optional)
Directions:
  1. Cut a small paper plate in half. One half is needed per turkey, so if you are only making one turkey, set this aside for another project. (One option is this paper plate turkey.)
  2. Cut a toilet paper tube in half. If you want to make lots of turkeys but you are short on TP tubes, you can also cut them into thirds. Using your scissors, make two small notches on one end of the tube, about 1/4" deep. They will be spaced equally apart so that the paper plate will be able to slide into the notches after it is decorated. (If you need a project for leftover tube sections, try making bird feeders.)
  3. Make a beak out of yellow (or orange) construction paper. The easiest way to do this is to cut a strip of paper and then cut a smaller rectangle from the strip. Then, fold the rectangle and cut a triangle so that the fold is the base of the triangle. When glued onto paper, this will make a 3-D beak.
  4. Draw and cut out a turkey body from brown construction paper. The basic shape is a small circle on top of a larger circle and it should be about 4 1/2" tall. (Note: Mrs. D.'s is thinner and reminds me of a bowling pin and mine looks a bit more like a fat pear, but I think they both are fine. Also, hers is flat on the bottom and mine is rounded, and they both seem to stand up nicely, so take your pick.) Tip: If you are planning to make more than one turkey, use the first one as a template and trace around it to make more.
  5. For the wattle, we used a scrap of red pipe cleaner. If you want to use pipe cleaner, you may need to cut a piece about 1" long. Tip: I keep left over bits of them in an old plastic peanut butter jar for times when we need just a small piece. This way, we don't have to cut up a perfectly good pipe cleaner. Tip: If you don't have pipe cleaners, you could also make a wattle from red construction paper, cut into a kidney bean shape.
  6. Have your child decorate the half paper plate using the Bingo markers. It doesn't matter which side of the plate gets decorated. Tell kids that they do NOT need to press hard. Tip: If the ink isn't flowing well, make sure the cap is secure, and shake the Bingo markers. If this doesn't work, gently tap, tap, tap the marker until the ink starts flowing. Set aside to dry. Tip: Sometimes markers will bleed through, so you might want to protect your table before starting. I like to use cereal box liners, but you can also use newspaper, an old vinyl tablecloth, or wax paper. Tip: If you don't have Bingo markers, let your child decorate the plate with regular markers.
    {Mia made a rainbow turkey.}
  7. Have your child decorate the turkey's body. Mrs. D. provided eyeball stickers for a no-mess option. (Logan's make me smile because one is upside down.) Mia used googly eyes and adhered them with tacky glue. (Tip: If you don't have eyeball stickers or googly eyes, use a black marker to draw eyes.) Next, both kids glued down their beaks. Mia then added her red pipe cleaner wattle. (Tip: If you don't have a pipe cleaner, use red construction paper or draw one with a red marker.) Lay flat until glue is completely dry.
  8. Kids may need help with assembling their turkeys. Place some glue on the back of the turkey's body and affix it to the tube, making sure that the two slits are on the top of the tube, and are to the left and right of the body. Slide the paper plate, flat side down, into the two slits so that the colorful side is facing the front.
  9. Display your child's turkey table topper. You may want to make several for all of your Thanksgiving guests.
One final thought: I know it has nothing to do with Thanksgiving, but Mia's rainbow tail feathers inspired me, and I could totally see tweaking this craft and making it into a showy peacock. To do this, use pretty blue paper in place of brown. Skip the wattle, and add lots of colorful Bingo marker dots to the body. For a final flourish, add a blue feather on top of the peacock's head, and voila! A pretty peacock!

Have a blessed and safe Thanksgiving!

Monday, October 14, 2013

Easiest Ever Pumpkin Craft

I recently learned how to make these at our local library, and I am very pleased with how mine turned out. Really! I am not making this up. This is the easiest pumpkin craft ever, and you need absolutely NO craft skills to pull it off. Also, you barely need any materials, and these pumpkins are really quick to craft. So, it's basically a perfect craft, even for beginners.

If I had any complaint, it would be that this is a little bit more expensive up-front than many other craft projects that I have made. That said, you will have plenty of duct tape left over, so it is really just a general craft investment. (And for the record, I can't complain, because all of my materials were provided by the library. Love!) I am sure I will be making more cool duct tape pumpkins... as soon as the faux pumpkins start going on clearance at the craft stores.


{Happy Halloween Crafting!}

Materials:

  • foam pumpkin (I recently saw some small ones at Dollar Tree!)
  • 1-2 rolls of decorative duct tape (I have found small rolls in the dollar section of Target.)
  • scissors (optional)

Directions:

  1. If using more than one roll of decorative duct tape, decide which design/solid color will be used for your stem and which will be used for the body of the pumpkin. Tear (or cut, but honestly, I found it easier to just tear it with my hands) off small sections and cover the stem. You can even tear the tape in half to have easier to work with strips if you stem is on the small side. Don't worry if the base looks messy because you will end up covering it later. Tip: If your stem is too long or awkward to work with, cut it with your scissors. I found this to be really helpful!
  2. Now, cover the base of the pumpkin with strips of duct tape. The best way to do this is to start at the top near the stem and then slowly smooth the tape down along the pumpkin. You will want to leave space in between each strip of tape, and then come back later and fill in the gaps. Tip: I decided to tear off several strips and lay them along the edge of the table to make the process go more smoothly. I just eyeballed them to see that they were the approximate length that I needed. Tip: Don't worry about making your pattern (if your tape has one) line up perfectly! I could have made myself insane trying to get those chevron stripes to line up just so, but I saved myself the worry, and it came out fine. The eye just tells me that it lines up (for the most part) even if it really doesn't.
  3. Find a place to display your spooktacular pumpkin craft. See, I told you that was easy, right?

Friday, August 9, 2013

Homemade Window Paint Recipe #1

Well, we're gearing up for another birthday party, and this time my little man has requested a shark theme. (It made no sense to me, but he has stuck with the idea for a few months now, so I'm going with it.) One idea I had for decorating was the paint the windows so it would look like we were under water. On a recent rainy day, I tried out this recipe for homemade window paint, or "Goofy Glass Paint," which I found on this website. (In looking at this again, I see that in the directions it says to apply it to a glass surface, not a window per se, although this did work for us. That said, it is somewhat labor-intensive to clean up, so you may want to try the next window paint recipe that I will be posting soon.) Since it was the first time I made this paint, I reduced the quantities from 1/4 cup to 1/2 tablespoon, after noting that it essentially just called for equal amounts of white glue and liquid tempera paint. Mia enjoyed painting an under-the-sea theme on our sliding door. Good thing it fits in with the upcoming party theme, because this is not coming down any time soon!

Materials:
  • white school glue
  • liquid tempera paint/s
  • bowl/s (1 per color)
  • spoon/s (optional, for mixing)
  • paint brushes
  • glass item to be painted (jar, window, etc.)
  • old clothes/smocks (optional)
  • something to protect work area (cereal box liners worked for us)
Directions:
  1. Protect work area using cereal box liners, newspaper, a vinyl table cloth, or even a drop cloth, whatever you have that is handy. Old cloths or paint shirts are also recommended.
  2. Using one bowl per paint color, mix equal parts white school glue and liquid tempera paint. (Tip: I used spoons for this, but you could also use your paint brushes.)
  3. Let kids paint on glass objects (or windows, like we did). Paint may dribble a bit, so having a damp cloth on hand is helpful. (Tip: It wipes up easily while it is still wet, so take care of any messes as soon as you notice them.)
  4. Allow paint to dry. The directions I read said to let it set over night, but we found that it dried much quicker than this.
  5. HOW TO REMOVE PAINT FROM WINDOWS? I have found two ways to do this, but neither one is ideal. The first is with a damp cloth and plenty of elbow grease. This takes some effort, but it is doable. The second method takes less effort, but it is much messier. Simply take a straight razor blade/utility knife and scrape away the dry paint. You will want to first lay down some newspaper or something to catch all the scrapings, however. NOTE: I honestly don't recommend using this paint recipe on windows. Next time around, we will paint some other glass objects!
{Fun on a rainy day...}


Thursday, July 25, 2013

Decorating Dilemma

Decisions, decisions. Today, I picked up my custom-framed artwork from Michaels and I am soooooo excited by how it turned out. This was a favorite souvenir from our day in Old San Juan, during our Puerto Rico trip: a $5 print of a cityscape, the most important design element being COLOR! (If you read my post about Puerto Rico, you understand how much I LOVE color!)

I enjoyed heading to Michaels and experimented with the different mats and frames until I had narrowed it down to two different color combinations: purple frame with red mat and green frame with blue mat. I think the guy working the framing counter knew to not mess with my creative juices because he just sat back and watched me. Then, he used his computer software to show me what the final product would look like for each color combination. (Way cool! I love the new technology, which they did not have the last time I had something framed.) The only problem was that I was stuck and couldn't decide between the two combinations. Both were really beautiful, but each one made the print look very different because it pulled different colors from the print and highlighted them. Finally, I decided to go with the red mat and purple frame because I told him I was pretty sure it would be hung on a yellow wall. He again used his computer program to show me what it would look like mounted on a yellow wall. That was the deciding factor because the red/purple pairing had the most impact.

Now, that I have gotten the artwork home, I am thrilled with what a $65 custom-frame and mat can do to make a very inexpensive print look amazing. However, I am once again faced with a design dilemma. While I was originally planning to hang the artwork on my yellow wall, I am now thinking it might look right at home in my green dining room. The yellow wall is the the entry way and living room, so people would see if upon first entering our home, but I would also enjoy looking at my picture of COLORFUL Old San Juan during every meal. After reading this post from Button Bird Designs, I have decided to ask for other people's input. Where do you think I should hang my print?


{Option 1: The Yellow Wall}
 
OR


{Option 2: The Green Wall}

Monday, May 20, 2013

DIY Window Clings

About three weeks ago I came across a book published by FamilyFun called Wintertime Fun: Warm and Cozy Treats and Crafts. It was in the Wal-Mart clearance bin for $1, and I was sure it would contain enough good ideas to be worth that price, so I snagged it. The first thing that Mia honed in was making our own window clings. Being a winter craft book, the idea was to make glittery snowflakes, which is pretty cool, I will admit. However, I didn't really want to add any snowflakes to our windows at the end of April. So, I encouraged her to make other shapes, and she ended up with free-form hearts and butterflies that sort of resemble those things. She seemed a bit disappointed by this.

I then went back to Wal-Mart and purchased a greater variety of puffy paint colors. I ended up selecting a 12-pack of neons/brights for $9.99, which is not all that expensive, if you thing about how many different projects these will be used to make. In the future, I want to try this again using glue and food coloring or glue and paint, but for now, here is how we made these with store-bought paint.

I had the idea window clings might turn out more the way she hoped if we first started with templates. Over this past weekend, I printed off a few templates including a monarch butterfly, a horse, and some ladybugs, and we tried again. One good thing about using templates, besides the obvious one of saving yourself the time needed to hand-draw something, is that you can paste them into Microsoft Word and then re-size them as desired.

Filling in the forms made for larger, more colorful window clings. They don't look perfect, but being home-made, I don't expect them to. There are some areas where the paint didn't cover, so there are little gaps poking through once they are in the window, but I think this is okay. It's surprisingly simple to make your own window clings, and I see this having lots of possibilities for party decorations, party activities, kids' room decor, Mother's Day gifts, rainy day fun, and so on. Plus, they're completely personalized, which is always a bonus! Of course, we can always make those glittery snowflakes, too, just not in the spring...


{My ladybug, Mia's horse, Mia's free-form shapes}
Materials:
  • puffy paint
  • wax paper (cereal box liners work well)
  • scissors
  • template (optional)
  • Sharpie marker (optional)
Directions:
  1. If using a template, either print one from the Internet or find a coloring page or clip art to trace. If you want to make free-hand drawings, you can just skip this step.
  2. Trace your template or draw your design onto wax paper using a permanent marker such as a Sharpie. I did this step for Mia since the horse had a lot of details and small areas. Tip: We used cereal box liners, and they worked great. You can't beat free supplies! Tip: You may want to trim your wax paper into smaller sizes to fit more window clings. Tip: Remember that permanent markers will stain clothing, so dress kids accordingly if they will be using Sharpies.
  3. Fill in your outline or the entire shape using puffy paint applied to the wax paper or cereal box liner. You want to make sure all of the lines of paint are connected or the window cling will not stay together. (You can probably still make it work in the end, though, so don't stress over this too much. My ladybug's antenna tore off, but I just stuck it back together on the window, and you would never know the difference.) At the very least, your lines of paint should be 1/8 to 1/4 inch thick. Tip: Puffy paint will also stain clothing, so be mindful of this before starting.
    {The final product looks a bit different, but it's all good.}
  4. Allow paint to dry completely. Drying times will vary according to how much paint has been used. The first batch that Mia made by drawing free-hand shapes were left to dry overnight and this was fine. My filled-in ladybug was also dry when left overnight. However, Mia's horse had super-thick globs of paint on it and it needed another day to dry thoroughly. Don't rush this process or you will make a mess.
    {This horse took about a day and a half to dry.}

  5. Carefully, peel paint away from wax paper (or cereal box liner) and adhere to a window. Yes, they really do stick! The original ones have been up for three weeks and have shown no signs of falling down. Cool, huh?


Tuesday, April 2, 2013

Easter Egg Sun Catchers

I feel like I am behind on posting since Easter has come and gone, but really, it felt a bit early this year. Anyway, here is a project we did on Sunday. We've done plenty of these sun catchers over the past couple of years. It's so easy and relatively mess-free, that once you have made them you find occasions to make more. Plus, it helps if you already have a stock-pile of pre-cut tissue paper squares in an assortment of colors. I prepped a few paper eggs and Con-tact paper rectangles and then took the whole bunch along to Grandma and Grandpa's house so that all the kids could make them, if they chose.

{Pink Egg by Mia, Age 6 & Yellow Egg by Logan, Age 3}
Materials:
  • colored tissue paper
  • scissors
  • pencil
  • construction paper
  • clear Con-tact paper 
  • scrap paper (optional, for making egg template)
  • paper trimmer (optional)
  • clear tape (for hanging finished sun catchers)
Directions:
  1. Cut colored tissue paper into small squares. I used approximately 1 inch squares, but you could make yours bigger or smaller depending on the age of the children. Tip: To make this process go faster, layer a couple of pieces of tissue paper together, cut into smaller rectangles, and then cut the rectangles into strips, re-layering as needed. Put as many strips together as you can comfortably cut before cutting smaller squares. Tip: I save all of the cut tissue paper from previous projects, and store it in zippered baggies according to color. Tip: You don't need to go out and buy nice, new tissue paper. We re-use all the crumpled pieces that come in gift bags.
  2. Fold a piece of construction paper in half like a hamburger. 
  3. Fold a piece of scrap paper in half, hamburger-style, draw one half of an egg shape, and cut it out. Make sure that your template will fit within the borders of your folded construction paper, with about an inch or more border all the way around. Tip: You could also find an egg template online if you prefer. Tip: If you are only making one egg sun catcher, you can save this step by simply folding your paper in half a second time, drawing your egg shape, and then cutting it out. You should end up with two corresponding egg shapes on either original half of the folded paper.The template is just handy if you know you will be making several sun catchers.
  4. Lay your egg template onto the construction paper, trace it with a pencil, and then cut it out so that both sides of the folded paper have a corresponding egg shape removed from the center.
  5. Cut two pieces of clear Con-tact paper (I used both a paper trimmer and scissors for this.) so that they are at least 1/2 to 1 inch larger than the construction paper all the way around. Tip: Do not remove backing from contact paper until you are ready to use it. Tip: If you have leftover pieces of Con-tact paper, save them for future projects. For example, I find that the long, somewhat narrow strip left after making several of these sun catchers is just the right size for "laminating" labels onto jars of homemade play dough, which we give as gifts. The smaller remnants are also good for hanging leaves in the fall.
  6. Adhere one side of the paper to the clear Con-tact paper so that there is a border of at least 1/2 inch all around the paper. Tip: Slowly peel the Con-tact paper away from the backing as you smooth the construction paper down onto the contact paper. This way you don't end up with "bubbles."
  7. Have your child stick tissue paper squares onto the Con-tact paper egg shape until it is filled. Tip: You can use multiple different colors or shades of the same color (pink, purple, etc.) of tissue paper to give the sun catcher a more complex design. It looks especially nice where the two colors have overlapped in places.
  8. Layer the other half of construction paper on top of the first, making sure that the egg shapes line up. Tip: If you wish for the project to have a name and date, add this to the back before sealing up the sun catcher.
  9. Add the second piece of Con-tact paper over the top, smoothing it down as you go. Trim away excess if desired, but don't trim too much or the sun catcher will not stay together. 1/4 inch is the minimum border I would recommend.
  10. You can display your sun catcher in a window using clear tape. Another option is to use a hole punch to make two holes near the top, thread some ribbon or yarn through the holes, tie it off, and then hang your sun catcher.

Monday, March 4, 2013

Easter Egg Centerpiece

Here is a craft that I have seen several versions of on Pinterest and I have been wanting to try it for ages. Mia and I finally gave it a go, and not surprisingly, it isn't the most kid-friendly of projects. I decided to use embroidery floss since I don't have much yarn on hand and I am surprised at how expensive it seems (at least for what I would use it for; knitters and crocheters might disagree, but I have no clue). Anyway, I had plenty of embroidery floss since I did a fair bit of cross-stitching in my B.C. era days (Before Children). I had also seen that this blogger used embroidery floss instead of yarn, so that seemed promising. I was worried about using glue, though, having remembered a flop of a project we tried two years ago for Valentine's Day that involved yarn and glue and thought we might want to try something else for our eggs. I found this blogger who used Mod Podge, which is awesome stuff, so I figured it was sure to work. So, that is how I decided on embroidery floss and Mod Podge for our Easter egg craft.

I originally thought I would be hanging these either individually or stringing them together as a garland, but when they were done I wasn't sure if they would hold up, so I decided to put them in a green footed glass bowl and use them as a centerpiece instead. I think they look great even if we did end up with one casualty in the process. It either did not have enough embroidery floss wrapped around it to hold it together, or else it was just not tightly wrapped and it sort of fell apart in a way that resembled a disintegrating birds nest. I just tossed that one out and was satisfied that the rest turned out okay. It was too bad, though, because the peach color would have made a nice contrast since we ended up with two blues (one is more of a periwinkle) and two pinks. However, this made the final count seven eggs, and odd numbers do always seem to make a better balance decorating-wise, so that was serendipitous in a way. I love the fresh, spring colors and the kooky, organic feel of the strings. I hope that they will store well because I want to display these for many years, although I guess we can always make more. They were not difficult and the materials are inexpensive. Here is how we made our string egg centerpiece.


{I LOVE how this turned out!}

Materials:
  • water balloons
  • embroidery floss
  • bowl
  • spoon
  • 1/4 cup Mod Podge
  • 1/2 cup water
  • newspaper (to protect work surface)
  • scissors
  • cups/mugs for holding eggs while drying
  • pin (for popping balloons)
Directions:
  1. Protect your work surface with newspaper. (Or, if you have one, a vinyl tablecloth would have worked even better for this.)
  2. In a bowl, mix up the Mod Podge and water. I used a ratio of 2 parts water to 1 part Mod Podge.
  3. Blow up your water (or any type) balloons. Mine came in a package of 100 from Dollar Tree and were easily blown up by mouth. I found that they resembled eggs when they were inflated to approximately 4-5 inches long.
  4. Cut several lengths of embroidery floss and set aside. Mine were about 18 inches, but no longer than 24 inches because that just got tricky to keep from getting tangled. 
  5. Dip the embroidery floss into the Mod Podge mixture and wrap around the balloon. Repeat until it is covered as desired (or you are out of that particular color of embroidery floss; this was always my stopping point). Tip: If you are lucky, you will have a little helper dipping these for you and then laying them aside until you are ready to use them. (We found that this project required fine motor skills that were a bit beyond Mia's 6-year-old grasp, and she is a very experience crafter, so that should give you an idea of the age that this is appropriate for. Fortunately, we found that she could help me in this fashion, and still be involved in the process.)
  6. Set the covered balloons into cups or mugs to allow them to dry completely. One post I read said this would take 24 hours. We let them dry overnight and they seemed fine in the morning (about 12 or 13 hours later), so we went ahead with the next step.
  7. Once dry, pop your balloons with a pin and carefully pull out the broken balloon bits. Tip: You might want to do this over the trash can since the balloons will be covered with the dried out Mod Podge mixture and it flaked off all over the table.
  8. Display your eggs. You can hang these with more embroidery floss or fishing line. You could also string several together and hang them as a garland. You can place them in a bowl or vase for a centerpiece, as I ended up doing. There are many possible ideas for Easter decorations with these eggs.
    {Here are the eggs while they are drying.}