Showing posts with label cookie cutters. Show all posts

Tuesday, January 28, 2014

Easy Cookie Cutter Potato Prints

Here's an oldie, but a goody: potato prints. I am not sure where I came up with the idea to use cookie cutters to make this process even quicker and easier, but it came in handy today when I was trying to prep for dinner and needed something to keep the kids occupied! Getting some potatoes out for roasting reminded me that I had just purchased some new cookie cutters that I found on clearance at Walmart -- a total steal, 6 of the little ones that are meant for fondant or something along those lines, and they were just $1.50. (Shhh! Don't tell Brett. I'm supposed to be cut off from buying any more.)

Have I mentioned that cookie cutters are one of my most favorite craft items? Really, they have so many great uses! I have always thought the small metal kind were nice for cutting cute cheese and fruit shapes, and, of course, for crafts. It turns out that they are quite handy for making potato stamps with precise edges in no time flat. Yep. Cookie cutters. What's not to love?!

{A finished potato stamp and a stamp in progress...}

Materials:
  • potatoes
  • small knife
  • small cookie cutters (metal preferably)
  • Styrofoam trays to hold paint (or plates)
  • paper (finger paint paper works well)
  • tempera paints
  • paper towel/damp cloth
  • paint shirts/smocks (optional)

Directions:
  1. You may wish to protect clothing and work surfaces. My kids each have an old paint shirt that they wore. Plus, each of their work areas was covered with a vinyl place mat. If messes don't bother you, proceed to the next step.
  2. Cut potatoes in half. I used 4 small red potatoes.
  3. Press a cookie cutter into each potato half. You don't have to press it entirely into the potato, but you can press it that deeply if you want. Remove the cookie cutter, and use a knife to carefully cut away the outer edges, leaving the shape of the cookie cutter. It's faster and more precise than trying to freehand the shape! (We used a star, some hearts, some fall leaves, and an apple.)
  4. Pour some paint onto Styrofoam trays and let kids dip their potato stamps into the paint and then press it onto paper. Tip: You can sterilize Styrofoam meat trays by running them through the dishwasher on the top rack. Tip: If you have more than one child, it is helpful to give each one his own tray. I just sat them next to each other so that they could share paint colors and potato stamps. Tip: It is helpful to have paper towels or a damp cloth handy for wiping the stamps off before switching colors (unless they want the colors to get mixed). Plus, you will need this for wiping hands when they are all done stamping.
  5. Let paintings dry completely before displaying them. This technique can also be used to making greeting cards or gift wrap.


Here are 10 More Fun Uses for Cookie Cutters:
By the way, please stop by the Livingston Parent Journal's crowdfunding site and see if there is a way that you can help them with their mission! Thanks ever so much.


Tuesday, January 7, 2014

Cookie Cutter Birdseed Treats

Here is an idea that I saw a while back that combines two things that I love: birds and cookie cutters. Of course, we needed to try it! Admittedly, I was skeptical that this would work. These are sort of like homemade "suet cakes," and I had never heard of anybody making their own before.

However, I don't want to call them suet cakes, and mislead you. There is no actual suet involved. I do, however, think that the gelatin serves a similar purpose both in holding the treats together and in providing the birds with a fat. The blog where I found this idea said to use Knox gelatin. To save money, I used Kroger brand unflavored gelatin, which is essentially the same. You do not need to buy a specific name brand for this to work.

I am thrilled to report that this project turned out very well! This is especially true since we made the treats on the day that everything was going wrong. These birdseed treats held up very well in extreme cold, wind, and heavy snowfall, which makes them great for wintertime bird feeding.

{This chickadee actually latched onto the treat to eat!}


One downside is that they were kind of messy to make and the kids weren't thrilled about getting their hands all sticky. Also, unlike other bird feeders* we have made in the past, there is a waiting period for the gelatin to set up. So, I wouldn't consider this to be the perfect kid-friendly bird feeding project  (although it is still a good one, and I would make them again). *Note: For more homemade bird feeder ideas, see my previous posts about birdseed biscuits and other assorted bird feeders.

This made 3 cookie cutter birdseed treats that stayed together and one that fell apart. (The little tree was the one that fell apart. It just did not have enough stuff to make the bakers twine hold it up on the tree branch.) For future reference, I would double the recipe so that both of the kids could each make two to three treats.
{Finished Cookie Cutter Birdseed Treats}


Materials:
  • 3/4 cup birdseed
  • 1/4 cup water
  • 1 envelope unflavored gelatin
  • small cooking pan
  • twine/string/yarn/baker's twine
  • scissors
  • cookie cutters
  • wax paper/parchment paper
  • cookie sheet

Directions:
  1. Cut a few lengths of twine, string, or yarn. We used both yarn and baker's twine. Tie each one into a circle and make a knot to secure the ends.
  2. Place the water and powdered gelatin into the pot. Simmer until the gelatin is dissolved.
  3. Remove from heat and stir birdseed into the pot until combined. Kids can easily help with this step.
  4. Line your cookie sheet with wax paper or parchment paper. (We actually used parchment since we had just baked. I flipped it over and used the reverse side of the parchment. Otherwise, I would have used wax paper since I usually reserve parchment for baking.) Place cookie cutters on top of the wax paper/parchment paper. Then, start spooning the birdseed mixture into the cookie cutters. Have children press the mixture in as tightly as possible. Fill about 1/2 to 2/3 of the way.
  5. Lay the twine/yarn/string on top of each. Now, fill the cookie cutters the rest of the way with the birdseed mixture.
  6. Place in the refrigerator for about two hours. Then, allow to dry overnight, flipping over occasionally so that they dry all the way through.
  7. Gently remove the treats from the cookie cutters. They are now ready to be hung outside, which children can do with some help. Enjoy watching the birds! (Note: I have noticed that most birds prefer to perch on a branch beneath the treat and to eat that way, so place the treats in a tree accordingly. The chickadee pictured above was an exception; it just climbed aboard to eat!)
{Our feathered friend enjoys a meal on a VERY snowy day.}

Thursday, December 19, 2013

Sandpaper Gingerbread Family Craft

For the past few years we have kept an Advent calendar. In the beginning, I used to put small candy such as Hershey's kisses inside each box, but last year I decided to get away from that. I typed up various activities (make hot cocoa, drive around and look at lights, watch a Christmas show, read a Christmas book, write a letter to Santa, etc.) and put the slips of paper into each box. This way, we are doing things as a family instead of just eating junk food.

Admittedly, my kids are not always thrilled about this. For example, they just plain ignored the slip that said, "make a list of our blessings." Fortunately, they were happy the other day when it said "do a Christmas craft." I didn't really have anything planned, but I had remembered pinning this idea ages ago. So I pulled out my sandpaper (purchased from Dollar Tree for this project) and my cookie cutters and we got to work.

The original craft that I was inspired by involved a lot of puffy paint (cute, but not exactly young child-friendly!) and it was intended to be used as invitations for a cookie exchange. This sounds very cute, too, but here is how I modified the craft to make a more appropriate project for my two kids.

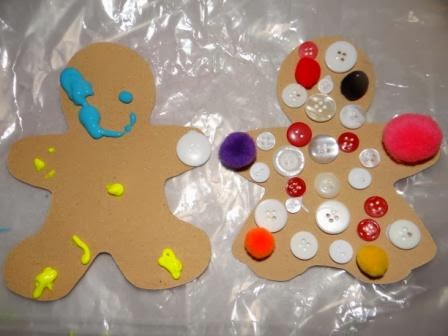
{Gingerbread Boy and Girl by Logan, Age 4}
(Can also be captioned, "why puffy paint should not be placed in the hands of preschoolers!"
Although, his wasn't too bad. It was actually dry by the following morning, which surprised me.)

Materials:
  • sandpaper
  • gingerbread boy and girl cookie cutters
  • pen
  • scissors
  • tacky glue
  • embellishments: buttons, feathers, pom poms, beads, pipe cleaners, craft foam, felt, markers, yarn, sequins, etc.
  • puffy paint (optional -- not suggested for preschoolers and toddlers!)
  • something to protect work surface (recommended -- I like cereal box liners.)
  • old clothes/paint shirts (optional -- strongly recommended if using puffy paint!)

{Our Sandpaper Gingerbread Family by Mia, Age 6}

Directions:
  1. Flip sandpaper over to the non-textured side. Place a gingerbread boy or girl cookie cutter on top and trace around it using a pen. Repeat as many times as desired. I found that we could fit 5 gingerbread people per sheet of sandpaper. (2 large and 3 small) Cut out the gingerbread people.
  2. (If desired, protect work surface and kids' clothing before decorating gingerbread people.) Allow kids to decorate their gingerbread people by using tacky glue to apply whatever embellishments you have at hand. We used many craft staples that you likely have at home: buttons, yarn, pom poms, pipe cleaners, and regular markers. There are many, many, many possibilities. For example, Mia used buttons in the traditional fashion to make a shirt and Logan used them just for decoration all over an entire gingerbread girl. She also used feathers in more than one way -- to make a skirt and also cut and shaped to make hair. (Note: If you are brave enough to let your kids use puffy paint, remember that it will stain clothing and plan accordingly. Also, it is very tricky to "pipe" it neatly, as you can see from my own example with the blobby outline around the head, so that may be frustrating for little ones.)
  3. Make sure that glue dries completely before displaying your gingerbread people. 

 {Brett came home and asked, "Where's Mama's?" Now I have one, too.}

Other Ideas:
  • I think it would be cute to string several of these together to make a garland.
  • Since we have both boy and girl cookie cutters in both large and small sizes, Mia decided that she would make one gingerbread person to represent each member of the family. This would a cute thing to do as a family or as a class: everyone decorates a gingerbread person to look like himself.
  • These could also be made into ornaments by punching a hole and then adding ribbon, yarn, bakers twine, or a pipe cleaner. The only downside is that the sandpaper is kind of flimsy, so you may want to first reinforce these with a layer of card stock. A more durable option would be craft foam.
  • In fact, if you don't have sandpaper, craft foam would be fine for this project. You just will not have the textural aspect unless you find a way to create it. One way would be to add a layer of glitter, but this is going to be messier than sandpaper, by far.
  • To make these into puppets, add a craft stick like we did here.
  • I really do like the idea, too, of using these as invitations to a cookie exchange. In the past, I made my own apron invitations for an exchange, but these would be a bit easier to mass produce.
  • If you don't have a gingerbread cookie cutter, don't run out and buy one! (unless they are already on clearance, in which case feel free to share where you are finding them -- not that I need any more...) You could also use a teddy bear or a puppy or any other item that would look good in brown.
  • Looking for more ideas of things that you can do with cookie cutters? You might also like: cinnamon applesauce ornaments, gingerbread men paper dolls, craft foam ornaments (page 20), and Christmas sun catchers.

Thursday, April 4, 2013

Spring Cookie Cutter Stamp Art

Last month, Logan made did some printmaking using shamrock cookie cutters. For a simple activity to do over spring break, I had the kids make some stamp art with our spring cookie cutters. Mia enjoyed experimenting with different amounts of paint on the cookie cutters, producing thick lines fading to thinner lines, and even sort of dotted lines as the paint was used up. Logan just enjoyed mixing colors. Of course, this inevitably turned to a finger painting project for him, and then for Mia as well.

{Spring Cookie Cutter Stamp Art by Mia, Age 6}
Materials:
  • cookie cutters in spring shapes (egg, cross, bunny, tulip, butterfly, flower)
  • paint trays (we used old Styrofoam trays)
  • paint (we used powdered tempera that I mixed up beforehand)
  • paper (we used construction paper)
  • table cloth or newspaper (optional)
  • paint smocks or old shirts (optional)
  • cookie sheets (optional, to hold paper and contain messes)
Directions:
  1. First, I covered our work surface a vinyl tablecloth (which happens to be in a Halloween print, but I picked it up for a few cents at the church rummage sale for the sole purpose of crafting.) Newspaper also works. Tip: Also, before starting I had Logan put on his paint shirt, which is one of my old t-shirts that I make fit better by using a clothespin to gather the extra material at the back of the next. Mia just wears another old shirt of mine.
  2. Next, I mixed up powdered tempera paint in red, yellow, blue, orange, green, and purple. I let each child pick 3 colors and put them onto Styrofoam trays (left over from some meat packaging and washed well; I am a fan of using what you have that is free.) Tip: The reason I only allowed 3 colors is that any more than that and it would have just become muddy brown. Tip: You could also use ready-made tempera paint, or even acrylic if you are feeling brave. Add white if you like, or use more than one shade of the same color to get different effects. (Note: Acrylic paint stains fabrics, so be aware.)
  3. I let the kids dip the cookie cutters into the paint, mixing as they wanted. Then, they stamped it onto some construction paper, and repeated until they felt the prints were finished. Tip: The reason I only allowed 3 colors is that any more than that and it would have just become muddy brown.
  4. We let the paint dry completely and then I hung up the kids' artwork for spring decorations.
{I love that he chose primary colors.}

{Finished Stamp Art/Finger Painting by Logan, Age 3}

Sunday, March 17, 2013

St. Patrick's Day Cookies

Recently I was thumbing through old magazines my mom gave me and tearing out ideas for future use when I came across a simple idea and wondered why I had not done this before: adding food coloring to the sugar cookie dough before baking. I think this came out of a 2 year old issue of Better Homes & Gardens, but I am not sure anymore. Normally, I get out our ingredients, mix up the dough, roll out our dough, cut out the cookies, wash the blades to the hand mixer and other bowls and utensils while cookies are baking, and then start a whole new mess mixing up a batch of frosting, but this avoids all that extra work (not to mention extra sugar, which face it, nobody in this family really needs). Smart right? Since I had just gotten the shamrock cookie cutter, this seemed like a good time to try it out, using green food coloring, of course.


My little kitchen helper and I used this recipe for cut-out cookies, which is a buttery cookie that is easy to cut out.
  • 1/2 cup (1 stick) softened butter
  • 3/4 cup sugar
  • 1 egg
  • 1 tsp. vanilla extract
  • 1 1/2 cup all-purpose flour
  • 1/2 tsp. baking powder
  • 1/4 tsp. salt
  1. Cream the butter and sugar in a large bowl. Add the egg and vanilla extract and mix.
  2. In another bowl, stir the flour mixture, baking powder, and salt together. Gradually add the flour mixture to the butter mixture and blend until smooth.
  3. I separated the dough into two balls since we were planning to make neon green and regular green cookies.
  4. This is the point when we added food coloring. My little helper added much more then we needed, about 10 or maybe even 12 drops when 3 would have been fine. No big deal, though. Then, I used the hand mixer to combine it all again.
  5. Then, I wrapped both balls of dough in plastic wrap and chilled them in the freezer for 15 minutes.
  6. Preheat oven to 350 degrees.
  7. On a lightly floured surface, roll out dough to about 1/4 inch thickness. Cut out cookies and place on cookie sheet. (Tip: I like to cover mine with parchment paper first.) Add sugar sprinkles, if desired. We used green, and lots of them when my little man was in charge.
  8. Bake for 10-12 minutes. Let cool on wire racks. Makes about 2 dozen cut-out cookies.

Tuesday, March 12, 2013

Shamrock Stamping with Cookie Cutters

Today, Logan did a print-making project using a shamrock shaped cookie cutter and some paint. I have thought to use cookie cutters for the obvious use -- cutout cookies -- and also for tracing tools and play dough tools, but it never occurred to me to use them as stamps. This is so simple and so clever, it is definitely one of those "why didn't I think of that?" ideas for preschool craft projects. This is the source of my inspiration for today's craft. We used a shamrock since St. Patrick's Day is coming up, but this is something that is versatile enough to work for any holiday or just because you feel like doing a project. I am picturing hearts for Valentine's Day, flowers for Mother's Day, eggs or crosses or bunnies for Easter, trees or stars or bells for Christmas and jack-'o-lanterns for Halloween just to name a few.

{Shamrock Print by Logan, Age 3 1/2}
Materials:
  • cookie cutter/s 
  • paint
  • tray to hold paint
  • paper
  • newspaper or vinyl tablecloth (optional)
Directions:
  1. First, I covered our work surface with a new-to-me vinyl tablecloth (which happens to be in a Halloween print, but I picked it up for a few cents at the church rummage sale for the sole purpose of crafting.) Newspaper also works. Tip: Also, before starting I had Logan put on his paint shirt, which is one of my old t-shirts that I make fit better by using a clothespin to gather the extra material at the back of the next.
  2. Next, I mixed up two colors of powdered tempera paint: green, the obvious choice, and yellow, for some variety. I put both colors onto a Styrofoam tray (left over from some meat packaging and washed well; I am a fan of using what you have that is free.) Tip: You could also use ready-made tempera paint, or even acrylic if you are feeling brave. Add white if you like, or use more than one shade of green to get different effects. (Note: Acrylic paint stains fabrics, so be aware.)
  3. I let Logan dip the cookie cutter into the paint, mixing it as he wanted to. Then, he just stamped it onto some paper, and repeated until he felt the print was finished. We used green construction paper, but you could also use cardstock or special paper for paint that you can purchase at craft stores. (Note: Our shamrock cookie cutter cost 99 cents and it came from Michaels, in case you are wondering where to find one. I checked many, many stores and nobody else had any, which surprised me.)
  4. We let the paint dry completely and then I hung up Logan's stamped shamrock print.


Saturday, February 9, 2013

Birdseed Biscuits


Yesterday, we made an assortment of bird feeders, and today I realized that I did, in fact, have the ingredients to try one more than we learned about from the story time lady at the library. Making "Birdseed Biscuits" turned out to be a good afternoon activity, and not nearly as messy as the bird feeders involving peanut butter. I would definitely make these again, and they get my top recommendation for a good kid-friendly activity that kids can actually participate in.

What You Will Need:
  • 2 cups biscuit baking mix
  • 1/2 cup water
  • 1/2 cup birdseed
  • medium size mixing bowl
  • spoon
  • rolling pin
  • cookie sheet
  • parchment paper (optional)
  • cookie cutters
  • plastic drinking straw
  • butter (or margarine)
  • basting brush
  • yarn/string/twine
  • scissors
Directions:
  1. Preheat oven to 425 degrees.
  2. Mix 2 cups of biscuit baking mix with 1/2 cup water to form a soft dough. Young kids can help pour and stir. Older kids can measure, too.
  3. Add 1/2 cup of birdseed. Form dough into a ball. Kids can help with this.
  4. Roll out dough. Kids can help with this. The directions we were given said to roll to 3/4" thickness, but we were successful with about 1/2" to 3/4" thickness. Any thinner, and it was hard for the cut-outs to keep their shape.
  5. Have kids cut out shapes using cookie cutters. Take extra dough, reshape into a ball, and roll out until all the dough is used up.
  6. Arrange cut-outs on a cookie sheet. This is probably best for an adult to do. (Tip: We lined ours with parchment paper first. This is not necessary, but it keeps your cookie sheet cleaner and makes removing the finished biscuits very easy.
  7. Use a plastic drinking straw to punch a hole into each biscuit. Kids can help with this step. (Tip: Make sure it goes all the way through and that it is not too close to the edges.)
  8. Melt butter or margarine and brush over the cut-outs. We used 1/2 tablespoon of butter. The directions we were given said to use margarine, but I don't buy that any more. Butter worked fine, and since it didn't specify how much to use, I decided to use a very small amount, which was just enough for the 12 biscuits we made. This step is more for an adult, so I did it myself.
  9. Bake for 15-20 minutes, or until light brown. This is something for an adult to do. Then, while they are baking, cut a piece of yarn, string, or twine for hanging each biscuit. Older kids can help with this.
  10. Allow biscuits to cool. Then, thread your yarn, string, or twine through the hole, tie a knot, and hang them on a tree for the birds to enjoy. (Tip: I found it was easier to use the straw to push the yarn through the hole rather than trying to poke it through on its own.)

Tuesday, December 20, 2011

Cinnamon Applesauce Ornaments

 Materials:
  • cinnamon
  • applesauce
  • glue
  • bowl 
  • spoon
  • rolling pin
  • cookie cutters
  • plastic drinking straw 
  • spatula
  • cookie sheet
  • ribbon or yarn for hanging
  • scissors
Directions:
  1. Preheat oven to about 175 degrees. Note: Only adults should use the oven.
  2. In a bowl, mix equal parts cinnamon and applesauce. Tip: If it appears too runny, add more cinnamon.
  3. Add a bit of glue. Tip: We used white glue, but you could try glitter glue for sparkly ornaments.
  4. Knead dough into a ball, and then roll it out until it is about 1/4" thick.
  5. Use cookie cutters to cut out shapes. Mia made a bell and Logan made a tree.
  6. Use a plastic straw to punch holes in the top of each shape so that they can be hung later. Tip: If you don't have a straw, just poke a hole with a pencil or other pointed object, just make sure it is big enough since it may shrink a bit as the ornament bakes.
  7. Using a spatula, slide ornaments onto cookie sheet and bake for about 1 hour. 
  8. Carefully remove ornaments from oven and allow to cool. Tip: Ornaments may need additional time to air dry, so I would recommend setting them in a safe place for 1-2 days before hanging.
  9. Once ornaments are firm, cut a length of ribbon or yarn, thread it through, tie a knot, and your ornament is now ready to display. These ornaments smell great and would make nice gifts for grandparents.

Wednesday, December 14, 2011

Gingerbread Boy and Girl Puppets

Here's a craft idea that has double the entertainment value. Once the kids are done making their puppets, they can use them to put on puppet shows... just in time for the holidays.
{Gingerbread Boy Puppet by Logan, Age 2}
Materials:
  • brown construction paper
  • pencil/pen
  • gingerbread boy/girl cookie cutters
  • scissors
  • craft stick/s (one per puppet)
  • glue
  • decorative items: yarn, buttons, puffy paint, pom poms, rickrack, sequins, etc.
Directions:
{Gingerbread Girl Puppet by Mia, Age 4}
  1. Fold a piece of brown construction paper in half. Trace around a gingerbread boy or girl cookie cutter. Keeping paper folded, cut around the outline. You will end up with two identical gingerbread shapes.
  2. Have your child decorate one gingerbread cutout. Mia and Logan made eyes and mouths with red puffy paint. (I helped Logan with this.) Next, he chose buttons, so I helped him with the glue. Mia cut lengths of yarn to decorate her gingerbread girl, making clothes and hair. Once the gingerbread cutout is decorated, set it aside so glue or paint can dry.
  3. On the other gingerbread cutout, glue a craft stick so about half of it is sticking out the bottom.
  4. Make sure all embellishments are attached and glue is dry before doing this next step. Add glue to the entire plain gingerbread cutout including the part of the craft stick that is inside. Carefully press your decorated gingerbread cutout on top of the plain one, sandwiching the craft stick in the middle. Run your finger over the top of the paper to make sure all parts are glued down.
  5. Once glue is dry, you can play with your gingerbread puppets. 
P.S. Don't forget to check out my book review and giveaway for Green Grandma's Vinegar Fridays. Giveaway ends at the end of the day today (Wednesday, December 14, 2011), so you still have time! This book has many amazing tips for cleaning just about everything including pet messes and crayon marks from the walls. There is something for everyone, so be sure to like Green Grandma's Facebook page and let her know I sent you.
     

    Saturday, December 10, 2011

    Christmas Sun Catchers

    I love making sun catchers with the kids because any time they want a project and I don't have a new idea, I can dust this one off and make it fit with the current season or upcoming holiday. While the approaching Michigan winter may not make me normally think of sunshine, these look pretty and remind me of stained glass windows, which is something I do think of at Christmastime. These can be made by toddlers on up, but they do require some parent prep work. If you aren't interested in drawing your shapes you can trace holiday cookie cutters like candy canes, Christmas trees, bells, stars, angels, gingerbread men, reindeer, or Santa Claus. I drew the ornament free-hand and traced candy cane and Christmas tree cookie cutters to make our sun catchers. Another option is to download a template, cut that out, and then trace it. For construction paper, we used traditional Christmas colors of red and green, but you could try black to make your sun catchers look more like stained glass windows. Or, use any color you wish.


    Materials:
    • pencil 
    • clear tape
    • scissors
    • clear contact paper
    • construction paper (We used traditional red and green.)
    • cookie cutters (optional) 
    • tissue paper (Again we used red, green, and some white.)
    • paper trimmer (optional)
    • hole punch (optional)
    • yarn, string, ribbon, etc. for hanging (optional)
    Directions:
    1. If you are making a shape that is symmetrical, fold your paper in half like a hot dog before drawing and cutting out your shape. This makes it go a bit faster, and hopefully it creates less frustration, too. If you are making a shape that isn't symmetrical, simply draw (or trace) your shape and cut it out on two pieces of paper. Tip: If you are using two pieces of paper, you will need to make sure they stay together so that you get identical Christmas shapes.
    2. Cut two pieces of clear contact paper (I used both a paper trimmer and scissors for this.) so that they are 1/4 inch larger than the construction paper all the way around. Tip: Do not remove backing from contact paper until you are ready to use it.
    3. Adhere one piece of paper to the clear contact paper so that there is a border of 1/4 inch all around the paper. Tip: Slowly peel the contact paper away from the backing as you smooth the construction paper down onto the contact paper. This way you don't end up with "bubbles."
    4. Have your child stick tissue paper squares onto the contact paper Christmas shape until it is filled. (Mia has created her own technique for filling in small spaces: crumpling up the tissue paper into balls. It makes the sun catcher a bit bulkier, but it does work, and I think it adds a bit of visual interest to the design. She helped Logan fill in the ornament hook using this method.)
    5. Layer the second piece of construction paper on top of the first, making sure that the Christmas shapes line up.
    6. Add the second piece of contact paper over the top, smoothing it down as you go. Trim away excess if desired, but don't trim too much or the sun catcher will not stay together. 
    7. You can display your sun catcher in a window using clear tape. Another option is to use a hole punch to make two holes near the top, thread some ribbon or yarn through the holes, tie it off, and then hang your sun catcher.
    Don't forget to read my review of the book, Vinegar Fridays, and enter for a chance to win your own copy. You have until Wednesday, December 14, 2001 to enter the drawing.

      Monday, October 24, 2011

      Halloween Cut-Out Sugar Cookies

      {I decorated these cookies. The one one the right is the last little ball of dough, and I pinched a small stem with my fingers.}

      {Cutting out the shapes}
      I have been searching for the best sugar cookie recipe for awhile now. I am not sure if this is it, but it is pretty darn close. The dough is a great consistency for making cut-out cookies and the flavor is good. My only confusion is that they taste more like a butter cookie than a sugar cookie, which reminds me of shortbread. I think I will keep looking for the perfect sugar cookie recipe, but for now, I will share how these turned out. 

      {There's no such thing as too much frosting.}
      {Don't forget to add lots of sprinkles.}


      {You may have to taste-test to ensure that your cookies are edible.}
      {Take pride in your work.}
      Possibly the best part of this whole experiment was trying out our jack-o'-lantern cookie cutter that I got on clearance at Jo-Ann's last year after Halloween. It's by Wilton and it has several smaller shapes that you can use to make the facial features, which I think is a cute idea instead of plain pumpkin cookies. For frosting, we used this recipe. Again, I am not sure it is the best one available, but it is the best I have tried so far. It is easy to make and easy to spread, and it made enough so that we could divide it up into different containers for making various colors. We left some plain white for the ghosts, and we mixed red and yellow food coloring to make orange for the jack-o'-lanterns. We also attempted (and failed) to make black for some cats (which we didn't even end up cutting out). It was more of a purplish gray, but it all tastes the same, so purple pumpkins were just fine. We also used green sugar sprinkles decorating (I was thinking of stems; the kids had other ideas.) as well as some other Halloween sprinkles. Making and decorating our Halloween cut-out cookies was good family fun, and I think it may become an annual tradition at our house.