Monday, January 28, 2013

Cheer Bear Photo Prop

I started doing photo props for birthday parties two years ago when we first started having little friends for guests. It works triple-duty as party decor, as a party activity, and as a cool souvenir to include in the thank-you cards. Plus, following the party, these end up as bedroom decor, so they definitely serve their purpose and make it worth the time invested in making them. Two years ago, it was a stand-up Ariel that I ordered online and painted. Then, last year, it was a bit less work for me because I got enlarged color copies of Fancy Nancy and did my own version of home "laminating." This year, however, Mia chose the theme of Care Bears, which I couldn't find anything for anywhere I looked, and I tried many stores: Dollar Tree, Michael's, Jo-Ann, Target, Wal-mart, Meijer... The only place I saw any Care Bear items was online, and since I wasn't interested in ordering anything, I realized I would have to make it myself. Here's how I did it.


Materials:
  • good sized cardboard box
  • scissors/X-acto knife
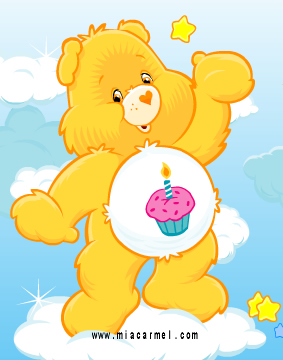
  • Care Bears image for inspiration
  • pencil
  • black Sharpie marker
  • acrylic paint (I used white, hot pink, fuchsia, red, orange, yellow, green, blue, purple)
  • paint brushes
  • plate/tray to hold paint
  • ruler
  • about 50 cotton balls (optional)
  • Aleene's Tacky Glue or white glue (if using cotton balls)
  • turquoise plastic table cloth (optional for photo back drop)
Directions:
  1. I cut the side off of a good sized corrugated cardboard box. I re-used one that had been used for shipping Christmas presents to our house.
  2. Then, I found the image I wanted to use. My picture was from a coloring book that Uncle Ryan sent Mia as a birthday present.
  3. Next, I drew the Care Bear onto the cardboard using a pencil. My Cheer Bear is about 25" tall and 17" across at the widest point.
  4. After that, I cut out Cheer Bear. I used mostly scissors for this, but switched to my X-acto knife for tight corners and curves.
  5. Then, I gathered my paints, brushes, and a palette. (Okay, my "palette" was a plastic take out lid that I am re-using. It washes cleaner than the Styrofoam trays that I frequently use for painting, and since I switched colors often, this was helpful.) To get the pale pink of Cheer Bear's fur, I made an approximately 50/50 blend of white and hot pink paint. Of course, her belly, eyes, and snout are white. The rainbow is pretty self-explanatory: red, orange, yellow, green, and blue. I don't know why there is no purple, but that's her belly badge. Accents include the red heart tush tag and hot pink heart nose, freckles, eyes, and eye brows. One lollipop is painted fuchsia and purple mixed with white. The other is painted purple and hot pink mixed with blue. The sticks are white. Apply as many coats of paint as desired for the coverage you want, and allow all paint to dry completely.
  6. After the paint was dry, outlined it with a black Sharpie marker. This made it look more finished.
  7. To make the Care Bear stand up, I took another side of the box (this time a thinner side) and folded it in half so I had two equal size pieces. I used a pencil and a ruler to find the center of one, then I made it into a semi-circle shape. I cut it out, traced it onto the other piece of cardboard, and then cut it out. My semi-circles are about 12" wide at the base and about 5" tall at the center.
  8. I painted both of the semi-circles white, let the paint dry, and then flipped them over and painted the other sides white as well.
  9. Next, I used my scissors to make a small wedge-shaped notch (the smaller point faces the straight edge of the semi-circle, which is the base) into each of the cardboard semi-circle. At the widest, they are about 1/4".
  10. I took another thinner side of the box, drew a cloud shape onto it, and cut it out. Again, I painted it white, but only on one side.
  11. I fluffed out some cotton balls by pulling them apart with my thumbs and forefingers and then I glued them onto the cloud shape and both of the semi-circles (one side only) using Aleene's Tacky Glue. This added a lot of dimension and made it more cloud-like.
  12. To set up the photo prop, I slid Cheer Bear onto the two wedges of the semi-circle shapes so that the fluffy sides faced out. After that, I just propped the fluffy cloud against the front. I took a bit of extra cotton ball and glued it to the tops of the semi-circles that were showing a bit just to make it more cohesive. I set Cheer Bear in front of a turquoise plastic table cloth (97 cents at Wal-mart) that I had doubled over and taped to our fake fireplace. As the guests arrived, I took their photos next to Cheer Bear, and I once I get them printed, I will include them in the thank-you cards.

Welcome to Care-a-Lot! Sign

It only just dawned on me last year with the Fancy Nancy party: the front door is the perfect place to set the tone for the party, right as guests enter the house. So, for Mia's 6th birthday with a Care Bears theme, I decided the welcome sign should be a rainbow with clouds that read "Welcome to Care-a-Lot!" in rainbow colors. I think it looks nice and cheerful, plus I can imagine it being on her bedroom door for quite awhile following the party, so I think that makes it even more worth my time.


Materials:
  • cardboard
  • pencil
  • tracing paper (optional)
  • scissors/X-acto knife
  • acrylic paint in rainbow colors
  • paint brush
  • something to hold paint
  • word processing software
  • scrapbooking markers in rainbow colors
  • clear con-tact paper 
  • Mod Podge (optional)
  • double-stick adhesive
  • masking tape
Directions:
  1. On a piece of cardboard, draw a rainbow shape. I noticed that the semi-circle window at the top of our front door looked a bit like a rainbow, so I used a pencil and tracing paper to help me with this. I had to trace just one half, cut it out, draw it onto the cardboard, flip it over, and then trace again. It didn't look exactly how I wanted, so I did some additional drawing, erasing, and more drawing until it was more like I envisioned. I cut out my cardboard rainbow with scissors mainly, using my X-acto knife when things got tricky around the curves.
  2. Then, I drew in lines to divide it into six bands, one for each color. Then, I got out my acrylic paints (first making sure I was wearing my old paint clothes) and painted it red, orange, yellow, green, blue, and purple. The yellow required more coats to cover the brown cardboard.
  3. After the paint dried and I felt it looked good enough, I sealed it with a coat of Mod Podge, which I applied with a foam brush. (Tip: If you are not familiar with Mod Podge it's an awesome, multi-purpose tool that you must have if you like to do crafts, serving as both an adhesive and a protective sealant.)
  4. For the lettering, I downloaded this free font called Care Bear Family. In Microsoft Word, I used the word art function to make the lettering in outline style using the largest possible font size, 96 point. I did this in landscape format and dragged the margins to adjust the lettering so that it was even bigger, as large as could fit on one page. After printing it, I folded the paper in half (like a hot dog) so that "Welcome to" was on top and "Care-a-Lot!" was on the bottom. Then, I took my scissors and cut out cloud shapes. (If you want, you can draw them first, but I just started cutting.) 
  5. Next, I took my scrapbooking markers and colored all of the letters so that they had all the colors of the rainbow, from top to bottom: red, orange, yellow, green, blue, and purple. When I was done coloring, I cut four pieces of clear contact paper so that they were about 1" larger than the paper all the way around. I "laminated" the clouds, each one between two pieces of clear con-tact paper, so that the sticky sides were pressed together. I trimmed off the excess so that they were cloud shapes once more, leaving about 1/2" border. Lastly, I used strips of double stick tape to adhere the word clouds to the cardboard rainbow.
  6. The day of the party, I used masking tape to put this on the front door, and it looked very colorful and cheery.


Monday, January 21, 2013

DIY Pin-the-Cupcake-on-Birthday-Bear Game

If you read my previous post about making the rainbow pull-string pinata, you know that party planning is in full-swing here, which hopefully helps you understand why I have been absent from the blogosphere for about 3 weeks. Here is a party game that I came up with and designed all on my own, thankyouverymuch. I am pretty doggone proud of myself. (It was inspired by my pin-the-tail-on-Ariel game that I made 2 years ago, however, this one I made from scratch.) This project was much simpler than the pinata, but it definitely helps that I am decent at drawing. Otherwise, it would have been a hopeless endeavor. This cost me less than $12 total, including the cost of the poster board and the cost of laminating. I think it ended up being my most expensive thing I have made for Mia's Care Bears party, but still it is not that bad, especially considering that it is exactly what I wanted, and it wasn't something that I could have purchased.


Materials:
  • white poster board
  • pencil
  • scissors/X-acto blade
  • black Sharpie marker
  • acrylic paint (yellow, white, turquoise, orange, pink)
  • paint brushes
  • plate for holding paint
  • magenta Sharpie marker
  • tracing paper
  • boxboard (cereal box)
  • markers (red, orange, yellow, green, blue, purple)

Directions:
  1. First, I found and printed this picture of Birthday Bear to use as my model. (I did this in black and white to save ink.)
  2. Next, I drew my version of Birthday Bear onto a piece of white poster board. I broke it down into shapes starting with the round belly (I think I actually used a plate or something to trace around), and several circular shapes for the head, cheeks, and paws. The poster board had a grid on it which annoyed me at first, and then I realized that it would be helpful in the long one for finding more accurate proportions and placement.
  3. I painted my Birthday Bear with acrylic paint, allowed it to dry, and touched it up as needed. Then, I outlined everything with a black Sharpie pen and used a magenta Sharpie to color in the sprinkles on the cupcake.
  4. To make the game pieces, I used a piece of tracing paper and a pencil to trace the outline of the cupcake on his belly badge. Then, I cut it out, traced it onto a piece of boxboard (cereal box), and cut that out. This became my template for the pin-the-cupcake game pieces. I was able to trace 11 of them onto the poster board, using up a lot of the white space around Birthday Bear. I colored them with regular old markers, nothing special: 2 red, 1 orange, 2 yellow, 2 green, 2 blue, and 2 purple (since Mia and I had already agreed on largely using rainbow colors for the birthday decor). 
  5. I took my nearly-completed game to Staples to have it laminated. The only downside is that it cost $10.60 to have it laminated, but that was a necessary evil for it to a) survive being played and b) spend the rest of its natural life living on Mia's bedroom door or wall.
  6. Finally I used scissors to cut him out. For the small section between his arm and leg, I used my X-acto knife to trim this area. I figure that we can use a dry erase marker to write names on the game pieces and then put some rolls of tape on the back, that way the birthday guests can play the game more than once if they want.


DIY Rainbow Pull-String Pinata

Mia requested a Care Bear pinata for her upcoming birthday party. While I had successfully made a Lightning McQueen pinata for Logan's most recent birthday party, so she felt she should get one, too. The car was pretty boxy, which lent itself well to using a cardboard box. It only seemed fair to make her a pinata (before hopefully retiring from making pinatas), and I planned to work with cardboard again. However, I didn't think I could pull off something with some much roundness for my second-ever home-made pinata. So, I convinced her that a rainbow was perfect, and thankfully, she agreed. We had already decided that rainbow colors would be used for our decor since Care Bears are hard to find. This pinata took about 3 hours total to make and it isn't something I would recommend for craft novices. It is a pull-string pinata, because after spending all that time, who wants to see her creation beaten to a pulp in mere seconds? I'm not completely crazy, after all. The best thing, besides that it looks exactly the way I want (unlike the kind that I would have had to order online), is that it cost me nothing but my time since I already had all of the supplies at home. After the party, I plan to hang it from a hook in a corner of Mia's room. Mama's on a roll planning the Care Bear party.


Materials:
  • corrugated cardboard
  • boxboard
  • scissors
  • X-acto knife
  • masking tape
  • crepe paper in rainbow colors
  • glue stick
  • string (I used bakers twine)
  • light blue curling ribbon 
  • Scotch tape
  • paper trimmer (optional)
  • pen/pencil
  • push pin

Directions:
  1. Find a large, flat piece of corrugated cardboard. Cut it in half. To start the arc shape, I traced the top edge of a frying pan on one piece of cardboard. Then, I free-handed the rest of the rainbow shape. I cut it out and then traced it onto the other piece of cardboard, and then cut that out, too. The base of my rainbow ended up being 13 1/2" in diameter.
  2. Draw a vertical line to find the center of your arch. A ruler helps with this. Then, I decided that my rainbow would be 4 1/2" wide. I used a ruler to help make lines (for the straighter parts only; there was free-hand drawing involved with the curved sections) to divide it into sections for each color: red, orange, yellow, green, blue, purple, so 6 altogether. I started at the bottom left and worked my way over to the center. Next, I cut out half of the inside arch (not the whole rainbow), flipped it over on top of the cardboard, and traced it to get the mirror image for the bottom line of my arc. Then, I cut out the second half of the inside arch. I now had a rainbow shape, which I traced onto my second piece of cardboard, and then cut out for a total of two complete rainbow shapes for the sides of the pinata. (Tip: It was easier to cut this if I used my scissors first on the straight sections and then cut into them with small pieces using whatever angle was handy. I just pulled away little bits at a time until I was finished rather than trying to cut it all out in one, long line.)
  3. For the bases of the rainbow, I used a ruler to measure 2 cardboard squares measuring 4 1/2" x 4 1/2". I cut these out with scissors.
  4. For the top and bottom arches of the pinata, I used boxboard (mostly cereal boxes, but there was some Barbie packaging involved since it was after Christmas and this was handy). I used my paper trimmer to measure strips that were 4 1/2" wide and then scored the boxboard with the trimmer. This gave me an easy line to follow with scissors. I think I needed a total of 3 boxes to get the amount I needed.
  5. To assemble my rainbow, I started with my square bases. I used masking tape to adhere the bases to the cardboard arches -- 2 strips of tape per side on the outside and 3 strips of tape per side on the inside. I laid the arch flat on the table upright to make this easier. (Tip: Tear off several strips of tape prior to starting and have them near your work station. I just taped them along the edges of my table. My 3 year old helped by handing them to me one at a time.) You want each piece of tape to be folded horizontally so that about half of the tape is at the top and the other half is at the bottom of your cardboard seam. It doesn't have to be perfect, just sturdy enough to hold.
  6. Next, I used my strips of boxboard to cover the top of the arch. Again, I used masking tape, both inside and outside. When I would get the the end of one strip, I would slightly overlap the next strip to the first and secure them with more tape. Working around curved sections required shorter pieces of tape. (Tip: Make sure that the inside of your boxes is facing the outside of your rainbow so that you don't have printing showing.)
  7. I decorated the rainbow pinata with strips of red, orange, yellow, green, blue, and purple crepe paper, all of which I had already, amazingly enough. (The red, yellow, green, and blue came in twin-packs from Dollar Tree. The purple was purchased at Target for her birthday party last year, and I have no clue about the orange, unfortunately.) I folded the crepe paper in half length-wise, cut strips, and used a glue stick to adhere them. I just started with red, and worked my way to the end, overlapped as needed. (Tip: As with the tape, it was easier to work around the curves using smaller lengths of crepe paper.) I did both sides like this as well as the top arch, which in retrospect, I could have made all red and saved myself some time. Oh, well. The inside (bottom) of the arch I did all with purple because I was tired by that point and wanted to be done. It looks just fine. (Tip: Do NOT use any other type of glue. It will be too wet, which will make your colors run and tear your crepe paper.)
  8. To make the trap door, I cut away 3 sides from the underside of one of the bottom squares. The 3-sided flap is set in about 3/4" all the way around. Then, I used an X-acto blade to make slits in the bottom square, about 12 around the outside edges, and 6 in the center (on the flap). I cut lengths of light blue curling ribbon, inserted them into the slots, leaving an inch or so on the inside, and then carefully curled the rest. One length of ribbon was taped securely to the inside of the flap to actually open the pinata. All the rest are for show. I may have added extras to fill it in, but I don't remember now. On the other side of the rainbow, I added several more curled blue ribbons and just taped them on with Scotch tape.
  9. For hanging, I poked 2 holes in the top, first with a push pin, and then I enlarged the holes with a pen. I struggled with getting my bakers twine in there and finally figured out a system that worked. I put the un-knotted bakers twine through the tops of each hole, pulled it through until it came out the bottom (luckily I could reach my hand all the way in), tied the ends together to make a secure knot (I had to knot it a few times to prevent it from slipping through the holes), and pulled it back through the top for a hanging loop.
  10. The pinata only opens on the one side. Before the party, I will fill it with goodies and close it up, probably adding a little tape just so it stays closed long enough.