Showing posts with label photo props. Show all posts

Monday, February 24, 2014

DIY Paper Chains Photo Backdrop

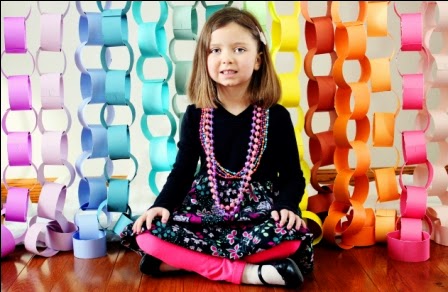
After a month, I am getting around to sharing some of Mia's birthday photos! These were taken by Erin of E.K. Photography, so be sure to check her out and give her some love. In my opinion, some of the cutest pics of Mia were the ones that Erin took using the paper chains that I made for a backdrop.


I saw a photo on Pinterest, which of course, always makes things look easy. This is easy, but there were no directions on how long to make the chains, how many chains to make, or how wide to make the strips, all of which I feel are kind of important to the success of a project! Here are the steps I used to create this paper chain photo backdrop.


  1. Each chain was made using 4 pieces of 12" x 12" card stock, cut into 2 inch wide strips with a paper trimmer. (I had previously tried 1" and 3" strips and found them to be too skinny and too fat, respectively. The perfect width, after trial and error, was 2" strips.) 
  2. I stapled each strip into a ring, linking them as I went along. This wasn't hard, but it did take some time. In total, there were 14 paper chains for the backdrop. Ideally, I would have made more chains for a wider backdrop, but I ran out of card stock -- or at least enough of the same color so that I could make chains that were long enough. (They had to be taller than Mia, of course.)
  3. To display the chains, Erin and I slipped them onto her backdrop holder, arranging them in a sort of rainbow.


All photos used with permission of E.K. Photography.

Sunday, February 16, 2014

Photo Thank You Cards for a Puppy Paw-ty

I once read that thank you notes should be sent within three months of the event. I think for busy folks, the sooner the better, so my goal was to get them done within three weeks. We just celebrated Mia's 7th birthday with a puppy paw-ty on the first, so I am going to meet that goal with these photo thank you cards. As a bonus, they serve as a fun and inexpensive souvenir from the party.

{Front of Card}


Materials:
  • card stock weight kraft paper (mine was 8 1/2" x 11")
  • paper trimmer
  • photos from dog house photo prop
  • scrapbooking adhesive
  • scalloped scissors
  • black ink pad
  • date stamp
  • "Wonderful Times" stamp
  • computer and printer

Directions:
1.  During the party, I took pictures of the guests wearing puppy ears and posing in the dog house photo prop. Then, I had them printed at Meijer. For family members who sent gifts, or for kids who didn't want to pose, I used pictures of Mia, so I had extras printed for this reason.

2.  Next, I folded a piece of kraft paper in half, width wise, and cut along the fold. Then I folded each piece in half again, width wise, to create two cards.

3.  In Microsoft Word, I created a fill-in-the-blank template for the inside of the cards. This fit four to a page in landscape setting and I used this free font. It read:

Dear ___________________________,                     
Thanks for helping make my 7th birthday                           
a doggone good time! Thanks also for the                     
______________________________­_    
______________________________­
______________________. It’s paw-fect!
Your friend,                                                                

At the bottom right corner of each, I included a red paw print clip art. I used scalloped scissors to trim these to size and then adhered them on the inside of the cards, on the right.

4.  I trimmed the photos to fit inside the cards and then adhered them to the inside, left of the fill-in-the-blank template.

{Inside of Card}


5.  For the front of the cards, I printed off several of this cute puppy holding a cupcake clip art. Again, I cut these out with my scalloped scissors and adhered them to the center of the cards. Then, I added the date of the party and the phrase "Wonderful Times" with stamps and a black ink pad. Tip: If you don't have this sort of thing (both are the dial type of stamp that you see at libraries), you can type anything into your computer and print it out. This would give you more choices of font style, size, and color.

6.  Last but not least, I had Mia fill in the cards with the recipient's name, description of the gift (mostly donations for the local Humane Society!), and, of course, her signature.

Tuesday, February 11, 2014

DIY Doghouse Photo Prop

This is the type of project that I debate whether or not to share. Not because I don't want to share. I do! I just don't want people to feel like they should be able to make this themselves. (Not that you can't. I'm sure you're very crafty!) You know what I mean, right? This is not the type of easy-peasy kids' craft that I often post here. That said, it really wasn't that hard to make, so it's totally do-able if you are planning a puppy paw-ty of your own.

{Ritzy and I get a turn in the doghouse.}

This photo prop turned out nicely and helped set the theme for Mia's 7th birthday paw-ty. Besides being fairly simple to make, it was virtually free! (My favorite kind of project, in case you didn't know.) All I had to buy was a 59 cent bottle of paint since I ran out after the first coat.

As soon as guests arrived, they received a pair of puppy ears. Once they were ready, I had them pose in the doghouse. The photos will be used in the thank-you cards (more on those later!).


Materials for Making Doghouse:
  • large cardboard box
  • scissors
  • pencil
  • ruler
  • hot glue gun
  • black Sharpie marker
  • red acrylic paint
  • white acrylic paint
  • black acrylic paint
Directions for Making Doghouse:
  1. Deconstruct the box and lay it flat. Using a pair of sharp scissors (or a box cutter, if you are more intrepid -- and less accident-prone than myself), cut along a seam so that you now have 2 pieces of cardboard. Each one is two sides of the box. Trim away the smaller flaps from one piece. (In case you are wondering, my cardboard measured 35 1/2" wide by 43" tall at that point.)
  2. Using a ruler, find the center point of the piece of cardboard. Mark it with a pencil. Next, use the ruler and pencil to make vertical and horizontal lines, dividing the cardboard into quadrants. (This is not necessary, but I found it helpful). Tip: Make all marks on the "outside" of the cardboard: the part that has printing on it. Then, when you flip it over, you will have a perfectly clean piece of cardboard to work with.
  3. This was the point when I decided how the roof line should look. I decided to make a horizontal line about 1/3 from the top, all the way across, because that looked right visually. Then I used my ruler to draw angles from the outside edges of that line, meeting at the top. (Remember, I already had a center line, so this is why it was handy.) I used scissors to cut along the lines and ended up with a triangular point on top of the house.
    {The basic shape}
  4. Next up, I made the doggie door. I decided the top of the door would be my center point. I didn't want it to be very wide, just enough for kids to pop their heads through, otherwise there might be clutter in the background of the photos. I measured 10" for width, 5" on either side of the vertical center line, and then drew lines. To get the curve at the top, I traced around the rim of a large plastic bowl. Then, I cut it all out with my scissors. Tip: Since I wasn't worried about how the part I was cutting away looked, I was free to cut it into smaller chunks. For some reason, I have found small triangles to be easier to work with rather than one large semi-circle.
  5. After getting the basic doghouse shape, I flipped my cardboard over to the "clean" side and laid in on a layer of newspaper. I used a foam paintbrush to apply a coat of red acrylic paint, let it dry, and then added a second coat of paint. 
  6. Once the second coat dried, I took a strip of cardboard (one of my discarded pieces), which was the same width as my doghouse and about 2 inches tall and used this as a straight edge to make lines across the entire house with a black Sharpie. This made it look like wooden boards. I added two "nails" per board along the outside edges. These were just small black hand-drawn circles. I also outlined the rest of the doghouse with black Sharpie for a more finished look.
    {Adding the "boards"}
  7. It didn't look finished, so I took two more strips of cardboard (again about 2 inches wide) and cut each one at a 45 degree angle so that they would meet up to make the roof. These, I painted with black acrylic paint and once they were dry, I adhered them with my hot glue gun. 
  8. To personalize the doghouse, I cut an oval out of some scrap cardboard and painted it with white acrylic paint (two coats). After the paint had dried, I outlined it with black Sharpie and then added another oval set about 1/4" in from the outline. Then I typed "Mia" using this free font and printed it out, trimmed it to size, and glued it the the placard. Lastly, I hot glued the oval to the front of the doghouse.
    {Finished!}
  9. Before displaying the photo prop, I took two extra scraps of rectangular cardboard and hot glued them to the back of the doghouse on either side of the door. I had noticed it was a bit flimsy (likely because I used more then one side of a box to create it), and this served as a necessary reinforcement. To hang it, I used twine which was not elegant, but it fit with the theme just fine. I cut two lengths and used plenty of masking tape to adhere them "stitches" fashion. Then, I taped both lengths of twine to the mantel with clear packaging tape. It had just enough distance between the prop and the fireplace for the kids to kneel behind it for photos. (Note: I had taped a small section of white plastic table cover behind the opening to the doghouse, and I later wished I had covered the whole area the way I did for the Care Bear photo prop from last year. Despite not thinking of that sooner, it looked pretty good.)

Tuesday, February 4, 2014

DIY Puppy Ears

These fun puppy ears doubled as photo props (for the upcoming thank-you cards) and as party favors. What can I say? I like when stuff serves double-duty -- it's just plain smart. Plus, I saved money by making them myself instead of purchasing them from this site! Here's how I made these cute puppy dog ears (I made 11 pairs total) for about $6.

{Some of the finished puppy ears}
Materials:

  • tan felt (I bought 6 sheets of 8 1/2" x 11" size at Wal-Mart, 23 cents each)
  • brown marker
  • scissors
  • brown/black plastic headbands (These came in 3-packs from Dollar Tree. I bought 4 sets.)
  • hot glue gun
  • cream felt (This came in a neutral colors multi-pack at Wal-Mart, but I only used cream for this project.)

Directions:
  1. Fold a piece of felt in half, width-wise. Cut along the fold. 
  2. Now, take one half piece and fold it in half, lengthwise this time. Cut along the fold. 
  3. Draw a floppy ear on one side and cut it out. Mine had a triangular notch at the top end.
    {This is how I folded and cut my felt to get started.}
  4. Use this as a template for all the other ears. Trace around it onto the felt. A brown marker works nicely, and even if it shows on the felt later, it doesn't really clash. (Note: You can either cut the felt smaller first, or just trace an ear, flip it over, fit the template ear against the tracing, and trace again. Then, cut all traced ears out. I did it both ways, and didn't really have a preference.)
    {How I laid the ears for tracing with as little waste as possible.}
  5. Lay out ears in sets of two, facing them the desired direction. (I made each one curve toward the center.) Then, using a hot glue gun, adhere each ear to a plastic headband. Lay them flat while the glue cools.
    {Here is my triangle tip + hot glue, before folding.}
  6. Cut spots from cream felt. Mine were all shapes and sizes, but you can make basic circles if you prefer. Apply the the ears using the hot glue gun. I took my triangle tip, turned it over, applied the glue to that area, and then folded it over on itself around the plastic headband. Again, lay flat while glue cools. Tip: If glue strings bug you, use your fingers to remove any glue strings.
  7. Your puppy ears are now ready to wear!

Wednesday, September 25, 2013

Photo Thank-You Cards for a Shark-Themed Birthday Party

After making fill-in-the-blank style photo-thank-you cards for the past few birthday parties, I think I have it almost down to a science. The only part that nearly threw me was that when Mia was this age she was able to start helping to personalize the notes by signing her name. Logan, on the other hand, can't write his name and to be honest, I'm not even sure if he knows what letter it starts with! Luckily, I was inspired by my friend Liz who had her son color a homemade shark birthday card, and I realized that Logan could do the same thing for his thank-you cards. (By the way, Liz, I have your card sitting right in front of me, so it's coming soon!)

{Card views from the outside (top) and inside (bottom)}

Materials:
  • blue card stock (8 1/2" x 11")
  • paper trimmer
  • word processing software/printer
  • pinking shears
  • scrapbooking adheseive (or glue stick)
  • markers/crayons/colored pencils
  • pen
Directions:
  1. At the party, take a picture of each guest. We used the shark photo prop that I had made for this.
  2. Have photos printed. Note: My 4" x 6" prints were ordered from Snapfish.
  3. To get two cards per piece of card stock, fold a sheet in half, hamburger style. Then, use a paper trimmer to cut along the crease. Now you have two cards. Again, fold each one in half like a hamburger.
  4. Check to see that the photo fits inside the card, trimming as needed. Next, use scrapbooking adhesive (or a glue stick) to adhere the photo to the inner left part of the card.
  5. While the card is still open, use your pinking shears to cut a "bite" out of the top left corner of the card. Make sure that this won't cut out anybody's face, of course. If desired, use a pen to add the date below the photo.
  6. For the fill-in-the-blank thank-you templates, use word processing software like Microsoft Word. Mine is in portrait layout and I was able to fit four per page. I chose to keep this simple, but still fun by including some invented words (or, as I like to call them, "mommyisms.") The wording reads:

Dear ______________________­­­_____,                        
     Thanks for helping me celebrate my                                       
“jawsome” 4th birthday! Thanks also for                         
the  ____________________________                                           
________________________________                                           
________________________________.                                                 
It’s “fintastically” fun!                                                       

Your friend,                                                                                        
Logan                                                

There was also a photo of a shark that I found online and inserted to the left of Logan's name, but I can't get it to show up here. After printing these out, I trim them to size with my paper trimmer and then use pinking shears to make decorative shark "bites" along the top and bottom edges. Lastly, affix the fill-in-the-blank template to the inside of the card, to the right of the photo. Depending upon the age of the birthday boy (or girl) you can either fill this in or let him (or her) help.

7. For the front of the card, print out simple coloring page shark designs. I can't seem to find the image I used, but just do a search for something like "shark images for coloring." I pasted my image into Microsoft Word and scaled it so that I could fit six per page, in landscape format. Then, I used word art to "Thank You!" below each shark. I trimmed and adhered these to the front of each card and then Logan colored the shark pictures.

I love the idea of taking the theme all the way through the party and wrapping it up with a thank-you card. Adding photos is a little something extras that makes for fun souvenirs. These cards were not difficult to make, (once I did the advanced planning and creation of the shark photo prop!) and they were perfectly personalized to the theme of Logan's "jawsome" 4th birthday party. For more themed party thank-you card ideas, see my previous posts about the Care Bears party thank-yous and the Cars-themed party thank-yous and the Fancy Nancy party thank-yous.

Tuesday, September 17, 2013

Homemade Photo Prop for a Shark Birthday Party

This was the first project I started making for Logan's shark-themed birthday party, and once I saw this fellow swimming on my kitchen floor, I knew that I was track for a pretty "jawsome" birthday for my favorite little boy! (This was good news because scrounging up the appropriate amount of cardboard had been somewhat challenging, so once again, it pays to plan ahead, folks.) I found inspiration for this project here, but as always, I tried to figure out how to do it myself for as cheaply as possible. Note: While this project cost me next to nothing, (Proof positive: the best things in life are free!) it did take about 3 hours to complete, and that actually shows that I am getting faster at these cardboard constructions as I make more and more of them.


Materials:

  • corrugated cardboard
  • scissors
  • pencil
  • ruler
  • tape: clear packaging, masking, Scotch
  • Sharpies: black and red
  • paint brushes
  • white acrylic paint
  • gray primer
  • two white plastic bottle caps
  • hot glue gun
  • 2 blue plastic table covers
Directions:

  1. First, I cut apart two of the largest boxes I could find to produce flat sections to work with.
  2. Then, I laid them out and found the center with my ruler and pencil. I sketched out the shark's head, followed by the fins and tail section.
  3. Next, I cut out the different parts of the shark's body, using scissors. I also used my scissors to cut out the inner part of the open shark's mouth.
  4. I taped each section to the next, using lots of clear packaging tape. This was on the back (printed side) of each box piece, meaning that the front of my shark was plain brown cardboard.
  5. I laid a vinyl tablecloth (used only for crafts) on my dining table and then painted the shark using gray primer that we already had on hand. A large foam paint brush worked very well for this, and since I got such great coverage, I only applied one coat. (This right here saved me lots of time. Normally when I make this sort of party prop, I need to do at minimum, two coats of acrylic paint.) I let this dry completely before moving on.
  6. For the teeth, I used white acrylic paint and a smaller paint brush.
  7. Afterward, I used a red Sharpie marker to draw in the gum line around the teeth. I followed that with a black Sharpie marker, which I also used for all of the outlining to make the shark look more finished.
  8. The finishing touches were the eyes. I took two white bottle caps from apple juice containers and used the black Sharpie to make slit-like pupils. Then, I hot-glued each one to the top of the shark's head.
  9. For the background, I used two blue plastic table covers from Dollar Tree. (So if you're keeping track, this project cost me a total of $2.12.) I folded them both in half and then I used lots of rolled masking tape to adhere the shark on top of the two table covers, which were held together with Scotch tape. After it was taped down, I cut away the inside of the shark's mouth so that there was no blue backdrop in that part. 
  10. Displaying the photo booth was the hardest part to figure out. Luckily, Brett was able to help with the logistics. After trying several types of tape, we settled on clear packaging tape (and plenty of it!) to secure the layers of plastic table cover to the top of our mantel. (Failed attempts included Scotch tape, blue painter's tape from Dollar Tree, and masking tape.) I added some red table cover (left over from a previous party) to the inside of the mouth area by taping it to the fake fire place with Scotch tape.
  11. The kids, and some brave adults, too, were then able to stand or kneel behind the backdrop, put their faces inside the shark's mouth, and let me take pictures (which were for the thank you cards). It stayed up for many days before I decided to take it down, and I think it was picture perfect.
{Say, "Ahhhhhhhhhhhhhh!"}

{You can't say I never post photos of myself!}


Wednesday, July 24, 2013

Make Your Own: Mustache on a Stick

Yesterday I saw an ad on Facebook that featured a woman and a little boy holding mustaches on sticks. So fun! With both of my brothers coming to Michigan this weekend, I felt inspired to make a few of these to take Up North with us. I felt that these would make for some fun family memories especially since I know that Nick, a professional photographer, will be taking lots of photos.

So, I grabbed all of the black felt scraps that I had, my bottle of Aleene's tacky glue, and a bunch of wooden skewers -- which had gotten tucked into my craft stash just last week after falling onto the laundry room floor. (Why do I store my skewers in the laundry room? Honestly, I have no clue, but that is where they have been for ages. Anyway, once they hit the floor, I figured that they were no longer "food safe," but that didn't mean that they couldn't be used for crafting. I just needed an idea. Funny how things work out.)

In the end, I had enough materials to make eleven mustaches on a stick. Coincidentally, (or maybe not -- you see how these things work out?) this is the exact number of family members who will be getting together this weekend.

{My mustaches remind me of a flock of birds.}

Materials:
  • wooden skewers (or dowels)
  • black felt (or craft foam or card stock)
  • tacky glue
  • pen/pencil
  • scissors
  • scratch paper (optional)
Directions:
  1. To begin, I cut pieces of scratch paper to approximately the same size as my black felt scraps. Then, I folded them in half, hamburger style. One each scrap of paper, I drew one half of a mustache shape, cut it out and checked to see if it fit on the felt. I then adjusted accordingly, both to make sure that it fit, and that I was happy with the shape, making more trimmings as needed. (Tip: If you don't want to draw your mustaches freehand, look for an online template such as this one.)
  2. Next, I used a little bit of tacky glue to stick my scratch paper templates on top of my black felt, just enough to get each to lay flat, but not so much to make it permanently bonded. Then, I cut around the templates. Once done cutting, I peeled off my templates. You do not have to use glue, but it made it easier to cut around the template without it slipping. (Tip: For cutting felt, use the sharpest scissors that you have available.)
  3. To make the wooden skewers more kid friendly, I used my scissors to cut off the sharp ends. (Note: If I had more felt, I would have made two-sided mustaches, sandwiching the sharp part of the skewer in between the two pieces of felt, and thus eliminating the need to trim them.)
  4. To finish my mustaches, I used a dab of tacky glue to adhere a wooden skewer to the back side of each felt mustache. When I say "back side," I mean the side that already had traces of glue on it, left over from the templates. (Note: I have seen other mustaches on sticks that had the sticks placed off center, and while I realize that this probably looks nicer in photos, it wasn't working for me. So, I centered mine to get stability, because floppy mustaches were not the look I was going for.)
  5. Make sure the glue dries completely before modeling your new facial hair. (Tip: If the tacky glue is not working, consider using hot glue instead.)
{My favorite little people model some of my creations.}