Dear Santa,
I want binoculars, a telescope, a tree... The princess dolls I want, too. A frog chair... I want a party hat, a matching game, cookies, berry game, a reindeer pull toy, a teddy bear, sparkly glasses. And I also want one more thing: a dolly -- a sparkly dolly with ornaments all over it!
Love,
Mia (age 3)
Tuesday, November 30, 2010
Monday, November 29, 2010
Where Has All the Customer Service Gone?
Over the weekend, I went shopping at the Levi's Outlet, where I was sure I would find a great pair of jeans. After all, I had found some Levi's at Kohl's the week before that were *almost* perfect (except that they were too big). When I walked in the door, a young sales clerk asked what I was looking for and steered me in the correct direction. Her name was Tyler and she seemed friendly and helpful. No complaints there. I started looking for jeans in a size smaller than I had found at Kohl's. There weren't too many options, but I tried on what I could find in both boot cut and straight leg. I wasn't happy with the way any of my first choices fit, so I tried again, and again, and again.
After becoming a bit frustrated, I took the best pair of jeans I had found to another sales clerk, Kim, (older than the first) and asked if they came in a smaller size. She told me that they didn't, and that the store didn't carry a lot of jeans in that size. She then found me three pairs of the another style of jean and sent me to the fitting room. When she came to check back with me, I wasn't thrilled with how these jeans were fitting. The "straight leg" seemed tapered to me, and my personal opinion is that skinny jeans do not look particularly good on anyone, not even on me, and I have been called "skinny" for as long as I can remember. Plus, there was a considerable gap in the back and the rise was lower than I prefer. When I mentioned the problem with the gap to her, she said, "Have you considered wearing a belt?" I told her that I usually do, but I still didn't think that would solve the gap issue. Her response was, "Have you considered buying different underwear with a lower rise?" She insisted that the jeans looked cute on me. I left the fitting room to look some more because despite what the sales clerk seemed to think, the jeans were not cute and they did not fit well. And it really annoyed me that she thought they would be fine if I just wore different underwear!
When I went back out to the store, I met Tyler again, and explained the dilemma. I thought the boot cut jeans were more flattering than the straight leg, but I was having a hard time finding a small enough size. She seemed to understand, so she showed me a different area than I had looked in before and suggested junior's sizes. I was skeptical, but decided to try the junior's jeans because they might actually fit, and I really just hoped to come away with one decent-fitting pair of jeans. As I feared, junior's sizes are not the way to go. The cut is completely different, which is what I suspected, and not meant to accommodate a grown woman's figure, not matter how petite it may be. I do not recommend trying on junior's jeans unless you are young enough to actually shop in the junior's department!
By now I was not only frustrated but also feeling like there was little hope in finding a pair of Levi's that actually fit my petite (not junior) frame. However, I had made a special trip to Birch Run specifically to go to the Levi's Outlet, so I really didn't want to leave until I had accomplished that task. So, I decided to search for jeans without the assistance of a sales clerk. While looking, I overheard a middle-aged lady complain, "I don't want jeans that are frayed or have a pearl button, and that if that makes me a difficult customer, then I guess I'm a difficult customer!" I nodded in agreement because I had passed up a pair of boot cut jeans in the proper size because they had holes in them. Call me picky, but I was not going to pay for holy jeans. I don't think a respectable looking mom should go out in public in holy jeans. I grabbed one last pair to try on and headed to the fitting room. By now, the attendant recognized me and told me that my room should still be open.
That last pair of jeans seemed a tad long, but I decided to make them work. They might shrink a little in the wash, I rationalized, or worse case scenario, I could have them shortened by a tailor. Feeling more defeated than proud, I took my *almost* perfect jeans to the cash register. When the cashier asked if anyone had helped me, I told her that both Tyler and Kim had helped me. I had to bite my tongue to keep from saying that they really weren't all that helpful, and ultimately, I had found the jeans on my own. And I didn't even "need" to buy new underwear for them to look right! What ever happened to, "The customer is always right?"
Friday, November 26, 2010
Thanksgiving in a Word
I was a teensy bit nervous about hosting our first Thanksgiving dinner this year, completely absorbed in the food preparation (which admittedly involved many shortcuts, but that is a whole other story). Everyone enjoyed the meal, but after the leftover food was all put away and the family had headed home, I realized that we had never talked to our kids about what Thanksgiving means. Mia quickly figured out that a lot of food is involved in the celebration, and she knows that we (try to) pray before each meal, but we didn't specifically teach what it means to be thankful. Of course, gratitude isn't a one-day-a-year sort of thing, so I hope to make up for this. After being inspired by imanimama to come up with a single word to explain what I am most thankful for this holiday season, I have decided that I have many...
BLESSINGS


BLESSINGS


Tuesday, November 23, 2010
Toilet Paper Tube Scarecrow
Here is another craft I came up with for the girls to do during their play date yesterday.

 |
| Scarecrow by Mia, Age 3 1/2 |
- toilet paper tube
- milk cap and plastic ring
- glue
- scissors
- 2 buttons for eyes (do not have to match)
- marker/s
- yellow construction paper
- another color of construction paper
Optional Materials:
- googly eyes
- yarn
- pipe cleaners
- raffia
- straw
- artificial flowers
- fabric scrap
 |
| Toilet Paper Tube Scarecrow by Emily, Age 3 1/2 |
Directions:
- Glue two buttons (or googly eyes) onto a toilet paper tube.
- Cut a small triangle out of construction paper and glue down to make the nose.
- Using a marker, draw a mouth. I did mine like cross-stitches.
- Cut fringe onto yellow construction paper and glue down for hair. You could also use yarn, pipe cleaners, raffia, or even real straw.
- To make the hat, cut a circle from construction paper (you could also use fabric), about 3/4 to 1 inch larger in diameter than the milk cap. Place paper circle over milk cap, and press down making an impression of the cap. Add a small amount of glue to the inside of the plastic ring from a milk jug and place it over the paper on top of the cap. Push down to secure the paper to the cap, being careful not to tear the paper.
- Add a bit of glue to your hat and place on top of the toilet paper tube.
- If desired, embellish your hat with paper, silk, or felt flowers, buttons, or whatever you have on hand.
- Once your scarecrow is completely dry you can display it. You could also use your scarecrow as a finger puppet or a place card holder.
Monday, November 22, 2010
Toilet Paper Tube Turkey
Since Mia's friend, Emily, was coming for a play date, I decided to come up with another turkey project for the girls to do. I think they turned out pretty cute.
 Materials Needed:
- toilet paper tube
- 2 googly eyes
- coffee filter
- markers
- spray bottle filled with water
- scissors
- glue
- orange pipe cleaner
- red pipe cleaner
- masking tape
 |
| Toilet Paper Tube Turkey by Mia, Age 3 1/2 |
- Using markers, color a coffee filter. You don't have to color perfectly or cover all of the white space. I used red, orange, and yellow markers to color my coffee filter in "pie piece" sections to look like tail feathers. Mia and Emily used various colors.
- Spray the colored coffee filter with water so that the marker blends like water colors. Set aside to dry.
- Using the tip of your scissors, poke a small hole in the toilet paper tube, approximately in the middle.
- Cut a length of orange pipe cleaner, approximately 2 inches, bend in half and insert the bent end into the hole to make the turkey's beak.
- Glue two googly eyes above the beak.
- Cut a length of red pipe cleaner, approximately 2 inches, bend into a kidney bean shape for the wattle. Glue onto the toilet paper tube, or twist it so that it is attached to the orange pipe cleaner beak.
- Once the coffee filter is dry, use one hand to pinch it together, and use the other hand to tape the gathered section to the back of the toilet paper tube. Allow glue to dry completely.
- You can now display your turkey on a table or shelf or use your turkey as a finger puppet. You might also use it as a napkin ring or add a name and use it as a Thanksgiving place card.

Toilet Paper Tube Turkey by Emily, Age 3 1/2

Thursday, November 18, 2010
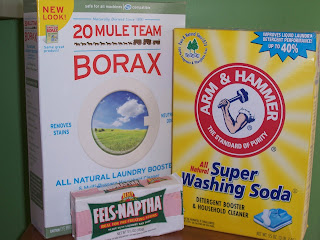
DIY Laundry Detergent
My friend Jeanine gave me a recipe for homemade laundry detergent and I decided to give it a try. First of all let me say that this sounds like a daunting task, but it wasn't as much work as I thought it would be. If you really want to save some money on laundry detergent, this is the way to go.
Materials Needed:
How to Make Laundry Soap:
1/3 Bar Fels Naptha Laundry Bar Soap
1/2 Cup Arm and Hammer Super Washing Soda
1/3 Cup Borax
2 gallons hot tap water + 8 cups tap water
* Use 1/2 cup of detergent per load.
Tips and Suggestions:
The ingredients needed to make your own laundry soap are not difficult to find. The entire process of making laundry soap is not complicated. It does take some time, but it's far from being an all-day chore and the amount yielded should last a few months so you will only need to make detergent a few times a year. To me, that is worth an hour or so of my time, especially once I did the math and figured out how little this homemade laundry detergent costs. I will break it down for you:

Materials Needed:
- Fels Naptha Laundry Bar Soap
- Arm and Hammer Super Washing Soda (not to be confused with baking soda)
- Borax
- 3 gallon bucket
- cheese grater
- large pot
- long-handled spoon
- water
- funnel
- something to store your detergent in
- essential oil (optional)
Fels Naptha, Borax, and Arm and Hammer Super Washing Soda are all found in the laundry aisle of grocery stores. I know for sure that you can buy Fels Naptha at Meijer and Kroger. I paid $1.29 for one bar at Kroger. Arm and Hammer Super Washing Soda is available at Meijer, Walmart, and Kroger. I paid $2.89 for a 55 oz. box at Kroger. I had previously purchased Borax for making Safe and Green Household Cleaner. It can be found at Meijer, where I paid $3.42 for a 76 oz. box, and it is also available at Walmart. You may also find these products at other stores or online.
How to Make Laundry Soap:
1/3 Bar Fels Naptha Laundry Bar Soap
1/2 Cup Arm and Hammer Super Washing Soda
1/3 Cup Borax
2 gallons hot tap water + 8 cups tap water
- Grate soap bar and melt in a pot of water (8 cups) on low heat, stirring as needed. (Note: The smaller your grated pieces of soap, the quicker this process will be. I found the most time consuming part to be waiting for the soap flakes to melt--about 35-40 minutes-- so I would advise grating your soap as finely as possible.)
- Fill a bucket with 2 gallons of hot tap water.
- Add washing soda and Borax to bucket of water and stir to dissolve.
- When bar soap is completely dissolved, pour mixture into the bucket and mix thoroughly with a long handled spoon.
- Pour directly into your containers using a funnel or store in the bucket if it has a lid. (I used 3 clean gallon milk jugs. Jeanine told me that she uses 3 100 oz. Dynamo jugs.)
* Use 1/2 cup of detergent per load.
Tips and Suggestions:
- This soap will not produce lots of bubbles. This is okay, though, because it is not the bubbles that get your clothes clean, anyway!
- The mixture will be clumpy and will need to be shaken or stirred before each use. (I just shake up my milk jug before using the detergent.)
- Do not use regular soap to make detergent. Soap that is made for your skin can stain clothing.
- Jeanine adds 1 tsp. of orange or eucalyptus essential oil when making her detergent. I did not do this because I didn't have any and I prefer not to use soap with fragrance. (Unfortunately, the Fels Naptha has a fragrance. However, it doesn't transfer to the clothing.)
- This detergent doesn't work well for removing odors, particularly urine, so Jeanine says to add 1/2 cup of ammonia when washing especially stinky clothes.
- Jeanine tells me that she has tried other laundry bar soaps, but she feels that Fels Naptha is the best.
- I have still been using a commercial pre-treater to tackle tough stains. Sometimes, I also add Oxi Clean to the wash load.
- I have used this detergent to wash everything except diapers. After doing some research online, I do not feel comfortable using this on our FuzziBunz. I found that Martha Stewart recommends using Borax and washing soda for diapers, but it is the Fels Naptha that I am concerned about. It is a soap and soap is not recommended by the manufacturer.
- Be sure to label your containers with all ingredients. I also wrote a reminder on each container to shake before use and to use 1/2 cup per load.
The ingredients needed to make your own laundry soap are not difficult to find. The entire process of making laundry soap is not complicated. It does take some time, but it's far from being an all-day chore and the amount yielded should last a few months so you will only need to make detergent a few times a year. To me, that is worth an hour or so of my time, especially once I did the math and figured out how little this homemade laundry detergent costs. I will break it down for you:
- Fels Naptha = $1.29/bar. Divide this by 3 since you only use 1/3 bar to make a batch of detergent and you get 43 cents per batch. Remember, one batch of detergent = 2 1/2 gallons.
- Arm and Hammer Super Washing Soda = $2.89/55 oz. or 0.0525 cents per oz. You use 1/2 cup per batch of detergent and that comes to 21 cents per batch.
- Borax = $3.42/76 oz. or 0.045 cents per oz. You use 1/3 cup per batch, which costs 0.1197 cents. (I rounded that to 12 cents.)
- Add 43 + 21 + 12 = 76 cents per 2 1/2 gallon batch. If you use 1/2 cup per wash load, you will get 80 loads from one batch of laundry soap. After dividing, that comes to a grand total of....
Wednesday, November 17, 2010
Bye-Bye, Binky!
It's official. I have lost the last of Logan's pacifiers. The second-to-last one went MIA when we were at the park last week and now the very last binky has disappeared (although it may turn up somewhere in the house only to be unceremoniously pitched into the trash). The last binky standing was the lavender and pink one that Mia had picked out for him, and I didn't really like to take it out in public anyway (because it's not a "boy" color-- Not that we're too hung up on that, anyway. But, well, you know...). Amazingly, he went to bed last night without it and didn't seem to have any problems, and we made it through today, too. And he went to bed just fine tonight.

It's interesting to me that I expected this to be a total nightmare and it has not been much of an issue. (Knock on wood!) That's sort of how it was with Mia, too. One day she had it, and then the next day we threw it away and never looked back. We were so afraid to do it, but the next day was her second birthday party and we figured we better just get rid of it then before she ended up being in elementary school and still sucking on a pacifier! (Okay, I wasn't actually afraid of this, but it does happen, people!) We knew we didn't want to let Logan use a pacifier as long as Mia did, but I wasn't exactly planning to get rid of the binky at 14 months. However, we weren't planning to buy new ones either, and our supply has been dwindling. It's funny how some of my seemingly most important (at the time, at least) parenting decisions are left up to circumstance. Ready or not, the binky has vanished, so we will simply say bye-bye!
A follow-up: The morning after writing this, the pacifier is found. My husband reports that Logan, upon seeing the binky, shrieks, lunges for it and pops it into his mouth. He happily sucked away until breakfast, when I threw it away while he was distracted by food.
Tuesday, November 16, 2010
Build-a-Turkey Snack

- Slice a ripe pear down the center lengthwise and use one thin section for the turkey's body.
- Slice fresh apples into wedges and use for tail feathers. I also used sliced canned peaches. (I was planning to use cheese, and then realized we didn't have any.)
- Cut a grape into 2 small pieces for eyes. (I would have used raisins or Craisins, but again, we were all out.)
- A pineapple tidbit made a perfect beak.
- I used a small bit of maraschino cherry for the wattle, although a Craisin would be good for this, too.
- Enjoy your turkey snack creation!
Monday, November 15, 2010
Fall Hand Print Wreath

Materials:
- scissors
- glue
- pencil
- paper plate
- crayon (marker or colored pencil)
- red construction paper
- orange construction paper
- yellow construction paper
- ribbon (or yarn)
Optional Materials:
- rubber stamps
- markers (or ink pads)
- acorns, leaves, pine cones, etc.
- foam scrapbooking adhesives
Directions:
- Cut out the center of a paper plate.
- Color the paper plate. We used a green crayon, but fall colors would look nice.
- Trace child's hand or hands onto red, orange, and yellow construction paper. Cut out hand prints. We used four of each color to make our wreath, but this will vary depending on the size of the hand prints. Arrange hand prints as desired and glue down onto the plate. (Tip: Instead of tracing each hand repeatedly, you can trace each hand once, cut out hand prints, and then use them as templates for tracing the other hand prints. I recommend this method since it requires children to sit still for shorter periods of time!)
- Cut a length of ribbon (or yarn) and adhere to the back of the plate for hanging. We used foam adhesives, but you could also use glue or tape.
- Decorate the front of your hand print wreath. We used fall-themed rubber stamps, colored with markers in place of ink. (Tip: If you use more than one color marker per stamp, it helps to apply all of your colors and then to "huff" on the stamp before stamping onto the paper. This moistens any of the ink that may have dried slightly while you were applying other colors.) You could also try gluing on real acorns, leaves, pine cones, or other natural items. We also added a ribbon bow to the front of our wreath.
- Allow everything to dry completely before hanging your wreath.
Sunday, November 14, 2010
Turkey Leg Maraca
My husband just looked at me like I was nuts, but this time my craft inspiration came from rinsing out an empty bottle for recycling. I think this is the quickest and simplest project I have ever come up with and Mia thought it was fun! What could be better?


Materials:
- plastic milk bottle with cap
- brown paint
- paint brush
- dried beans (or rice, coins, etc.)
Directions:
- Coat the inside of a clean, dry plastic milk bottle (ours was from McDonald's) with brown paint. Allow the paint to dry. The way we did this was to pour paint into the bottle, put the lid on, and tip it upside down. We let gravity do most of the work and then used a paint brush to touch up any areas as needed.
- Fill the bottle with dried beans. Replace the lid and have fun making some music!
Saturday, November 13, 2010
Paper Bag Turkey Puppet
Just when I thought I was getting tired of turkey crafts, I came up with this idea for a quick and simple way to make a turkey hand puppet. Obviously, we had to try it out, and I was pleased with the final results.
 | |||
 |
| Paper Bag Turkey Puppet by Mia, age 3 1/2 |
Materials:
- paper plate
- brown paper lunch bag
- scissors
- glue
- crayons (colored pencils, markers, or paint) in fall colors
- yellow or orange construction paper
- red construction paper
- 2 googly eyes
Directions:
- Starting toward the center of a paper plate, use crayons to color different sections so that it looks a bit like the spokes of a wheel. You don't have to color the portion of the plate that will be covered by the paper bag.
- Make sure that the creased part of the bottom of the paper bag is facing you. (It will be the turkey's head and you will want to be able to put your hand inside.) Glue the paper plate to the paper bag so that the colored side is toward you.
- Glue two googly eyes onto the bottom part of the paper bag. We placed ours near the center.
- Cut a rectangle out of yellow or orange construction paper, fold it in half, and then cut a triangle shape with the creased side as a base. Make sure not to cut on the fold. You will have a 3-D beak to glue onto the bottom section of the paper bag.
- Cut a wattle from red construction paper and glue it onto the paper bag.
- Allow the glue to dry completely before playing with your puppet.
Friday, November 12, 2010
Pine Cone Turkey Craft
This craft is one we put together last year using a kit assembled by another family from our library's story time. Mia was 2 1/2 at the time, and she was able to glue on the eyes, beak, and wattle. Everything else was my responsibility, so I would not recommend this craft for children younger than preschool age unless you are prepared to help quite a bit.
 |
| This turkey is so cute! I will save it and display it every year. |
Materials:
- medium pine cone
- yellow or orange felt
- red felt
- 1 orange pipe cleaner
- 1 red, 1 yellow, and 1 brown pipe cleaner
- 2 googly eyes
- scissors
- glue
Directions:
- Glue two googly eyes onto the narrow end of the pine cone. Tacky glue works well for this.
- Cut a small triangle from orange or yellow felt to make the beak. Glue below the eyes.
- Cute a kidney bean shape out of red felt and glue onto the beak to make the wattle.
- Cut the red, yellow, and brown pipe cleaners in half, form a loop with each section and adhere to the back of the large end of the pine cone to form the tail. You may use glue, but I found this didn't stick well, so I twisted the ends around the little segments on the pine cone.
- Cut the orange pipe cleaner in half. Bend each half so that it has two or three curved toes and glue to the bottom of the pine cone to make the turkey's feet.
Other Options:
- You could use craft foam or construction paper in place of felt for the beak and wattle.
- Try actual feathers in place of pipe cleaners for the tail.
- Another option for the tail would be to make feathers out of felt, craft foam, or construction paper.
- Use construction paper, craft foam, or felt to make the feet.
- If you don't have googly eyes, you could make your own eyes from paper, felt, foam, buttons, beads, etc.
- Substitute any color pipe cleaners for the fall colors and make a funky turkey!
- Make one for each family member with various sized pine cones and display them together.
- Or tuck a slip of colored paper onto the back of each one and label it with a Thanksgiving dinner guest's name. Voila! You have a place card and a cute souvenir all in one.
- Glue a pom pom on the small end of the pine cone to make a head. Then decorate with eyes, beak, and wattle.
- I am sure you can think of even more ideas for personalizing this project!
Wednesday, November 10, 2010
Paper Bag Turkey Project
 |
| My turkey has Logan's hand prints for wings. |
I adapted this idea by using lunch size paper bags instead of grocery bags. In my opinion, this is better anyway, because the bags don't have writing on them and their smaller size means that you finish the project more quickly (which is a plus when you are doing crafts with young children)! Also, I think using lunch bags would lend itself more easily to group projects since you can simply buy a package of them instead of scrounging up grocery bags. I have also made a few other changes to the original project that allow for some fun variations in how you decorate your paper bag turkey.
Materials Needed:
 |
| Turkey by Mia, age 3 1/2 (includes Logan's foot prints for wings) |
- brown lunch bag
- scissors
- glue
- crayons or markers in fall colors
- orange or yellow construction paper
- red construction paper
- yarn, twist tie, or rubber band
- googly eyes
- newspaper
Optional Materials:
- pencil (for tracing hands or feet)
- orange or yellow pipe cleaner
- paint in fall colors
- paint brush
- newspaper (to cover work surface when painting)
Directions:
- Starting at the top of a brown lunch bag, use crayons (or markers) in fall colors to fill in the top half of the bag. (I folded the bag in half to give us a visual of where to stop coloring.) Mia colored hers randomly, and I colored mine in vertical stripes about 1/2 to 1 inch in diameter.
- Fill the bag half full with crumpled newspaper.
- Twist the bag closed and secure with a length of yarn, a rubber band, or a twist tie. (The original directions said to use yarn. I found this to be the trickiest to work with, but it be a logical choice if you are doing this project with a group. Rubber bands and brown twist ties from bread bags worked nicely for this.)
- Using scissors, cut strips from the top of the bag down to the yarn/rubber band/twist tie to form tail feathers. I followed the lines separating my different colored stripes. Mia just started cutting.
- Glue on two googly eyes.
- Cut a triangle from orange or yellow construction paper and glue down to make the beak.
- Cut a kidney bean shape from red construction paper for the wattle. Glue down near the beak.
 |
| Mia's painted turkey has pipe cleaner feet. |
 |
| Paper Bag Turkey by Mia |
- Create wings for the turkey by tracing a child's feet onto brown construction paper, cut out foot prints, and glue onto paper bag. I did this with Logan's foot prints.
- Another option for making wings is to trace a child's hands onto colored paper, cut out hand prints, and glue onto the bag. I used Logan's hand prints on brown paper and two more hand prints on orange paper. After cutting out the hand prints, I layered the orange on top of the brown and trimmed off the excess. Then I glued the orange pieces to the brown and glued the wings to the paper bag. (You could also glue the orange on top of the brown before trimming.)
- To make feet for the turkey, cut two squares out of yellow or orange construction paper. Then trim the paper so that it resembles a crown with three points. Glue to the bottom of the bag.
- Another option for making feet is to cut an orange or yellow pipe cleaner in half. Bend each half so that it has three toes and then glue to the bottom of the brown bag.
- If you don't have googly eyes, you can draw on eyes or make them from construction paper.
- The directions for the original project said to paint the tail feathers after cutting them. I found that this was too difficult for Mia, but it may be something that a school-age child can do. (It might also be easier if working with a grocery bag instead of a lunch bag, but I didn't try this.) I also tried having her paint the bag before cutting, but again this didn't work out too well. She didn't really know where to apply the paint and we had to wait for it to dry. (My opinion is that using crayons is best. It's less messy and you don't have to wait for paint to dry.)
- Another option for tail is to color or paint a paper plate and glue to the bag of a paper bag. To do this, I think you would need to fill the whole bag with crumpled newspaper and close it at the top. Or you could possibly separate the bag into two sections, one for the head and one for the body, and secure it both in the middle and at the top.
- Today (11/17/10) I saw a picture of a paper bag turkey in our local newspaper. It had a plastic spoon decorated as the head, with the handle of the spoon stuck into the front of the paper bag.
Tuesday, November 9, 2010
Hand Print and Foot Print Turkey
I got the idea for this craft from this website. The original directions say to use two foot prints to make the turkey's body. We used one and I think it looks fine, but you could use two for a really plump turkey.
Directions:
 |
| Turkey by Mia, age 3 1/2 |
Materials:
- scissors
- glue
- pencil
- red construction paper
- orange construction paper
- yellow construction paper
- brown construction paper
- googly eyes
- orange or yellow pipe cleaner (optional)
Directions:
- Have child stand on brown construction paper and using a pencil, trace around his foot (or feet, if desired). Cut out foot print/s. (Older kids can do this themselves, but I did this for Mia.)
- Trace both hands on red, orange, and yellow construction paper. Cut out hand prints. Save scraps.
- Fan out hand prints as desired and glue to the back of the brown foot print, forming the tail.
- Glue two googly eyes onto the top of the foot print.
- Cut out a triangle from a scrap of orange or yellow and glue below the eyes to make the beak.
- Cut out a kidney bean shape from a scrap of red paper and glue down to make the wattle.
- If desired, you can cut scraps of yellow or orange paper to form feet. You could also cut a pipe cleaner in half, bend it to make toes leaving some straight section of pipe cleaner for the legs, and tape the straight parts to the back of the paper.
Monday, November 8, 2010
Multi-Generation Gobbler Craft
I have seen many hand print turkey crafts, but this one is especially neat because it gets the whole family involved, and what could be more appropriate for Thanksgiving? You could even begin a holiday tradition of doing this each year to record the kids' growth!
Materials Needed:
Materials Needed:
- glue
- scissors
- pencil
- red construction paper
- orange construction paper
- yellow construction paper
- brown construction paper
- wiggly eyes

Directions:
- Trace hands of each family member onto construction paper and cut them out, including Mom and Dad, if you wish. Save the scraps. (I traced the largest hand print--mine--on yellow, Mia's on orange, and Logan's on red. You can do them in any order you wish.)
- Cut a pear shape out of brown construction paper for the head and body (If you prefer, cut out a circle for the body and a smaller circle/oval for the head.)
- Using your scraps, cut out a yellow or orange triangle for the beak and a red kidney bean shape for the wattle.
- Lay your largest paper hand print on a flat surface and then glue the next smaller one on top of it. Continuing gluing until all of the hand prints are layered to form the turkey's tail feathers.
- Glue the brown body onto the smallest hand print.
- Decorate the turkey's face by gluing on the beak, wattle, and two wiggly eyes. Allow to dry completely.
Sunday, November 7, 2010
Lactation Consultant Let Down
I called my doctor's office for advice recently because of some issues I was having with breastfeeding. Here is what I think happened: Logan caused a puncture wound because he was having teething pain and changed his latch. I had seen the doctor two weeks after it initially happened, and at that time it was healing. However, a week the wound had reopened and I called the doctor's office for advice. I ended up taking an antibiotic four times a day. After a week of antibiotics and pumping on that side, I was feeling much better. That's when Logan gave me a corresponding injury on the other breast. So I called the doctor's office again. When the nurse returned my call she said, "Have you considered that maybe it's time to wean?" I thought that was a pretty dumb question. Of course I had considered it, and then I decided I didn't want to wean, which is why I was calling them for help. Duh!
The nurse then offered to put me on the phone with the "lactation consultant." Unfortunately, she wasn't much help either. The main piece of advice she offered was to tell Logan not to bite me and then stop nursing him if he did. She didn't seem to understand what I was saying. It's not that he is biting me in isolated incidents. That I have stopped in the past doing what she suggested. The real problem I feel is in his latch. She told me I could look on the internet for more help. Gee, thanks. I could have figured that out on my own. And I am a bit annoyed and saddened that the nurse would suggest I wean. That is why I had been avoiding telling anyone but Brett about the problem I was having. I knew they would think I was crazy, and I was worried that it would scare people into thinking that breastfeeding is painful. Okay, right now it is, but in the three years total that I have nursed my kids, this is the only real challenge I have had. I wish that our society was more open to long-term breastfeeding, and that there was a better support system for nursing mothers. I am feeling like it's totally up to me to solve my problem or else give up breastfeeding. And I'm just not ready to give up!
The nurse then offered to put me on the phone with the "lactation consultant." Unfortunately, she wasn't much help either. The main piece of advice she offered was to tell Logan not to bite me and then stop nursing him if he did. She didn't seem to understand what I was saying. It's not that he is biting me in isolated incidents. That I have stopped in the past doing what she suggested. The real problem I feel is in his latch. She told me I could look on the internet for more help. Gee, thanks. I could have figured that out on my own. And I am a bit annoyed and saddened that the nurse would suggest I wean. That is why I had been avoiding telling anyone but Brett about the problem I was having. I knew they would think I was crazy, and I was worried that it would scare people into thinking that breastfeeding is painful. Okay, right now it is, but in the three years total that I have nursed my kids, this is the only real challenge I have had. I wish that our society was more open to long-term breastfeeding, and that there was a better support system for nursing mothers. I am feeling like it's totally up to me to solve my problem or else give up breastfeeding. And I'm just not ready to give up!
Friday, November 5, 2010
Neighborhood Cookie Swap
 |
| I'm pretty happy with how my invitations turned out. |
I hand-made the invitations, 27 in all, to look like aprons with the party details printed on a small card that can be slipped in and out of the apron's "pocket." I thought they turned out cute, but I am probably nuts for spending the time to make them myself. I did this because a) I thought that little extra personal touch might entice people to participate and b) I like making things myself. Then the kids and I all bundled up in our coats, hats, and mittens (yeah, it's suddenly cold enough for all that!) and went for a walk through our subdivision two days ago, stopping at each mailbox to drop off an invitation. So far, I have heard back from only one person. The good news is that she said she was coming to the cookie exchange! The bad news is that she asked which house was mine. I recognized her name when she called, though, because she is my next door neighbor! We have lived next to each other for over four years, and she doesn't even know my name. Do you see why I
In case you are curious, I came up with my idea for the cards after seeing this kit. It was a bit more than I wanted to spend, so I created something similar with materials I had on hand.
Thursday, November 4, 2010
My Quest for Toddler Winter Boots
After searching through all of the brick and mortar stores in the known universe (or at least what seemed like it) and doing a fair amount of internet searching, I have determined that winter boots do NOT come in a toddler size 3. The closest I came to finding them was at The Children's Place, where I was told that their smallest size is a toddler 4. While the sales clerk checked the stock room, I debated about whether or not to buy these in a 4 and just have Logan wear extra socks... Then she returned and told me they didn't have any in stock. She did offer to call the next closest store. When I told her that I probably wouldn't make it that way any time soon, she offered me a voucher for free shipping, which I gladly accepted. While I was pleased to receive great customer service, I decided to continue my search for the elusive toddler size 3 boots, convinced that they are out there somewhere, and I just haven't looked in the right place yet. (Plus, I knew that if I didn't find them anywhere, I had my free shipping of size 4 boots to fall back on.)
Recently, I explained to my sister-in-law about the challenge I was having with finding boots in a toddler size 3, and asked what she had done when her boys were Logan's age. (Apparently, I had some form of amnesia and couldn't remember what we did with Mia during the first winter that she was walking.) Jill was quick to point out that none of her kids really liked playing in the snow at that age because it was too deep for them to easily walk in. That's when I recalled a vision of Mia all bundled up in her snow gear, looking like a little lavender Michelin Man, awkwardly toddling for a teensy bit and then plopping into the snow. I then realized that perhaps there are no toddler size 3 boots for a reason. Still I continued on my quest, rationalizing that Logan is much more active than Mia was at that age, and figuring that I would go stark raving mad if I had to keep him inside all winter!
I am happy to report that I have found a boot in a toddler size 3! It's not a true winter boot, but I think it will get the job done. It's pretty cute, too, a sort of cross between a camouflage design and a cowboy boot. I am hoping that these boots from Walmart, (which cost a mere $12!), will hold up to a midwestern winter because we will definitely be spending some time outside. By the way, I used the money I would have spent on those size 4 boots (plus an additional $2) to buy Logan some new sneakers, which he needed, and some black dress shoes for the holidays (which were on clearance)!
Wednesday, November 3, 2010
Paper Plate Owl Craft
Every time Mia watches Timmy Time on Playhouse Disney, I look at the clay-mation owl character and think about how his face reminds me of a paper plate. That's the inspiration behind this project. And for whatever reason, it seems like an appropriate craft for fall.
Materials Needed:
 |
| Paper Plate Owl by Mia, Age 3 1/2 |
Materials Needed:
- paper plate
- brown paint
- yellow paint
- brown construction paper
- orange construction paper
- scissors
- glue
- paintbrush
- 2 big wiggle eyes
- 2 round Styrofoam take-out lids (or yellow construction paper)
- pencil (optional)
- newspaper (optional)
- Cover work surface with newspaper. Paint the back side of a paper plate brown. (You could also color it with crayon, marker, or colored pencil.) Allow paint to dry.
- Paint two round Styrofoam lids yellow. (If you don't have these, you can cut two circles out of yellow construction paper.) Allow paint to dry.
- Cut out two triangles from brown construction paper and glue onto the top of the plate to make ears.
- Cut two rectangles from brown construction paper, about the same diameter as the yellow eyes. Cut fringe along one side of each rectangle. Curl the fringe up around a pencil (or your finger). Glue paper fringes onto the plate to form "eyelashes."
- Glue a wiggle eye onto each yellow Styrofoam lid, and glue yellow lids just below the brown "eyelashes."
- Cut a diamond out of orange construction paper and glue below the eyes to create the beak.
Tuesday, November 2, 2010
Falling Leaves Crayon Resist Project
Remember doing a crayon resist project in art class in elementary school? I know I do. After seeing a crayon resist leaf project on this website, I was inspired to come up with one my own.
 |
| Falling Leaves Crayon Resist by Mia, age 3 1/2 (drawing by Mama) |
Materials Needed:
- white paper
- watercolor paints
- paint brush
- small container of water
- crayons in fall colors (red, orange, yellow, etc.)
- real leaves (optional)
- Draw outlines of various leaf shapes onto white paper using crayon. I chose to space the leaves out all over the paper so that it looks like they have fallen somewhat randomly, and some of them go over the edge of the paper. Draw veins on the leaves for extra dimension. (You could trace an actual leaf if you don't want to draw the leaves free hand.)
- Color in the leaves with crayons, making sure to press firmly. You may wish to leave parts of the leaves uncolored. (These parts will get filled in with paint.)
- Using one color of watercolor paint (Mia chose red), wash over the entire piece of paper.
- The paint will fill in the white spaces, and of course, the crayon-covered parts will resist the paint. Allow the paint to dry before displaying your artwork.
Subscribe to:
Posts (Atom)