Wednesday, April 27, 2011

Toilet Paper Tube Wind Sock

Here's my take on a decorative wind sock craft. Please note that it is not meant to be hung outside.
{Wind Sock by Mia, age 4}
Materials:
  • toilet paper tube
  • paint
  • paintbrush
  • scissors
  • glue
  • hole punch
  • tissue paper (or construction paper)
  • yarn (or ribbon or string)
Directions:
  1. Paint a toilet paper tube and allow paint to dry.
  2. Cut tissue paper (or construction paper) into strips about 1/2 to 3/4 inch in diameter (and slightly longer than the tube itself.)
  3. Once the paint is dry, glue the tissue paper strips to the bottom of the toilet paper tube.
  4. Use a hole punch to make two holes on either side of the tube.
  5. Thread some yarn, ribbon, or string through the holes. Tie the ends and your wind sock is ready to be hung up.

Cardboard Tube Butterfly

{Butterfly by Mia, age 4 (with wings cut by Mama)}
Our recent trip to Butterflies are Blooming at Frederik Meijer Gardens inspired this pretty spring craft.

Materials:
  • cardboard tube
  • scissors
  • tissue paper
  • pipe cleaners
  • tape
  • googly eyes
  • construction paper
  • Mod Podge (or glue)
  • foam paint brush (if using Mod Podge)
  • other decorative items: feathers, pom poms, beads, etc.
Directions:
  1. Cut strips of tissue paper (or construction paper) and use Mod Podge (or glue) to adhere the strips around a cardboard tube. We used the tube from an aluminum foil carton, but a paper towel or toilet paper tube would also work.
  2. Cut wings from construction paper. Tape wings onto the back of the tube once the Mod Podge or glue is dry.
  3. Cut a pipe cleaner in half. Curl one end of each half for the butterfly antennae. Attach to the inside of the tube with tape.
  4. Glue two googly eyes onto the front of the tube. 
  5. Decorate the butterfly's wings as desired. Mia used strips of tissue paper, feathers, and pom poms, but you could use just about anything.

Saturday, April 23, 2011

Toilet Paper Tube Bunny

Materials:
{A joint effort by Mama and Mia, age 4}
  • toilet paper tube
  • white paint
  • paint brush
  • white paper or craft foam
  • pink paper or craft foam
  • scissors
  • glue
  • 2 googly eyes
  • black marker
  • pink marker (optional)
  • cotton ball (optional)
Directions:
  1. Paint a toilet paper tube white. Allow paint to dry. (I used acrylic paint and a foam paint brush.)
  2. Glue on 2 googly eyes.
  3. Cut a small triangle from pink paper and glue beneath the eyes. (You could also use craft foam or just draw a nose with a pink marker.)
  4. Use a black marker to draw the mouth, whiskers, and if you want, teeth.
  5. Cut two ears from white paper and glue to the top of the tube. (You may wish to line the inside with pink paper or craft foam, or color the inside pink before gluing on the ears.)
  6. Once all the glue is dry, you can use your bunny as a finger puppet or place it on a table or shelf for decoration.

Extra options: Mia wanted to add a cotton ball tail to the back side, which you can't see in the picture. I had also thought of using white craft foam hearts or ovals to make the paws, but her face ended up taking up the entire tube so I decided to skip that part.

Toilet Paper Tube Chick

{A joint effort by Mama and Mia, age 4}
Materials:
  • toilet paper tube
  • yellow paint
  • paint brush
  • googly eyes
  • orange construction paper
  • yellow feathers
  • scissors
  • glue
  • push pin (optional)
Directions:
  1. Paint the outside of a toilet paper tube yellow. You can also paint the top part of the inside if you want it to look more finished. Allow paint to dry.
  2. Glue on two googly eyes.
  3. Cut a beak and glue beneath the eyes.
  4. Use a push pin or scissors to make small holes on either side of the tube and one in the back.
  5. Insert a yellow feather into each hole to make wings and a tail.
  6. Cut two feet (I made ours like three-pointed crowns) from orange construction paper and glue to the bottom of the toilet paper tube.
  7. Once all glue is dry you can use your chick as a finger puppet or else display it on a table or shelf.

Earth Day Flower Crafts

I came up with this recycled craft in honor of Earth Day.

Materials:
  • newspaper
  • scissors
  • watercolor paints
  • paintbrush
  • construction paper 
  • pencil
  • buttons (optional)
  • decorative scissors (optional)
  • lids, cups, bowls, plates, etc. for tracing
  • drinking straws, pipe cleaners, or yarn (optional)

Directions:
  1. Trace various sized circles onto newspaper. (I used lids and plastic containers from the recycling bin for this, but you could also use cups, bowls, or plates.)
  2. Fill in circles with watercolor paints. 
  3. Allow to dry and then cut out circles using scissors or decorative scissors. I used some with scalloped and zigzag edges, for example.
  4. Layer and arrange circles as desired to form flowers. When you're happy with the arrangement, glue flowers onto construction paper.
  5. Add extra decorative touches to the flowers if desired. I used buttons for the flower's centers, but you could also make stems using straws, pipe cleaners, or yarn.
    {Mia, age 4, put her own spin on this craft. After cutting out her circles, she pinched them into flowers and added pipe cleaner stems like we had done when we made coffee filter carnations.}

Thursday, April 21, 2011

Paper Plate Easter Egg Wreath

Mia did this one almost entirely on her own. I think you could adapt it and use it for toddlers on up. You can make the eggs as fancy or as plain as you want, but either way I think it is fairly simple to make this craft.
{Easter Egg Wreath by Mia, Age 4}

Materials:
  • paper plate
  • scissors
  • tape
  • pencil
  • markers, crayons, or paint
  • construction or scrapbooking paper
  • stapler or glue
  • yarn or ribbon for hanging
  • egg shaped cookie cutter (optional)
  • decorative materials: beads, foam, pom poms, rickrack, etc. (optional)

Directions:
  1. Using scissors, cut out inner circle of a paper plate.
  2. Decorate outer ring with markers. (You could also use paint or crayons if you prefer.)
  3. Using cookie cutters, trace and cut out several egg shapes from construction paper. (If you don't have an egg shaped cookie cutter, you can draw one freehand, cut it out and use it as a template or find a picture you like and trace it.)
  4. Decorate construction paper eggs if desired. (You can also you patterned scrapbooking paper.)
  5. Arrange eggs on the paper plate ring. When you are happy with the arrangement, glue or staple them.
  6. Cut a length of yarn or ribbon and adhere to the back of the plate with tape. 
  7. Make sure all glue is dry before hanging your wreath.

Row, Row, Row... Ah!

Logan had another great session with Ms. Pam, his speech teacher, today! When I told him that she was coming this morning he clapped his hands and said, "Yay!" (which was a first!) While she was here, he really enjoyed playing with her iPad, especially the app that showed pictures of animals and included animal sounds and music. (She said that most kids weren't as interested in the music as he was, which is interesting. I told her we don't listen to that much music without words so I was a bit surprised at how well he liked the classical music.)

I excitedly told her that he has really taken off since his last session and mentioned all of the new animal sounds he has picked up, including "rawr" for lion, "ah ah ah" for monkey, and "tweet tweet" for bird. He also says "cheep cheep" for chick.

On the 10th, I heard him say "choo choo" for train and he waved "hi" for the first time on the 14th. (He has been waving bye-bye for a little while now.) One of the teachers at Logan's LESA playgroup told me that he said "down" yesterday, which I have not heard before and today during his session with Pam he said "cat" and "go."

When we started attending playgroup, I learned this version of the song "Row, Row, Row Your Boat" and we started singing it to Logan every time we brush his teeth:
Row, row, row your boat
gently down the stream.
If you see an alligator,
don't forget to scream! Ah! (scream)
Now, Logan rocks himself from side to side and sings along with his own version: "Row, Row, Row... Ah!" (scream), which is cute and pretty funny to hear. He clearly knows the beginning and the end of the song, including the best part, the scream. Who needs all those extra words, anyway?

Monday, April 18, 2011

Pasta Petals Project

{Pasta Petals by Mia, Age 4}
While cleaning out the pantry, I came across some expired pasta -- really, really expired. Mia wanted to do a craft so I decided they could be made into flowers (although my husband said they look like pinwheels). Problem solved. I won't feel guilty about wasting food. And I don't have to serve pasta that has apparently been in our house longer than Mia!

Materials:
  • paper (or cardboard)
  • glue 
  • pasta
  • scissors
  • drinking straws
  • buttons
Directions:
  1. Decide on the arrangement for your flowers.
  2. Glue buttons onto construction paper be the centers of the flowers. You could also use cardboard if you want something sturdier.
  3. Arrange pasta around the buttons and glue down to form the petals. We used Kroger Rainbow Salad Twirls, but most any pasta would work. We liked that there were three different colors already, but you can paint or dye plain pasta if desired.
  4. Cut drinking straws to desired length and glue onto paper to form stems for the flowers.
  5. Once the glue is dry, display your artwork.

Friday, April 15, 2011

Signs of Spring

I think we can finally say that spring has arrived! Here are some of the signs of spring that I have noticed in the past week, in no particular order:
  • Logan has eaten sand, dirt, sidewalk chalk, and rabbit droppings. (Fortunately, he decided that the last one wasn't edible and spit it out almost immediately.)
  • Mia has been playing with various bugs, including a caterpillar of some sort. (I think it is destined to be something less lovely than a butterfly.)
  • Mia knelt on an anthill while studying the grape hyacinths. Thankfully, I noticed quickly and she only had a few ants in the cuff of her jeans.
  • Mia found the first dandelion in the yard. She was absolutely thrilled to find a "flower."
  • Logan got the first scraped knee of the season. If he even noticed it, he showed no sign.
  • The farmer kitty-corner from us has a brand new baby llama born the day before yesterday.
  • Spiders are coming out of the woodwork, apparently. All I know is that they keep appearing in the house, and the kids are playing with them.
  • The battle against grass stains has officially begun!
  • Since it finally got a bit warmer, the kids are wearing a mish-mash of clothing sizes -- whatever I could dig out from storage. And it's apparent that I need to do some shopping since they have grown.
  • The rainstorm from a few nights ago pelted the crocuses and they are pretty much done. The good news is that the tulip leaves are well on their way.
  • The people across the street are getting a new roof. I don't know if it has anything to do with the recent rainstorm or possibly just that they needed a new roof and have just gotten their tax return.
  • There are little buds on some of the trees in our yard!

    Thursday, April 14, 2011

    Easter Bunny Mask

    {Mia models my bunny mask.}
    Materials:
    • paper plate
    • craft stick
    • white paper
    • scissors
    • tape
    • glue
    • red or pink pom pom
    • pink and black markers
    • 2 black pipe cleaners
    Directions:
    {Mask by Mia, Age 4}
    1. Using scissors, cut two eye holes near the center of a paper plate. We used luncheon size plates.
    2. Cut two ears from white paper. Color the inner part of the ear pink. Tape ears to the front (eating) side of the plate so that the colored part shows on the outside.
    3. Make the bunny's face on the back side (non-eating) of the plate. Glue on a pom pom nose and draw a mouth. Draw teeth if desired.
    4. Bend a pipe cleaner into thirds. Cut off one section. Keep the other part bent in half. Glue the bent piece on one side of the nose to make the bunny's whiskers. Glue the smaller section in between the two bent halves. Repeat this process with the second pipe cleaner and glue the pieces on the opposite side of the nose.
    5. Tape a craft stick handle to the back of the mask.
    6. Once all the glue is dry you can wear your mask.
    Other Options: 
    • Skip cutting eye holes and glue on wiggly eyes, eyes cut from construction paper, or simply draw eyes onto your mask. 
    • If you choose to color your bunny (as Mia did because "bunnies are 'posed to be brown", you could add teeth cut from paper, felt, or foam.
    • Add a bow tie made from paper or actual ribbon.

    Monday, April 11, 2011

    A Rainy Day Snack

    We've done a few umbrella crafts today and it got me thinking that we should enjoy a rainy day snack, too. It's not perfect and I thought it looked more like a toadstool than an umbrella. Then, Mia asked me "How are we going to make the rain drops?" I suggested grapes and it suddenly looked more like an umbrella. We make a good team!

    Ingredients:
    • slice of round cheese
    • string cheese
    • grapes (or other round/oval fruit)
    Directions:
    1. Break (or cut if you want to be more precise) a round slice of cheese in half. Lay one half on a plate.
    2. Take some string cheese and peel off a section. Arrange it underneath the half cheese slice to look like the umbrella's handle. (It probably won't stay curved, but that's okay.)
    3. Arrange a few grapes above the umbrella to look like rain drops. (Other fruit such as blueberries or raisins would also work.)
    4. Enjoy your snack on a rainy day (or whenever).

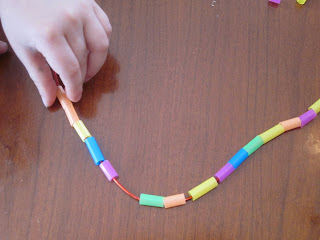
    Bendy Straw Beaded Jewelry

    Mia and I were working on some umbrella crafts today using bendy straws for the handles. We had some parts of plastic straw left over, and I decided that we could cut them into smaller sections and use them to make simple beaded jewelry. We ended up with enough to make a necklace and bracelet for Mia. They remind me of colorful macaroni jewelry.
    Materials:
    • plastic drinking straws
    • scissors
    • elastic cord (or string, yarn, etc.)
    Directions:
    1. Cut plastic straws into small sections about 1/4" to 3/4" long.
    2. Decide on how long you want your necklace or bracelet to be and cut a length of cord (or string or yarn or whatever you are using.)
    3. Tie a knot at one end of the cord making sure it's large enough to prevent beads from sliding off.
    4. Add beads as desired.
    5. Tie a knot at the other end and wear your necklace or bracelet or give it as a gift.

    It's Raining Cats and Dogs! Craft

    {"It's Raining Cats and Dogs!" by Mia, Age 4}
    Materials:
    • scissors
    • glue
    • tape
    • paper
    • paper cupcake liners
    • drinking straws
    • scalloped scissors (optional)
    • crayons/markers/colored pencils (optional)
    • cat and dog stickers (or magazine cutouts)

    Directions:
    1. Fold a cupcake liner in half and cut it apart with scissors OR trim along the straight edge with scalloped scissors. (One cupcake liner makes two umbrellas.)
    2. If desired, decorate the umbrellas with crayons, markers, or colored pencils.
    3. Cut a flexible drinking straw in half. The bendy part will become the umbrella's handle. Save the other half for another craft.
    4. Tape the straw to the back side of the cupcake liner.
    5. Glue the cupcake liner and straw to the paper. (Repeat steps 1-5 as many times as desired.)
    6. Add dog and cat stickers to the paper.
    7. Once the glue is dry, display your project.

    Paper Plate Umbrella Craft


    Materials:
    • paper plate
    • crayons or markers
    • scissors
    • circular punch (optional)
    • flexible drinking straw
    • tape
    • stapler
    • newspaper (optional)
    Directions:
    {Umbrella by Mia, Age 4}
    1. Fold a paper plate in half and cut with scissors OR use a circular punch to make a scalloped border along the straight edge, leaving you with two identical pieces.
    2. Color the back (non-eating) side of each half using crayons or markers.
    3. Cut about 1 inch off of the bendy end of a flexible drinking straw. Save both pieces.
    4. Tape the longer part of the straw inside of one half of the plate and then bend bottom part of the straw to form the umbrella's handle.
    5. Tape the shorter part of the straw to the top part of the inside of the paper plate half.
    6. Staple the two paper plate halves together to make the umbrella. (If you want more fullness, crumple a bit of newspaper and stuff it inside before stapling.)
    Extension Ideas:
    • Add raindrops cut from blue construction paper. (You can also buy a teardrop shaped hole punch at use that in place of scissors). Next, use a small hole punch to make a hole in each raindrop and attach them to the bottom of the umbrella by tying on various lengths of fishing line (or blue string or yarn).
    • "It's raining cats and dogs!" Affix cat and dog stickers to construction paper, cut around them leaving about 1/8" to 1/4" border. Use a hole punch and fishing line to hang the stickers from the umbrella. If you don't have cat and dog stickers, you could cut out pictures from magazines and glue them to the construction paper.
    • Use any left over parts of bendy straw as beads and make some jewelry. 

    Friday, April 8, 2011

    Live, Laugh, Love (and Eat Chocolate)

    Maternity Test?
    Logan isn't a big fan of sweets, which is surprising to me. Anyone who knows me even a little bit is likely to know that I have a huge sweet tooth. Sometimes I have wondered how this child who spits out ice cream, cake, and cookies even came from my womb. If he didn't look so much like me I would wonder if he were somehow switched at birth. However, a couple of nights ago he was eating chocolate pudding, and he spilled some on the table. Not missing a beat, he leaned down, licked it up, and kept eating! That's my boy!

    Sometimes You Feel Like a Nut
    Logan has a bit of a diaper rash that has spread to his privates. Recently, Mia has been asking about what she calls the "thing on his bum." I realized she meant his penis and told her what it's called and that he has it because he's a boy. That was enough of an explanation for her until yesterday when she noticed how red it was from the rash. (She was helping me by holding his hands to prevent him from "exploring" while I changed a poopy diaper.) Mia asked me, "What's wrong with his peanut?" I said, "You mean his penis?" She replied, "Yes, what's wrong with his poor little nuts?" I was trying not to make a big deal of this, but it was hilarious so I couldn't help but laugh. I reminded her of the correct term and added that we don't talk to other people about body parts that are covered by our swimsuits. I was thankful that this conversation didn't take place around other people who would seriously wonder what I was teaching my 4 year old!

    I Have Good Kids
    As much as the squabble over silly things and have me checking my scalp for gray hairs lately, I know that I have been blessed with two amazing little kids. Even though Logan hit Mia tonight, he gave her a kiss after he was done with his timeout. (I asked him to do that since he can't say "I'm sorry.") And then at bedtime, it was so sweet to watch them give each other a hug and kiss good night. I love my babies! Now if they would only stay little...

    Wearable Easter Bonnet Craft

    {Mia models the Easter bonnet I made.}
    Some of my previous ideas for wearable crafts have been tricky to keep on the wearer's head, but I think I have this problem solved now. The ribbons on this Easter bonnet craft that I came up with are both pretty and functional. I am happy with how it turned out.
     
    Materials:
    {Easter Bonnet by Mia, Age 4}
    • paper plate
    • scissors
    • crayons or markers
    • construction paper
    • tape
    • paper trimmer (optional)
    • hole punch
    • ribbon, yarn, or curling ribbon
    • decorations: silk flowers, craft foam, felt, lace, feathers, buttons, beads, pom poms, etc.
    Directions:
    1. Color the outer ring of the back (non-eating) side of a paper plate.
    2. Use scissors to cut out the inside circle. Discard or save for another project.
    3. Cut construction paper into strips. For my bonnet I used 10 strips that were 1" x 9". For Mia's we used 4 strips that were 2" x 11". I think the larger size worked better.
    4. Tape one end of a paper strip to the underside (non-colored part) of the plate, hold the strip across the paper plate ring, and tape the other end of the strip to the opposite side. Place a second strip perpendicular to the first and tape either end of it. Repeat with additional strips, crossing them over each other until the top of the bonnet is formed. Gently push the strips of paper through the ring so that they are arched.
    5. Decorate your bonnet with whatever materials you like. We used ribbon, craft foam, and silk flowers attached with brads.
    6. Looking at the front of the bonnet, punch two holes, one on each side of the wearer's head.
    7. Thread ribbon, yarn, or curling ribbon through holes and secure by knotting (or with tape if needed).
    8. Wear your Easter bonnet, using the ribbon or yarn ties to help it stay on your head.

    Murphy's Law of Motherhood: A Top 10 List

    Murphy's Law: Whatever can go wrong, will... especially when you're a mom! I call it "Murphy's Law of Motherhood." I'm sure that this list could go on indefinitely, but here are the top 10 episodes that keep replaying themselves at my house.

    10) This isn't really a terrible thing, but at some point or another, you will lick your thumb and clean your child's face. "Mom Spit" is a very conveniently available cleaning solution, and it gets the job done when you don't have a wipe, towel, or washcloth handy. Your child, however, will hate it, and you will think, "Gross! I'm that mom!" while you give your kid a spit bath. And then you will do it again whenever necessary, thinking all the while, "Gross! I'm that mom!" The good news is that kids eventually learn to clean their own faces to avoid another application of "Mom Spit."

    9) Before I had kids, I would often pick the shopping cart with the "bum" wheel. This rarely happens now but I am amazed at how frequently the first (and sometimes second and even third) cart I choose has a busted seat belt. Now, this may have always been the case, and I never noticed because it was irrelevant in my b.c. (before children) era life.

    8) Babies and toddlers have really hard heads. God, in His infinite wisdom, designed them this way, presumably so that they will survive all of the potentially suicidal things that they will attempt during the toddler phase. They will somehow bash their heads into yours (probably on more than one occasion). The funny thing is that they will be fine and you will really be hurting.

    7) I forget to eat sometimes...This is largely due to the two little people who are constantly eating food from my plate. And it doesn't matter if I take food directly from my plate and put it onto theirs; they will still steal my food. I guess it just tastes better when it comes from Mommy's plate.

    6) "How did this get here?" The combination of kids' not-so-great organization skills and your own "mommy moments" brought on by lack of sleep and stress from various "Murphy's Law of Motherhood" events results in finding interesting things in very odd places. Sometimes it's my own doing. For instance, I have a tendency to use the laundry room as a collection center for toys that the kids have temporarily "lost" and then I forget about them, too. Then there are all the times I've nearly killed myself slipping on a toy car, particularly when they end up on the kitchen floor while I'm trying to cook. I once found some Pillsbury refrigerated biscuits in the pantry, and on more than one occasion, I've snapped back to reality only to realize that I was in the process of putting the milk in there, too. Tons of small objects have been dropped down the air vents over the past 4 years at our house. I'm constantly finding odd little things in the pockets of my jeans or coat: a paper clip/coin/small toy (or anything else deemed "choking hazard"), an alphabet magnet, tissues with other people's snot on them (these also turn up frequently in the dryer since I forget to remove them from my pants pockets), Goldfish crackers, and so on--always stuff that screams "I'm someone's mom!" And don't get me started on the van! Goldfish crackers are just the tip of the iceberg...

    5) Traveling with children is a major event. The younger they are, the more gear they seem to require. Even a simple trip to the store requires me to pack a bag with snacks, sippy cups, extra diapers... (My rule of thumb is to always pack one more diaper than I think I will need for any particular outing~ this has saved me one several occasions!) Something inevitably is forgotten while packing and something always gets left behind. It might not be anything that's of utmost importance, but it will happen, you can count on that.

    4) "I'm hungry" and "I have to go to the bathroom!" You hear these words a lot when you have small children. And it's usually just after they have eaten or used the bathroom, or in more frustrating instances, it's right after you have gotten them strapped into their car seats or bundled into their snowsuits.

    3) "I just cleaned that!" is a common phrase I hear myself uttering. It's a never-ending cycle of laundry, dishes, picking up toys, bathing children, scrubbing down various surfaces... As Phyllis Diller said, "Cleaning your house while the your kids are still growing up is like shoveling the walk before it stops snowing." The good news is that nearly everything in your home is washable (children included)! Some of my favorite words that I can find when shopping are "machine washable" or "dishwasher safe." 

    2) If someone is going to get sick enough to require medical treatment it will almost always happen late at night, and if you're really lucky, it will be a holiday weekend, too. Off the top of my head, I can recall trips to Urgent Care on Mother's Day and the E.R. in the middle of the night over Memorial Day weekend.

    1) I wait as long as I can before getting ready to go out sans children, but no matter how hard I try, the kids will somehow mess up my efforts. It might just be that they will pull off my necklace or muss my hair. However, I will usually end up with something yucky on my clothes. It's always something that would not have ended up there in the "b.c. (before children) era": snot, drool, spit-up (although I don't really have to deal with this anymore, thankfully), urine, blood, partially chewed Goldfish crackers, peanut butter, jelly, apple juice, ... you get the idea. And yes, I've even discovered poop on my jeans while out without kids!

      Thursday, April 7, 2011

      Coffee Filter Carnations

      This craft was inspired by a coffee filter flower that Mia made in preschool. Hers was painted with watercolor paints, which you could also do, but I thought this was a quick and simple alternative. Another option is to color the coffee filters with washable markers and then spray them with water. If you didn't want to mess around with coloring or painting, you could also just cut out circles of colored tissue paper to make these flowers. Thanks to Sue for adding that this is a great way to use up your extra dye after coloring Easter eggs!

      Materials:
      • glass of water
      • food coloring
      • coffee filters
      • green pipe cleaners
      • newspaper (optional)
      Directions:
      1. Add a few drops of food coloring of your choice to a glass of water.
      2. Fold a coffee filter into quarters and dip the pointed end into the glass of water. Allow the color to seep all the way up, unfold the coffee filter, and then set it aside to dry. (I sometimes do this on newspaper, but I've also found that a wire baking rack works nicely because the coffee filter won't stick to it.)
      3. Take the dry coffee filter, pinch it in the center, and twist it tightly so that the twisted portion is about 1/2 to 1 inch long.
      4. While holding the twisted part of the coffee filter in one hand, wrap the end of a green pipe cleaner around it until it is covered (about 4-6 times.) Kids may need help with this part.
      5.  Make several flowers and display them in a vase or give them away as Easter or Mother's Day gifts.

      Wednesday, April 6, 2011

      Easy Easter Egg Craft

      Materials:
      {Easter Egg by Logan, Age 19 Months}
      • construction paper
      • pencil
      • scissors
      • Bingo markers
      • newspaper (to protect work surface)
      Directions:
      1. Fold a piece of construction paper in half like a hot dog.
      2. Use a pencil to draw 1/2 of an egg shape (basically an oval that is narrower on one end).
      3. Cut out the egg shape and unfold it.
      4. Decorate your Easter egg by dotting it with Bingo markers.
      5. Allow the egg to dry and then display your craft.

      More Mommyisms

      I've compiled another list of things I never thought I'd say, things that I seem to say ad nauseam now that I am a mom...And yes, most of these things are pointless to say; they just slip out of my mouth. I seem to say these thing more frequently as the kids get older, and unfortunately, most of them seem pretty negative. Apparently I have become a compilation of every mom I have ever known. It happens to the best of us, I guess.
      1. "How did this get here?"
      2. "Not in my house!"
      3. "I just cleaned that!"
      4. "What were you thinking?"
      5. "What happened?"
      6. "Don't put that in your mouth!"
      7. "Sit down!"
      8. "Drink your milk."
      9. "That's what you're wearing?"
      10. "Take your finger out of your nose."
      11. "NO bouncing on the furniture!"
      12. "Don't talk with your mouth full."
      13. "Did you flush the toilet?"
      14. "Did you wash your hands?"
      15. "Don't stand on that!"
      16. "Don't touch that!"
      17. "Put that back where you found it."
      18. "No throwing balls in the house!"
      19. "You need to share."
      20. "What did I just say?!"
      21. "Keep your hands and feet to yourself."
      22. "Next time, please ask first."
      23. "Give that back to your brother/sister."
      24. "Use your inside voice."
      25. "Do I need to call your father?"
      26. "Be careful!"
      27. "NO running in the house!"
      28. "Settle down."
      29. "Not right now..."
      30. "We'll see..."
      31. "Pick up your __________ (fill in the blank)."
      32. "Put your __________ (fill in the blank) away."
      33. "Don't pull the dog's tail/ears/fur."
      34. "Don't slam the door."
      35. "How many times do I have to tell you not to  __________ (fill in the blank)?"
      36. "NO biting/hitting/kicking! Biting/hitting/kicking hurts." 
      37. "Go somewhere else and do that."
      38. "Please be quiet." 
      39. "I'm sorry."
      40. "I love you." Fortunately, the last two mommyisms, along with a hug, can undo any potential damage from being grouchy and saying any of the above mommyisms. Kids are very forgiving.

      Tuesday, April 5, 2011

      Easter Sun Catchers


      These are the sun catchers that we made for Easter. There are lots of fun shapes that you can make for Easter, both religious and secular, and some that are a combination of both. The Easter egg, for example, was originally a Pagan symbol of fertility and new life, but has since become incorporated as a symbol of the resurrection of Christ. The chick is another symbol of new life or re-birth. The life cycle of the butterfly is used to represent Jesus' life. The first stage, the caterpillar, symbolizes His life on Earth. The cocoon stage represents the crucifixion and burial, and the adult butterfly is used to symbolize the resurrection. The cross, of course, stands for the crucifixion but also for Christ's victory over death. The Easter bunny is one I'm not too sure about. I've read that its origins are somewhat like Santa Claus, but it is also a symbol of abundant life. In my opinion, the idea of a benevolent being who brings joy to children can't help but seem to fit into Christianity in some way, although I'll admit I'm stretching a bit here. Additional symbols that you could make sun catchers for include Easter baskets, flowers (particularly Lilies), hot cross buns, palm branches, Easter bonnets, candles, and lambs. You can make these sun catchers as simple or as complex as you like, and I have found that they can be done with toddlers on up with some parent prep. I think they are beautiful for spring, and they remind me a bit of stained glass windows, which is a lovely thought during the Lenten season. John 11:25-26
      Jesus said to her, "I am the resurrection and the life. He who believes in me will live, even though he dies; and whoever lives and believes in me will never die. (NIV).


      {Chick and Easter Egg Sun Catchers by Logan, 19 Months}
      Materials:
      • pencil 
      • clear tape
      • scissors
      • clear contact paper
      • colored paper
      • tissue paper (any color)
      • paper trimmer (optional)
      • hole punch (optional)
      • yarn, string, ribbon, etc. for hanging (optional)
      Directions:


      {Bunny by Mia, Age 4}
      {Butterfly by Mia, Age 4}
      1. Cut tissue paper into small squares. Older kids can do this themselves. We used approximately 1/2 inch squares, but you could make yours bigger. 
      2. Fold a piece of construction paper in half like a hamburger (or use two pieces of construction paper if you would like to make a larger sun catcher).
      3. Draw an Easter shape (or trace around a cookie cutter or a picture from the Internet) onto one half (or one piece) of the paper, and cut out the shape. Do not draw your design too close to the edges of the paper. Cut paper in half along the fold. You should now have two pieces of paper with identical cut-outs.  Tip: When making symmetrical shapes such as the butterfly, cross, or Easter egg, you can gently fold your paper in half like a hot dog before drawing and cutting out your shape. This makes it go a bit faster, and hopefully it creates less frustration, too.  Tip: If you are using two pieces of paper, you will need to make sure they stay together so that you get identical Easter shapes.
      4. Cut two pieces of clear contact paper (I used both a paper trimmer and scissors for this.) so that they are 1/4 inch larger than the construction paper all the way around. Tip: Do not remove backing from contact paper until you are ready to use it.
      5. Adhere one piece of paper to the clear contact paper so that there is a border of 1/4 inch all around the paper. Tip: Slowly peel the contact paper away from the backing as you smooth the construction paper down onto the contact paper. This way you don't end up with "bubbles."
      6. Have your child stick tissue paper squares onto the contact paper Easter shape until it is filled. (Mia has created her own technique for filling in small spaces: crumpling up the tissue paper into balls. It makes the sun catcher a bit bulkier, but it does work, and I think it adds a bit of visual interest to the design.)
      7. Layer the second piece of construction paper on top of the first, making sure that the Easter shapes line up.
      8. Add the second piece of contact paper over the top, smoothing it down as you go. Trim away excess if desired, but don't trim too much or the sun catcher will not stay together. 
      9. You can display your sun catcher in a window using clear tape. Another option is to use a hole punch to make two holes near the top, thread some ribbon or yarn through the holes, tie it off, and then hang your sun catcher.

      Monday, April 4, 2011

      April Showers Bring May Flowers Sun Catchers

      I've been on a sun catcher kick lately so these umbrella and flower sun catchers were the perfect craft for this dreary day. Mia enjoyed them too, and she asked if we could make some more. Their bright colors look cheerful in the window even if there isn't any sun, so she may have the right idea! It seems like spring is never going to arrive...

      {Sun Catchers by Mia, Age 4}

      Materials:
      • construction paper (any color)
      • scissors
      • clear contact paper
      • tissue paper (any color)
      • pencil 
      • clear tape
      • paper trimmer (optional)
      • hole punch (optional)
      • yarn, string, ribbon, etc. for hanging (optional)
      Directions:
      1. Cut tissue paper into small squares. Older kids can do this themselves. We used approximately 1/2 inch squares, but you could make yours bigger. 
      2. Fold a piece of construction paper in half like a hamburger (or use two pieces of construction paper if you would like to make a larger sun catcher).
      3. Draw a flower or umbrella shape (or trace around a cookie cutter or a picture from the Internet) onto one half (or one piece) of the paper, and cut out the flower or umbrella shape. Do not draw your design too close to the edges of the paper. Cut paper in half along the fold. You should now have two pieces of paper with identical fish cut-outs.  Tip: If you are using two pieces of paper, you will need to make sure they stay together so that you get identical flowers or umbrellas.
      4. Cut two pieces of clear contact paper (I used both a paper trimmer and scissors for this.) so that they are 1/4 inch larger than the construction paper all the way around. Tip: Do not remove backing from contact paper until you are ready to use it.
      5. Adhere one piece of paper to the clear contact paper so that there is a border of 1/4 inch all around the paper. Tip: Slowly peel the contact paper away from the backing as you smooth the construction paper down onto the contact paper. This way you don't end up with "bubbles."
      6. Have your child stick tissue paper squares onto the contact paper flower or umbrella shape until it is filled. (Mia chose pink and purple for the flower petals and green for the leaves and stem, and she decided that the umbrella should have rainbow colors. She came up with her own technique for filling in smaller spaces like the umbrella handle: crumple the tissue paper into balls. This makes it a bit bulkier, but it still works, and it gives it some visual interest.)
      7. Layer the second piece of construction paper on top of the first, making sure that the flower or umbrella shapes line up.
      8. Add the second piece of contact paper over the top, smoothing it down as you go. Trim away excess if desired, but don't trim too much or the sun catcher will not stay together. 
      9. You can display your sun catcher in a window using clear tape. Another option is to use a hole punch to make two holes near the top, thread some ribbon or yarn through the holes, tie it off, and then hang your sun catcher.