Showing posts with label butterfly crafts. Show all posts

Monday, April 16, 2012

Beaded Clothespin Butterflies

I think this has to be one of my favorite crafts that we have ever done. Not only are they cute, but even my Little Man could thread his own beads onto the pipe cleaners (while I held the pipe cleaner) so this is really a craft that can be done with almost any age group. The only part I had to do was assembling the butterflies. This was a great way to occupy our time on this very windy and somewhat rainy day. I could also see making these butterflies for Easter or for Mother's Day gifts. Here is where I found the idea for this (floating around on Pinterest).

{A couple of Mia's butterflies}

{Beaded Butterfly by Logan, Age 2 1/2}
Materials:
  • wooden clothespin
  • 3 pipe cleaners
  • scissors
  • plastic beads
  • acrylic paint
  • paint brush
  • something to hold paint
  • glue (hot glue is recommended)
  • wax paper (optional)
  • fishing line (optional)

Directions:
1) Paint a wooden clothespin as desired. Set aside to dry. Tip: I suggest doing this on wax paper, especially if you are painting all sides of the clothespin. It won't stick as much as it would if you laid it to dry on newspaper. Tip: Acrylic paint stains clothing so have kids wear old clothes or protect clothing before starting.

2) Leaving about one inch uncovered on either end, string beads onto a pipe cleaner. Repeat with a second pipe cleaner. Tip: I found the easiest way to do this was to bend it upward at the end so that the last inch wasn't available for the kids to put beads on. This also prevented beads with larger openings from sliding off the ends (not a big issue, but still it could be helpful.)

3) Cut the last pipe cleaner in half. Bend it in half for the butterfly's antennae. Thread a bead onto each end and wrap around to secure if desired. (Some beads may stick well on their own. You can also add glue if you like.)

4) Making the wings is the trickiest part. (The blog post this idea came from said to make a figure 8, which took me some trial and error, so I will try to make the directions as clear as possible.) Take one beaded pipe cleaner and form a circle.


Then take slightly more than 1/2 on top pull it into a small circle and bring the end over to the rest of the pipe cleaner. Fit the end in between two beads and loop it tightly around one time, making sure that the end sticks off the side that will be on the inside of your butterfly. Now you have something that looks like a lowercase "g."


Bring the other end up to meet the beads where you just twisted the pipe cleaner. Again, loop the end around and make sure that it is secured around both sections of the beaded pipe cleaner. Loop around again if needed. Now you have a sort of figure 8 with a one oval larger than the other. To me, it looks a bit like a capital "J" in cursive handwriting.


That's the first wing. Repeat step 4 with the other beaded pipe cleaner to make the second wing. Congratulations! The hard part is over.


5) Once clothespin is dry, pinch it open, add a drop of white glue or hot glue, and insert center of pipe cleaner antennae. The pipe cleaner antennae will be held in place once the clothespin is closed.

6) To attach the wings, put glue into both sides of the spring on the clothespin. Tip: Hot glue works best. Of course, this should only be used by an adult. Then, insert pipe cleaner ends into each side of the spring. Tip: You may wish to trim the ends first if they appear too long. Another suggestion is to add more hot glue as needed if the wings don't seem sturdy enough.


{I know I shouldn't brag, but isn't my butterfly so darn cute?!}

{"Princess" the Butterfly by Mia, Age 5}
7) Allow glue to dry before displaying your butterfly. I hung our butterflies from the dining room chandelier. To do this, I took a length of fishing line, and placed the clothespin in the center. Then I tied it around and knotted it off so that the fishing line was nestled into the groove. Lastly I took the two ends of fishing line, threaded them both through the an arm of the chandelier, and secured them with a double knot. I repeated this for all 5 of our butterflies.

{I love how they flutter in the breeze when we walk by.}


Tuesday, April 10, 2012

Butterfly Foot Print Paintings

When I saw these butterfly foot print paintings, I knew we had to make some since they are so cute and we love butterflies. I can see them as an Easter craft, Mother's Day craft, or just a nice craft for spring. They could easily be framed to make nice wall art.

{Footprint Butterfly by Mia, Age 5}
{Footprint Butterfly by Logan, Age 2 1/2}
Materials:
  • paper
  • foam paintbrushes
  • acrylic paint
  • Styrofoam trays
  • black permanent marker
  • newspaper to protect work surface
  • old towels, paper towels, baby wipes, etc.
Directions:
  1. Before starting this project get ready for a potential mess by protecting your work surface with newspaper. (Note: I recommend doing this on your dining room floor.) Cover kids clothing or have them wear old clothes as acrylic paints will stain. Be sure to have old towels, paper towels or baby wipes handy for quick clean up. (You definitely do not want kids running away with messy feet!)
  2. The original picture I found of this craft was using canvases, which would be nice, but I didn't have any. I used white cardstock which I had on hand. Lay the paper on top of the newspaper.
  3. Pour about 3 or 4 paint colors of your child's choosing onto a Styrofoam tray (reused from meat packaging) or a plate. Have your child sit in a chair near the paper and paint the colors onto the bottom of one foot using a large foam paintbrush. (I had my kids tell me their preference for the order of the colors first.) Help child off chair and press his foot firmly onto the paper. Note: The placement of the feet is opposite of the way they would naturally be standing. (The left footprint becomes the right wing of the butterfly and the right footprint becomes the left wing.) Be sure to plan accordingly so that you have enough room on your paper for both prints.
  4. Clean the bottom of the foot and repeat with the other foot. Try to place the footprints as closely together as possible.
  5. Apply some paint to your child's thumb and make two impressions above the wings for the ends of the antennae. Allow paint to dry completely.
  6. Using a permanent black marker, draw the butterfly's head, antennae, and body, including a face, if desired. (Note: I realized after doing this that our butterflies weren't truly anatomically correct since they should only have a head and 2 other body segments, but I was doing my best to close the gaps between the footprints. If you are inclined, you can make your butterflies more scientific, but I think ours turned out nicely.)  


Thursday, May 19, 2011

Butterfly Garden Collage Craft

After dying pasta recently, I decided that the bow ties (farfalle) would make cute butterflies so I came up with this spring collage craft for Mia to do. It was a perfect activity for this rainy spring day.

{Butterfly Garden Collage by Mia, Age 4}
Materials:
  • construction paper
  • tacky glue
  • cupcake liners
  • scissors
  • bow tie pasta
  • green pipe cleaners
  • markers (optional)
  • green construction paper (optional)
  • food coloring for dying pasta (optional)
  • corkscrew pasta (optional)
  • beads, buttons, foam, yarn, etc. (optional)
  • clear tape (optional)

Directions:
  1. Glue about 3-5 cupcake liners to a piece of construction paper to make flowers. We put glue just on the inner circular section so that the outside part stood out to make 3-D flowers.
  2. Decorate the flowers. Mia used markers for the flower's centers, but you could use buttons, beads, craft foam, paper circles, or yarn. 
  3. Make flower stems. Trim green pipe cleaners to fit the paper and glue down for the flower stems. You may need to press down and hold for 10-20 seconds to help the pipe cleaners stick. We also added a small amount of clear tape to help hold them. You could also use drinking straws or paper for the stems or just draw them with markers.
  4. Add some "butterflies" to your garden by gluing bow tie pasta to and around the flowers. You might also choose to add corkscrew pasta "caterpillars." Again, it helps if you press down gently and hold for about 10-20 seconds to make sure the pasta is securely attached to the paper. Note: If you want dyed pasta shapes, follow the same directions for making dyed pasta necklaces.
  5. If desired, add grass or dirt to the bottom of the paper. Mia chose to draw these with markers but you could also use yarn for grass or cut some fringe on green construction paper and glue it to your paper.
  6. Once the glue is dry, you can display your butterfly garden collage.

Wednesday, April 27, 2011

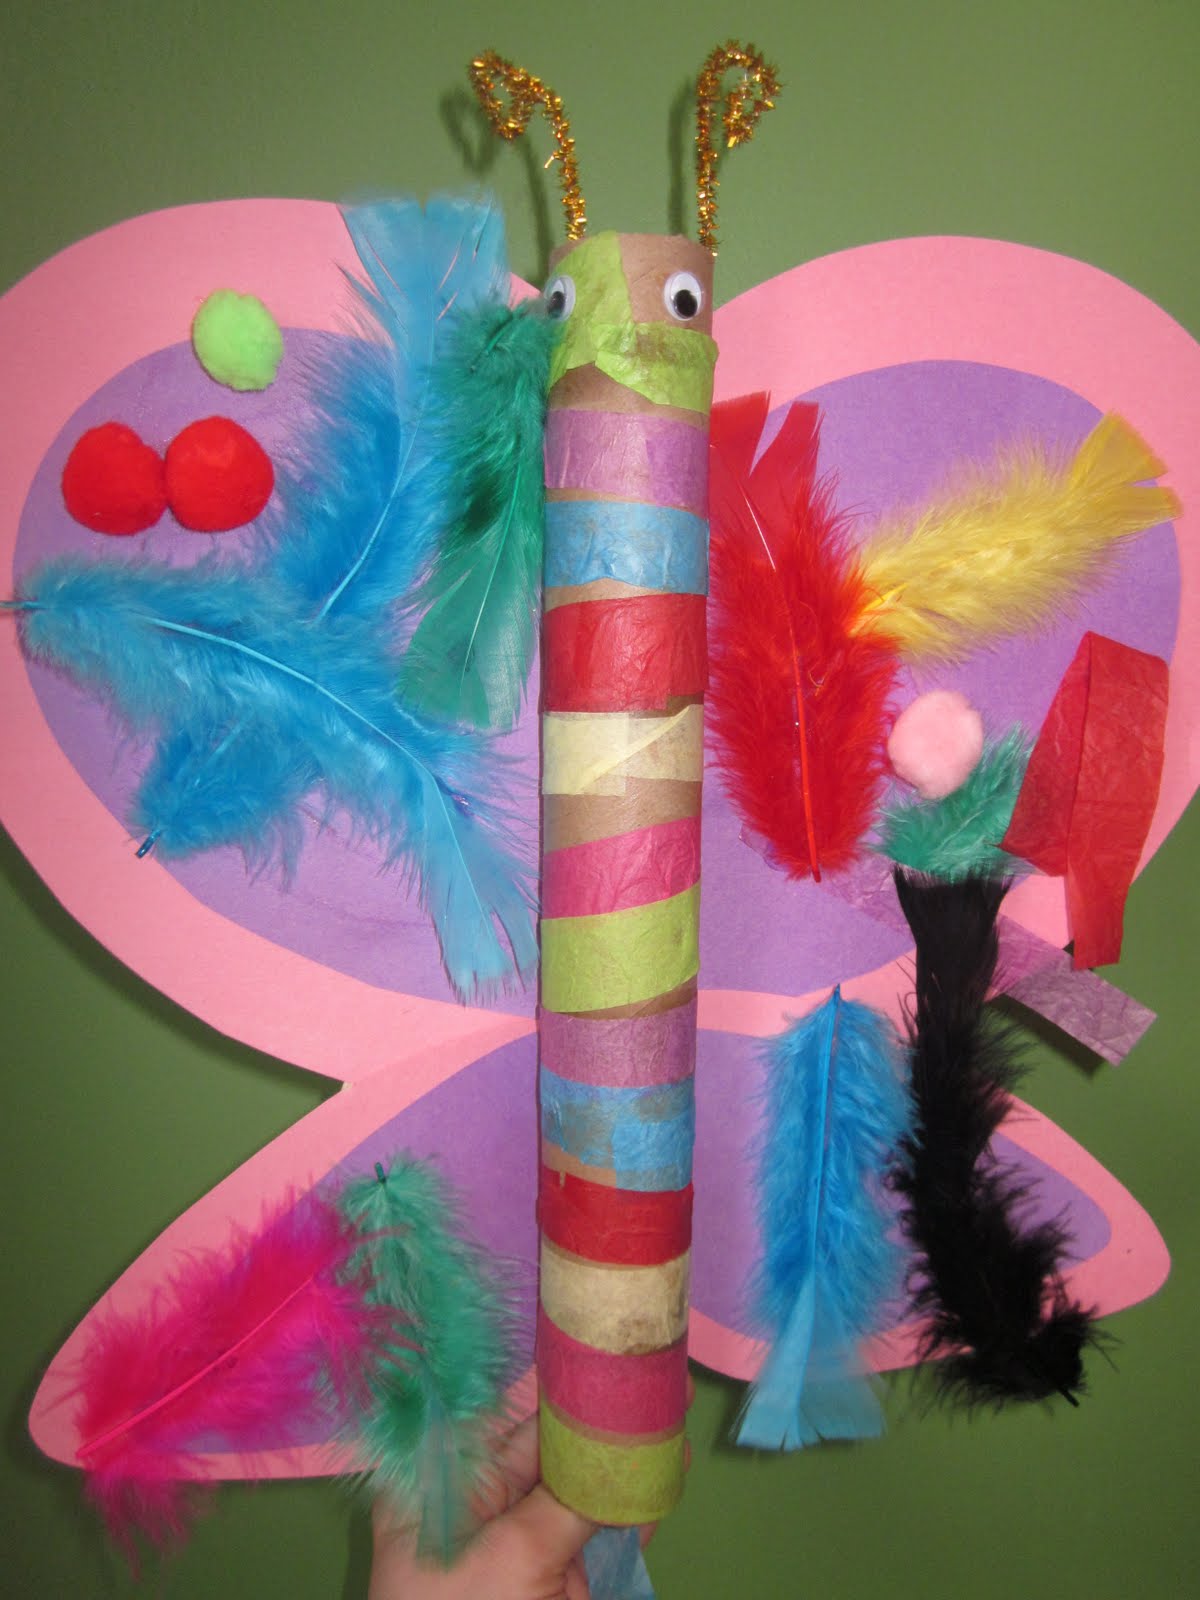
Cardboard Tube Butterfly

{Butterfly by Mia, age 4 (with wings cut by Mama)}
Our recent trip to Butterflies are Blooming at Frederik Meijer Gardens inspired this pretty spring craft.

Materials:
  • cardboard tube
  • scissors
  • tissue paper
  • pipe cleaners
  • tape
  • googly eyes
  • construction paper
  • Mod Podge (or glue)
  • foam paint brush (if using Mod Podge)
  • other decorative items: feathers, pom poms, beads, etc.
Directions:
  1. Cut strips of tissue paper (or construction paper) and use Mod Podge (or glue) to adhere the strips around a cardboard tube. We used the tube from an aluminum foil carton, but a paper towel or toilet paper tube would also work.
  2. Cut wings from construction paper. Tape wings onto the back of the tube once the Mod Podge or glue is dry.
  3. Cut a pipe cleaner in half. Curl one end of each half for the butterfly antennae. Attach to the inside of the tube with tape.
  4. Glue two googly eyes onto the front of the tube. 
  5. Decorate the butterfly's wings as desired. Mia used strips of tissue paper, feathers, and pom poms, but you could use just about anything.

Tuesday, April 5, 2011

Easter Sun Catchers


These are the sun catchers that we made for Easter. There are lots of fun shapes that you can make for Easter, both religious and secular, and some that are a combination of both. The Easter egg, for example, was originally a Pagan symbol of fertility and new life, but has since become incorporated as a symbol of the resurrection of Christ. The chick is another symbol of new life or re-birth. The life cycle of the butterfly is used to represent Jesus' life. The first stage, the caterpillar, symbolizes His life on Earth. The cocoon stage represents the crucifixion and burial, and the adult butterfly is used to symbolize the resurrection. The cross, of course, stands for the crucifixion but also for Christ's victory over death. The Easter bunny is one I'm not too sure about. I've read that its origins are somewhat like Santa Claus, but it is also a symbol of abundant life. In my opinion, the idea of a benevolent being who brings joy to children can't help but seem to fit into Christianity in some way, although I'll admit I'm stretching a bit here. Additional symbols that you could make sun catchers for include Easter baskets, flowers (particularly Lilies), hot cross buns, palm branches, Easter bonnets, candles, and lambs. You can make these sun catchers as simple or as complex as you like, and I have found that they can be done with toddlers on up with some parent prep. I think they are beautiful for spring, and they remind me a bit of stained glass windows, which is a lovely thought during the Lenten season. John 11:25-26
Jesus said to her, "I am the resurrection and the life. He who believes in me will live, even though he dies; and whoever lives and believes in me will never die. (NIV).


{Chick and Easter Egg Sun Catchers by Logan, 19 Months}
Materials:
  • pencil 
  • clear tape
  • scissors
  • clear contact paper
  • colored paper
  • tissue paper (any color)
  • paper trimmer (optional)
  • hole punch (optional)
  • yarn, string, ribbon, etc. for hanging (optional)
Directions:


{Bunny by Mia, Age 4}
{Butterfly by Mia, Age 4}
  1. Cut tissue paper into small squares. Older kids can do this themselves. We used approximately 1/2 inch squares, but you could make yours bigger. 
  2. Fold a piece of construction paper in half like a hamburger (or use two pieces of construction paper if you would like to make a larger sun catcher).
  3. Draw an Easter shape (or trace around a cookie cutter or a picture from the Internet) onto one half (or one piece) of the paper, and cut out the shape. Do not draw your design too close to the edges of the paper. Cut paper in half along the fold. You should now have two pieces of paper with identical cut-outs.  Tip: When making symmetrical shapes such as the butterfly, cross, or Easter egg, you can gently fold your paper in half like a hot dog before drawing and cutting out your shape. This makes it go a bit faster, and hopefully it creates less frustration, too.  Tip: If you are using two pieces of paper, you will need to make sure they stay together so that you get identical Easter shapes.
  4. Cut two pieces of clear contact paper (I used both a paper trimmer and scissors for this.) so that they are 1/4 inch larger than the construction paper all the way around. Tip: Do not remove backing from contact paper until you are ready to use it.
  5. Adhere one piece of paper to the clear contact paper so that there is a border of 1/4 inch all around the paper. Tip: Slowly peel the contact paper away from the backing as you smooth the construction paper down onto the contact paper. This way you don't end up with "bubbles."
  6. Have your child stick tissue paper squares onto the contact paper Easter shape until it is filled. (Mia has created her own technique for filling in small spaces: crumpling up the tissue paper into balls. It makes the sun catcher a bit bulkier, but it does work, and I think it adds a bit of visual interest to the design.)
  7. Layer the second piece of construction paper on top of the first, making sure that the Easter shapes line up.
  8. Add the second piece of contact paper over the top, smoothing it down as you go. Trim away excess if desired, but don't trim too much or the sun catcher will not stay together. 
  9. You can display your sun catcher in a window using clear tape. Another option is to use a hole punch to make two holes near the top, thread some ribbon or yarn through the holes, tie it off, and then hang your sun catcher.

Friday, March 11, 2011

Think Spring! Butterfly Craft

{Butterfly by Mia, Age 4}
Mia made this cute and very simple craft at preschool and we decided to make a few more to decorate at home. The snow has to go away soon, but in the meantime, we have a cheery bit of spring indoors!

{My Dotty Butterfly Design}
Materials:
  • coffee filter
  • Bingo markers (Ours came from Dollar Tree.)
  • pipe cleaner
  • scissors  (optional)
  • fishing line (optional)
Directions:
  1. Make a design for the butterfly's wings by dotting Bingo markers onto a coffee filter. (You can also use markers or watercolor paints if you don't have Bingo markers. One option is two color with washable markers and then spray the design with a water bottle to create a softer look.) 
  2. Let the markers (or paint) dry.
  3. Pinch the coffee filter in the center and twist once.
  4. Cut a pipe cleaner in half. Bend one half around the twisted center of the coffee filter and twist it to secure it. Shape into antennae. (If you prefer, you can use a whole pipe cleaner. You will just have fairly long antennae.)
  5. You can make a whole flutter of butterflies and hang them using fishing line if you wish.
    {My Finished Butterfly}