
Materials:
- large piece of cardboard
- pencil
- scissors (or craft knife)
- red spray paint
- acrylic paint: black, white, yellow, orange, red, turquoise
- Styrofoam tray for paint (or bowl/plate)
- round objects (bowls/pans/bottle caps, etc.) for tracing (or a compass)
- hook and loop tape
- foam paintbrushes
- word processing software (Microsoft Word)
- Mod Podge
- black Sharpie marker
- newspaper (to protect work surface)
- scrap paper
1) Find a large piece of cardboard. I used one side of a dishwasher box. I cut mine with scissors because they were handy. (Although this is probably not the ideal box-cutting tool, it is what I felt safe using around my kids, and it worked fine.) Using one of Logan's Lightning McQueen toys for reference, I sketched the outline onto the cardboard and cut it out.

3) Once paint is dry, draw details like McQueen's eye and eye lid, side windows, headlight, mouth, outlines where wheels will go, etc. and go over them with a black Sharpie marker.

4) Paint details on Lightning McQueen. White and turquoise for eye, light strokes of white (or gray) for side windows, white for mouth, yellow for headlight, red/orange/yellow graduated for lightning bolt. Allow paint to dry and add additional coats as desired. Touch up black Sharpie marker if needed.
5) Enlarge this number 95 clip art and print to fit the side of the car. (I also used this clip art image for my Lightning McQueen pull-string pinata.) Apply to car with Mod Podge on foam paint brush.
Directions for Tires:
1) Trace and cut out two cardboard circles. (I used a frying pan for my template, and again, cut mine out with scissors. Really technical, huh? See, you can do it, too.)

2) Protect your work surface with newspaper. Pour some black acrylic paint onto your Styrofoam tray (or plate/bowl). Paint the circles with a foam paint brush.

3) Once paint is dry, trace center circles onto your black circles. (I used a small bowl for this.) Paint the center circles with red paint and allow paint to dry.

4) While paint dries, make your template for the spokes (unless you want to paint these freehand two different times. I did not want to do that.) I used a scratch piece of computer printer paper, and traced that same green bowl, and cut out the circle. Then, I traced a smaller bowl (or maybe it was a jar lid?) for a smaller circle. Next, I folded my circle into eighths. In the center of one fold, along the curved line of the un-cut circle, I drew a trapezoid-type shape. I cut that out and traced it so that I had a total of 8 of that shape. These all need to be cut out. I think the center circle I sketched out freehand, but you could trace a bottle cap or something similar. The very center circle will need to be cut out. I drew dots where I wanted my 5 bolts to be around the center circle and just poked through the paper with a pencil to get the holes started.
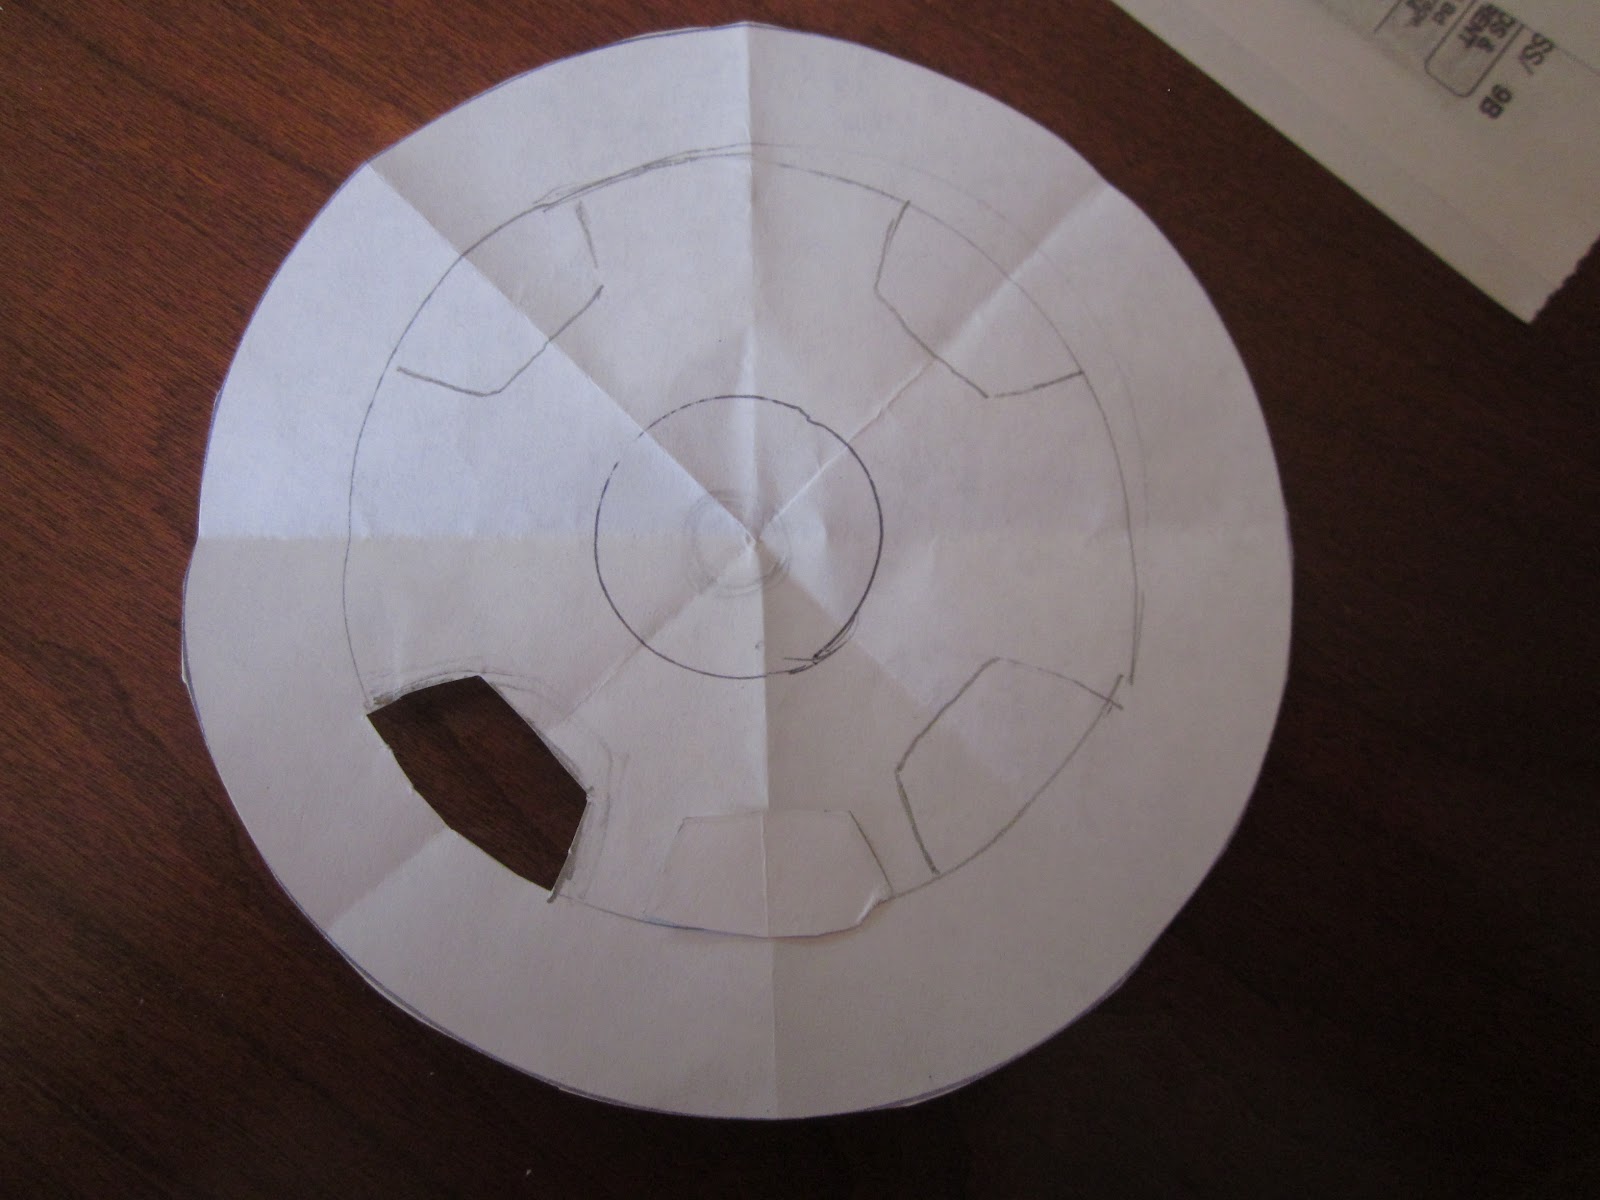
5) Now that the template is made, it is easy to lay it onto your red circle and using a black Sharpie, fill in the cut out areas. Repeat on the other tire.

6) For the lettering "LIGHTYEAR," I found the closest font in Microsoft Word (Eras Bold ITC, 85 point font) and used the word art feature to make it into block lettering. I was able to fit this 4 to a page (the number I needed) in landscape format. My husband pointed out that the lettering isn't on a slant like the real thing, but I felt this was as close as I could get without having to do hand lettering, which would have taken much too long. I did cut out each letter individually because I thought it would look more finished that way. I laid the letters out the way I wanted them, and then applied them with Mod Podge. Once it was dry, I applied a coat of Mod Podge over the whole tires to ensure a good seal.


7) To make it so that the tires could be taken off and reattached repeatedly, I used hook and loop tape (I think it is made by 3M). It came in strips. I affixed the two sides to each other and then cut them into 1 inch sections so that I had 6 total (3 per tire). Next, I peeled the backing off of one side of the tape, adhered 3 pieces to the cardboard car, peeled off the backing for the opposite side of the tape, and affixed it to the tire, making sure that the two sides of hook and loop were matching up. I repeated this with the other tire, and then tested them a couple of times to make sure the tires could come up and go back on with relative ease for little hand and not come undone. Fortunately, this worked like I hoped it would.

9) Enjoy your pit stop game. We just did tire changing, but you could also have kids do minor repairs with plastic tools or have a clean, empty gas can for fill-ups, or other "pit stop" type activities you can come up with (not my realm of expertise). Now, Logan has a big cardboard Lightning McQueen car "living" in his room, and he loves it.
 |
| {The birthday boy changes Lightning McQueen's tires at his 3rd birthday party.} |
Hi there! I am in the throes of making a Lightning Halloween costume - and have had problems with the Lightyear font! Is there any way at all you would consider sending me your template as a Jpeg? I would be eternally grateful! Yours in Lightning Trials, Michelle :)
ReplyDeleteHi Michelle, I actually need to make that same costume and quite soon! I didn't have a "template" per se. I just printed off the closest font I could find, and then cut out and applied each letter individually, which was time-consuming, but the best I could do with my limited computer skills. The font I used was ERAS bold, 85 pt. I don't know if that helps or not, but if you can explain what is stumping you, maybe I can better help.
Delete