Showing posts with label me time. Show all posts

Tuesday, May 13, 2014

Homemade Powder Foundation

Coming up with a homemade powder foundation has been a bit trickier than some of the other homemade makeups that I have tried so far. I found a few suggestions on how to get started (here and here). There was a third idea that I wondered about but it called for a type of clay, which isn't something I had at hand... so I experimented with stuff from my kitchen. (I always suggest using what you have, right?)

I have to say that while food-grade items are safer than a lot of chemicals in store-bought makeup, applying them to one's face requires caution! Obviously, don't use anything you know you are allergic to or don't tolerate well. (One of the above bloggers suggested nutmeg as a potential face powder ingredient, but after having it cause instant itchiness when making eye shadow, I decided against trying that one again.)

The next thing that is difficult about making your own powder foundation is getting the right color. It's not like making blush when one easy to create color will suit most any skin tone. My first attempt was something I came up with all on my own: arrowroot and turmeric (which I was surprised to find in an organic line at Walmart, oddly enough). I had seen this as an ingredient when researching how to make eye shadow, and I thought that if mixed with arrowroot, it would make a nice pale peach powder. Since I am extremely fair-skinned, I thought this would be more subtle than, say, cocoa powder. When mixed up and applied to the inside of my wrist it was a near-perfect match to my skin tone. Now for the real test.

It looked good on my face at first but then the powders seemed to separate and I was embarrassed to catch my reflection one day (after wearing this in public for a few days in a row! Why couldn't I have noticed that sooner?!). Unless the Oompa Loompa look is in this season I had really missed the boat! Needless to say, there is a reason none of the other bloggers out there are recommending the use of turmeric in a homemade foundation.


{Homemade Powder Foundation Experiments}

Fortunately, my second attempt was much better. Cinnamon and cocoa powder were suggested by both of the blog posts I had read, so it made since to try them out. I was a bit nervous about using cinnamon on my skin, fearing an itchy reaction, but luckily that did not happen. This powder looks a lot darker and I was worried that it would look like I was trying to fake a tan, but it actually went on quite natural. It wore well, keeping shine at bay. (I am thinking the arrowroot powder is to thank for that.) It's not as great at concealing blemishes as my store-bought stuff, but overall, this worked for a powder foundation. The best part was that it smelled incredibly delicious and I half expected people to ask me where I bought my Christmas cookie perfume. (I used 1 teaspoon arrowroot powder + 1/8 teaspoon cocoa powder + 1/8 teaspoon cinnamon. Proportions can be adjusted as needed, and I suggest starting with small amounts and adding more as desired.)

Even thought that second formulation worked well, I wanted to try yet another concoction. This time, I added ginger to see if the yellow tint would tone down the overly dark cocoa powder to create a more suitable shade of powder foundation. Again, I was slightly apprehensive about whether or not there would be an itch factor, and I was relived that this was not an issue. My main complaint about the ginger, though, is that it tends to tickle my nose when inhaled, making me sneeze. (Kind of like my second blush experiment -- I ultimately nixed that version, in part because of this.) This third mixture is what I have been wearing most recently, but I am thinking that I will go back to the cocoa powder and cinnamon mixture. I am not sure that the ginger is really working for me, but I will say that this works well as a translucent powder, similar to the second variation. (I used 1 teaspoon arrowroot powder, 1/2 teaspoon ginger, and 1/8 teaspoon cinnamon. Proportions can be adjusted as needed, and I suggest starting with small amounts and adding more as desired.)

In case you're wondering, I have been wearing food on my face for the past two and half weeks and nobody has noticed -- or if they have, they have been kind enough not to mention it. (I'm especially thinking of when I realized my face was splotchy orange while out to brunch with a bunch of people from church!) I'm not sure that I have found the perfect recipe yet, but I do seem to be on the right track. If you want to save some money and know exactly what is contained in your foundation, it is possible to make your own at home. Finding the perfect match for your skin tone and type, well, that's a whole other issue!

{Modeling my 3rd Foundation Attempt}

What do you think? This was a picture that I took of myself yesterday, which just happened to be my birthday. Brett informed everyone at church that I was turning "29 again." Here I am wearing a full face of homemade makeup: cocoa powder eye shadow, activated charcoal eye liner, beet root blush, beet root lip gloss, and my latest attempt at homemade mascara (more on that soon). Maybe I am delusional, but I really do think that I could pass for 29!

Monday, May 5, 2014

Homemade Eyeliner (So Easy!)

Okay, this is seriously the easiest homemade makeup you will ever see directions for. One all-natural ingredient and just two simple steps. I don't see a reason why anybody could not make this themselves at home! Save yourself some money and know exactly what is in your eyeliner -- win-win. (I found the idea for making my own eyeliner here.)

First, go get yourself a bottle of activated charcoal capsules. You can find them at vitamin stores, health food stores (where I found mine), or online. These are NOT the same as charcoal from your grill. Activated charcoal is meant to be taken internally for gastrointestinal issues (food poisoning, for example) so it's considered completely safe for cosmetic purposes.

My bottle contained 90 gelatin capsules and it cost $10.59. This won't expire until September of 2017, so I am set for eye makeup for 3+ years. (I'm currently working on a homemade mascara, which also calls for activated charcoal. I am wearing it in the picture below, but for today, I just want you to focus on the eyeliner.) Considering how much I was spending before to get bareMinerals makeup -- which still contained things I could not pronounce (even though it was decidedly safer than the cheap drugstore makeup I had previously purchased) -- this is a steal!


{Wet Application, Dry Application}

How to Make Your Own Eyeliner (So Easy!):
  1. Grab a small container with a lid. (Mine is plastic and came in a 10-pack at Dollar Tree. A small glass jar would be ideal, but I didn't have one on hand.) Open an activated charcoal capsule and dump the contents into the container. (Your hands will get a little messy, but it washes away easily.)
  2. Apply your eyeliner with a small brush. (I suggest getting an eyeliner brush for this. Mine is from Ulta.) For a simple day-time look, I just dip my brush into the charcoal and apply it dry. For a more dramatic night-time look (or if you just like a more intense eyeliner for day-time), first wet your brush slightly, then dip it into the charcoal and line your eyes. Use small motions and add more as needed for best results. This stays put well and washes away easily at the end of the day (I use the oil cleanse method for face washing and eye makeup removal.)

{I capsule = about 1/4 teaspoon}


A Few Notes:
  • Please note that my eyeliner is is not "perfect." It does leave a small amount of dust beneath my eyes by the end of the day. However, to be fair, the way more expensive eye makeup that I was purchasing did the same thing!
  • To me, this is still tops because it is safe, easy to apply, and very affordable!
  • In my self-portrait, I model both application methods. On the left, is the more dramatic wet-application, and on the right is the softer dry application. I have not tried it, but I think you could use the dry application over your entire lid for a very-wearable neutral gray eye shadow.
  • Also, in the photo, I am modeling my homemade beet root eye shadow, which I love!
  • I should probably mention that I lined my top lids only, which is my personal preference. That's the way I have done it for years. You can line both the top and bottom if you like that look better.
  • I "made" this eyeliner 3 weeks ago, and I'm estimating that the one capsule will last me about another 3 weeks with almost daily usage. This is perfect, I think. Not so long that I have to worry about bacteria growth, but still not so short that I am forever having to "make" more eyeliner.

Some More of My Favorite Homemade Makeup Recipes:
Mascara and face powder recipes are in the works, so I'll let you know when they are share-worthy!

Wednesday, March 26, 2014

3-Ingredient Homemade Sugar Scrub

This week is making me a teensy bit stressed out and it's only half over. Mia has a new pet, Bluey, that we brought home on Monday. Remember what it was like to have a newborn baby? How you constantly kept checking to make sure the baby was still breathing? Well, I have a newborn now, too, except my "baby" is a betta fish and at least a dozen times in the past couple days I have checked to make sure that he was still kicking -- I mean, swimming!

Then there was yesterday, when Logan announced, "I pooped my pants!" (Darn! He was doing so much better lately, too.) Of course, this was right as we were about to head down to the bus stop. And, of course, the bus was running early for like the second time all year. Yes, that wild woman running down the street holding a little boy upright, neither of them in hats or coats despite the never-ending winter weather... That was me.

Fortunately, I was able to take a nice relaxing bath after the kids were in bed. I soaked in some homemade lavender bath salts and then I pampered myself some more with this skin-softening sugar scrub that I made a few days ago. After that, I nearly felt like a new woman. Having smooth and soft knees, elbows, and heels feels really great, and I can't help but hope that the weather will turn soon and I will get to show them off a bit more!

When my friend Jaci shared this recipe for homemade sugar scrub that she had guest posted on The Blessed Nest, I knew I would have to give it a try! (Thank heavens I did. It's just one of those simple but wonderful indulgences that keep this mama from losing her mind.) This is super quick (think under 5 minutes!) and easy to pull together -- with ingredients in your kitchen!

The only item you may not already have is the essential oils. For this batch, I used orange essential oil purchased from a nearby health food store. You can also buy essential oils online. Here's how to make your own little bit of heaven in a jar.

{Pretty Bow + Label = Easy Gift Idea!}


Ingredients:
  • 3 cups white sugar
  • 1 cup + 2 tablespoons oil (I used EVOO.)
  • 35-40 drops essential oil (I used orange.)
Directions:
1. In a good-size bowl, combine sugar and oil. (I like extra virgin olive oil.) Stir until well-blended.

2. Add essential oil of your choice, and stir some more. I used 40 drops of orange essential oil, and I found this to be nice for several reasons. First, it is one I already had. (Others were tea tree, lemongrass, lavender, and peppermint, and orange just seemed to fit with this homemade beauty item.) Orange essential oil is relatively inexpensive. It smells lovely, and I think most people will enjoy the refreshing citrus scent. As a added bonus, it goes well with the color achieved from this particular brand of olive oil I used. (The color of your sugar scrub may vary according to your ingredients.)

{Freshly Mixed Sugar Scrub.}


3. Store in air-tight containers. This makes enough to fill about 4 half-pint mason jars, perfect for gifts! I just added a ribbon and a simple hand-made label to the top of the jar.
4. To use sugar scrub, rub into skin and then rinse off. If using it on your hands, you may want to do it over the sink. For other parts of the body, apply in the bath or shower. 

Note: I've noticed that the oil starts to seep to the top of the container after a few days, so you may need to mix it up before each use. This is easy and quick to do with your hands -- although a spoon would probably be better to help prevent any contamination.


Tuesday, March 25, 2014

Homemade Blush Trial #2

A couple weeks ago, I experimented with making my first homemade blush with beet root powder, which had a good outcome. It ran out quicker than expected in part because I gave some away. (Really, I don't mind that because it's always nice when somebody in interested in my kitchen science experiments.) The bigger issue was that I did not it in an air-tight container, as I am always recommending. In fact, I didn't even put a lid on it so there was spillage and moisture invasion.

Okay, those of you who are gasping in shock can kindly close your mouths now. Haven't you ever told your kids -- or anybody else -- to "do as I say and not as I do?" Glass houses, people.

There, I 'fessed up and you know the real reason why I needed to mix up another batch of blush. In the interest of science, I felt it was important to try at least one more version before making up my mind on the recipe. Since I had tried both the beet root powder and the hibiscus powder for my tinted lip balm experiments, I decided it would be simple enough to make the blush again and substitute hibiscus for the beet root. I kept the proportions the same to get a fair idea of how the two stacked up against each other.

{2-Ingredient Homemade Natural Blush}


Ingredients:

  • arrowroot powder (mine is organic)
  • hibiscus powder (mine is organic)


Directions:

  1. Using a spoon, combine arrowroot powder and hibiscus powder in a small bowl or container. I used 1 teaspoon of hibiscus powder and 1/2 teaspoon of arrowroot powder. You can adjust the proportions to suit your personal preferences. I stored my blush in a container with a lid this time (although I am not certain that my old Altoids tin is actually air-tight enough to prevent moisture from seeping in.)
  2. Apply with a makeup brush as you would any loose powder makeup. (Dip brush into the powder, tap off the excess, and gently brush onto the apples of the cheeks, spreading upward along the cheekbone to blend.)
The Results:

The color of the hibiscus is similar to the beet root, but I think the beet root recipe went on smoother and blended better than this second attempt. Also, whenever I have applied the hibiscus version, it seems to fly off the makeup brush and I get it into my nose, which is not something I enjoy. Overall, I preferred my first experiment to this one. (I wouldn't call this a failure, though, since it did produce a usable all-natural blush.) I don't know if it is a coincidence that I liked beet root over hibiscus for both homemade blush and homemade tinted lip gloss, but I am not quite ready to write it off entirely. I plan to make some homemade powder eye shadows in the future and it could still prove to be the perfect ingredient.


Tuesday, December 10, 2013

Homemade Peppermint Bath Salts

A while back we made bath salts at a MOPS meeting, which I thought were great! After getting the link to where the idea originated, I decided to make more of my own, some of which we are giving as gifts. I'm very happy with how this year's teacher gifts turned out. They look pretty, they smell wonderful, and most importantly, they have been test-driven and given two thumbs up by this mama.

To get started, I chose three different scents: peppermint, orange, and lavender, and I found the essential oils at a nearby health foods store. Why did I choose peppermint oil for the gifts? Well, it is currently vying as my favorite fragrance of the three types of bath salts that I made. Orange is on top at the moment, but peppermint seemed like the obvious choice for Christmas. Plus, it has lots of health benefits like alleviating muscle soreness as well as stress, improving circulation, helping ease congestion, and promoting energy and alertness. These are all the curative properties that I will personally attest to. Peppermint essential oil is also said to help curb appetite, just by inhaling the scent, so that may be an added bonus I have not noticed yet. At any rate, these bath salts are a perfect no-calorie indulgence during the crazy-busy holiday season.


{Easy Christmas gift idea!}

Ingredients: (Makes enough to fill 2 half-pint mason jars)

  • 3/4 cup Epsom salts 
  • 1/2 cup coarse sea salt 
  • 1/4 cup baking soda
  • food coloring (I used 10 drops of red.)
  • essential oil (The original recipe calls for 8 drops, but I found this to be much too faint once I got into the tub, so I have doubled it for the gift batches.)

Directions:

  1. In a bowl, combine the dry ingredients. (If making gifts for teachers, kids can help pour the ingredients.)
  2. Add essential oil and food coloring*. (Kids may be able to help with this step. I helped Logan count out the food coloring, but I added the essential oils myself.)
  3. Use a spoon or whisk to mix it all together. (Kids may help with this step, too as long as they don't stir to roughly.)
  4. Store in an air-tight container. (It will clump together somewhat after time. This happens to store-bought bath salts as well, so I don't see this as a problem.)
  5. Enjoy your bath salts or package them up and give as gifts. 

*Notes about food coloring:

  • Food coloring is optional, and mainly just for presentation. 
  • Once diluted in the bath, you don't need to worry about it staining your skin.
  • When I made orange scented bath salts I used a combination of 3 drops red and 5 drops yellow to make orange. 
  • For the lavender bath salts, I used 8 drops of neon purple food coloring. 
Notes on Where to Purchase:
  • The best deal I have found for Epsom salts is at Sam's Club, but they are very reasonably priced and can be found near the first aid section of any grocery store.
  • Coarse sea salt is found in the baking aisle. I have also used natural sea salt, which has smaller grains that don't look as much like the bath salts you might purchase, but it's a bit cheaper and it works the same.
  • My essential oils came from a natural foods store, but you can also find them online.
  • Lavender essential oil was the most expensive at $8.79 for a 0.5 ounce bottle, followed by peppermint oil at $8.29 for a 0.5 ounce bottle, and the least expensive was the orange essential oil, which was only $3.99 by comparison. (That may sound pricey, but since you will only use a few drops at a time, a bottle of essential oils will last a long time, so I look at this as a good investment.)
How I packaged my gifts:
  1. First, I filled each half-pint mason jar with bath salts.
  2. To make tags that read "Peppermint Bath Salts," I downloaded this free font. I put it in 24 pt. font, switched the color to red, and printed it so that I got 8 per page (in portrait layout). Then, I used plastic templates to cut them out, and then layered them on top of oval cut-outs of red card stock (which I made with another template.) I adhered the layers and then added a gold eyelet.
  3. I used a glue dot to affix the bamboo spoon to the jar.
  4. I cut a 21" length of red and white bakers twine, which I wrapped around the jar twice before tying on the tag.
  5. Then, I added a red card stock circle to the top of the jar and topped it off with a cute peppermint button, which I bought a few years back from Oriental Trading, attached with another glue dot. 

Sunday, June 23, 2013

Leaving on a Jet Plane...

Awhile back, I read this post, written by a college friend, Katie, who essentially laughs about her "first-world problem" of deciding to whether or not to create a play room for her girls. This came to mind again when it became time to finally pack for the upcoming vacation. (Tropical island! No kids! Eeeeeeeee!)

The "first-world problem" that I had? Not knowing which shoes to pack! I know, I know, this is really not that BIG of a deal, but I was trying to limit myself, and there were just soooooo many choices. And that was when I was mainly limiting it to sandals and cute flats. That is why I am borrowing Katie's term "first-world problem," because it is totally apt here.

Here are some of the options that I considered (which is not even my inclusive shoe wardrobe, which now that I think about it, signifies that I am not as low-maintenance as I previously thought. That, or it's just easier to find shoes that fit than it is to find clothing, so I'm more likely to treat myself to shoes.) I laid them all out on top of the bed to see what might work, but it was still overwhelming. (Also, it's not a particularly good idea to put shoes on top of your bedspread, unless, of course, you don't mind getting it kind of dirty.)


Feeling stumped, I texted my mom asking for suggestions. Her response was that I needed sandals, beach shoes, and walking shoes. I already knew what I needed I told her, but how to choose which ones I wanted was the issue. No problem she tells me, just choose the ones that "go with everything." Um.... which ones would those be? If I had shoes that went with everything, would I "need" so many pairs?

This meant that I had to do a "fashion show," trying on all of my sundresses and cute shorts and tops, modeling them with each of the possible footwear options. (Brett was definitely not complaining about this.) While doing that, I also had to keep a mental tally of how many outfits would go best with each particular pair of shoes. In the end, I went with the black Crocs (bottom, middle) which are my new beach shoes, as I really, really HATE flip flops and would not even consider wearing those. The sneakers were also an essential for the rainforest. Brett insisted that I had to bring what he called the "sexy" shoes which are the black gladiator style wedges (bottom, second from left). And then, the basic sandals made the cut: the black ones (bottom, left) and the brown ones (bottom, right).

I seriously debated bringing the cobalt blue sandals (bottom, second from right) because I LOVE that color. However, they only went with one dress and one pair of shorts so they weren't the most practical choice. And then there were the woven green ballet flats (top, right) that I kept coming back to. They are super cute and I was really tempted, but again, they only went with a couple of things. Brett almost convinced me to pack them because I clearly wanted to SO badly, but I practiced some restraint here. As it was, five pairs of shoes seemed like plenty for a seven-day trip. (I'm sure most of the smart travelers who tell you how to pack one back only will tell you I am out of my mind for packing this many pairs in the first place, but this was tough stuff, and I am not joking when I say the hardest packing decision I made! It was easier to pack both my kids' stuff for a week at "Camp Grandma" that it was to decide which shoes to pack.)

So, folks, I'm leaving on a jet plane, and it's gonna be awesome! I can't wait to share some truly amazing memories -- when we return from our tropical paradise. In the meantime, don't look for any new posts for a bit. I'll on a beach drinking something with a little umbrella.

Tuesday, June 4, 2013

Emotional Purging

Sometimes it's the seemingly little things that are really the biggest things. Tonight, for example, I packed what will be Mia's last school lunch as a kindergartener. That could make me sad, but recently, I had some much-needed emotional purging (although I didn't know I was due for it at the time.)

It started out with a simple trip to the salon. I hadn't been there in, oh, about 6 months, because I was really happy with the way my hair looked. (I will swear to the ends of the earth that giving up shampoo was the single best thing I have done for my hair, and consequently for my self-esteem -- because regardless whether or not a woman is high maintenance, her hair is a huge part of how she expresses herself to the world.) I was growing it out because I thought it made me look pretty, and it made me feel younger, and I figured that if I ever got sick of it being longer than it's been in quite some time, I would just cut it and donate it...

So, why did I make that appointment for a "trim?" Well, I am insanely excited about an upcoming vacation without children!!!  (To a tropical island! Eeeeee!) I have so, so, so much to do to get ready, and I decided that I could hear my stylist in my head saying that my "ends are looking a bit skinny." Really, that's what she has told me in the past. Anyway, I figured it was best to get it shaped up before the trip, and I thought I could tick that off my to-do list quite easily.

I called the salon and scheduled a trim, and thought I was so lucky to be able to get in with my stylist (who's done my hair for almost 8 years now) the very next day. Sounds straight-forward enough. I showed up, laughed about how I heard her voice in my head worrying over my "skinny ends," and made a point of saying that I was really happy with my hair and just needed it to be cleaned up a bit. Then, I proceeded to yammer on while she did her thing. Topics of conversation included my upcoming vacation, obviously, but also some other beauty-related items of current interest to me: homemade shaving cream, homemade facial cleanser, and my general disgust with parabens. (Perhaps I need to get out more. These are kind of sad topics for general conversation, but they're pretty important to me!)

The next thing I knew, she was handing me the mirror to view the finished haircut. This was when I realized that she had taken off much more than I was anticipating, at least two or maybe three inches! (Truthfully, it's hard to gauge length since my hair is naturally curly, plus, she always manages to make it much fuller than I ever could.) Since I was somewhat it shock (How did I not realize what was happening?!) I just thanked her, paid the bill, and gave her a ten percent tip, as I normally would. Then, I went home and studiously avoided looking at myself in the mirror by taking the kids outside to play, doing yard work, and basically, pretending that I had not just lost all the hair I had been growing out for over 6 months, the hair that made me feel more attractive than I had in ages, the hair I was planning to donate... I was totally in denial.

This experience has taught me that it's actually possible to go through all five stages of grief in one day. Once I finally came back indoors, several hours later, to use the bathroom, I saw my reflection. Then, it really hit me that my hair was gone and there was nothing I could do about it. This led to some majorly-blown-out-of-proportion depression, complete with out-and-out sobbing, the kind that made me gasp for air, the kind that made me have puffy, swollen eyelids, the kind that went on much longer than it should have because each time I began to calm down, I had another irrational thought that provoked more outbursts. Part of me was disappointed in myself for crying in front of the kids (or at least for not having a "good" reason for my grief). Another part of me felt selfish and guilty for mourning my hair in the first place, considering how many people I know who have cancer and would probably love the opportunity to cry over a "bad" haircut because it would mean that they have enough hair to go to the salon and get it cut in the first place! But still, I couldn't stop crying for a good twenty minutes. Depression.

Then, I went through what must be considered the bargaining phase, essentially trying to rationalize things by constantly asking the "what if?" questions. Why didn't I pay attention to what she was doing? Why was I talking so much? I should have told her up front not to cut more than 1/4" off the length! Didn't she understand me when I said I was really happy with my hair, that I meant the length? What was I thinking making a hair appointment when I loved my hair the way it was? I should have never done that.... Now, how will I ever have enough to donate?

This led to anger. This can't be happening to me! What if my now-short-hair looks like a poof-ball on our tropical vacation? What if I can't get it up anymore? (And I just recently have been getting compliments on wearing my hair up, so I have started doing it more often.) I went upstairs, tossed my clothes aside while quickly undressing, let forth some under-my-breath screams (still not wanting to freak my kids out over this -- and Brett was wisely standing aside and letting me fight my demons), and then got into the shower. I let the hot water beat down on me for a while, soaking my odious, too short hair, and washing away most of my frustrations. Stepping out of the shower, I felt that I had purged most of the negative emotional energy, and surveying my wet locks, felt more like myself. Even if the mirror reflected my shorter hair, it at least looked a bit longer since it was wet.

After my shower, I felt enlightened. The tears were not for my hair, not really. That was just the trigger to my emotional purge, the last straw as it were. This "bad" haircut had been the conclusion to a very emotional week. I had learned that my dance teacher was injured and wouldn't be able to teach any classes until fall, so I am without an outlet for all of this stuff... Mia's first loose tooth was quite the milestone event, and then a couple days after that, we went to her "kindergarten graduation." It was so amazing to see how far she has come in the past few months! This is a lot for most people to take in, I can imagine. But for me, being so very sensitive, it makes absolute sense now that I was due for a good cry so that I could come to terms with all the big changes and then move forward. (This has historically been how I have coped with all the little mole hills building up until one seems like a giant mountain, threatening to engulf me.) As upsetting as it was, this was not about my hair. This was about my baby girl growing up. After a refreshing shower, I realized these things, and I while felt completely spent after crying, I was also relieved, physically and emotionally purged.

Did I finally achieve acceptance? Well, my hair looked more like "me" once it dried. Plus, it's bouncier and healthier looking. In truth, I didn't get a "bad" haircut after all. My stylist knows my hair better than I do, apparently. While it wasn't exactly what I was hoping for, I do look good with the shorter hair style. And the stuff that really triggered the tears? Well, I can deal with that, too, just one thing at a time.

----------------------------------------------------------------------------------------------------------------------

By the way, having stayed up past my bedtime tonight and blogging into tomorrow, I have now just reached my 3rd "blogiversary!" This means that it's been three years since I wrote this, (which was viewed by all of three people) and here I am still at it, wondering where to go from here... Thanks so much for stopping by and reading my thoughts! I love being able to share parts of my life in this way, and I hope that you, too, get something out of it. Sorry, no fabulous giveaways, or anything like that, but someday, perhaps, I will be able to do that sort of thing!


Wednesday, May 29, 2013

3- Ingredient Homemade Shaving Cream

This is the only shaving cream recipe that I have tried so far, but honestly, I am happy with it, so I see no reason to try any others. While I have always used Skintimate, and I can get it very cheaply with coupons and sales, I just wasn't happy with all of the unnecessary chemical ingredients. Although, this homemade version is a bit more work and a bit pricier, I find that it's a perfect replacement. It's moisturizing, it smells nice, and it gets the job done without any chemicals added, which makes it a must-have for "surviving summer." I found this fantastic recipe on the blog Little House Living, and I am now kissing my Skintimate good-bye!

{Freshly whipped shaving cream}
{This is what it looks like after it "settles."}
Ingredients:
  • 1/3 cup coconut oil
  • 1/3 cup shea butter
  • 1/4 cup olive oil
Directions:
  1. On the stove top, melt the shea butter and coconut oil on low heat. (This took about 5 minutes.)
  2. Pour the melted contents of the pan into a container. Add the olive oil and stir to combine. (You can also substitute almond or jojoba oils, according to Little House Living, but I have not tried this. Perhaps for the next batch, I will try the almond oil, since I have some on hand for making my homemade moisturizing oil.)
  3. Set the container in the refrigerator and allow the mixture to harden. (I am not sure how long this takes, but it is definitely more than 1 hour. Since I tried this late at night, and it wasn't solidified after 1 hour, I went to bed, and it was hardened by morning.)
  4. Remove the solid block and place it in a bowl. (This easily fell out when I tipped the container over.)
  5. Whip it. (Whip it good! Feel free to sing Devo while you make your shaving cream, even if it's only in your head.) I used a hand mixer for this, and it it took about 3 minutes to achieve the desired creamy texture.
  6. Store your shaving cream in air-tight containers. I put my shaving cream into two different plastic containers with lids. One holds 8 ounces and the other hold 4.5 ounces. I suggest labeling your containers. For this, I just used masking tape (because I have found that permanent marker gets rubbed away from the plastic containers over time). The one I've been using for the past couple of weeks is being stored in the shower (although this may not be recommended, I find it easiest). The other container, I placed under the bathroom sink where it is nice and dark. I assume that this should last me for several weeks. (If you look at the photos, you will note that the consistency has changed so that it is no longer fluffy. It's more of a butter, but it still works wonderfully for shaving.)
  7. To use the shaving cream, I just use my fingers to take out just a dollop. It liquifies while it is being rubbed into the skin, but I think that this is good for a couple of reasons. First, I never have to worry about it running down my legs and getting wasted, which can easily happen with a commercial shaving cream or gel. Second, I think that this provides extra moisture, which gets locked into the skin. You can see the water beading up where the shave cream has been applied. I believe that patting dry after rinsing means that my legs look softer and shinier than they did when I was using Skintimate. I use this in all the usual places: my legs, my underarms, and my bikini area. So far, it has worked nicely giving me smooth skin with no irritation, and I have nicked myself just once in the past couple of weeks. (The only downside is that this can make the floor of the shower a wee bit slippery, not terribly so, but I do want to mention that as a word of advice; If you do your shaving in the shower, please use caution.)
Notes on Where to Buy Ingredients: 
  • Coconut oil should be available at most grocery stores. The one I used is organic. It came from Meijer and cost $12.74 for 16 ounces. Aside from making your own shaving cream, it can be used as a natural diaper rash cream, an all-over moisturizer, or a cooking oil. 
  • Shea butter is a little more expensive and not as easy to find. Mine came in a 7 ounce container for $9.99 at a natural foods store. It's an ingredient found in lots of natural beauty products due to its healing properties. I've not personally tried it, but shea butter is said to cure lots of skin conditions such as psoriasis, eczema, and even sunburn. It just like it because it feels nice on the skin and doesn't leave a greasy residue. If you can't find this locally, there are lots of online vendors.
  • For my oil, I used extra virgin olive oil, which I buy at Kroger, but you can get it anywhere. For the best deal, consider buying it in bulk, especially if you cook with it our use it to make other beauty products like my homemade face wash, homemade non-petroleum jelly, or this eye makeup remover. (Yes, I am currently in LOVE with extra virgin olive oil. I think there is very little that it can't do!)

Saturday, May 11, 2013

4 Homemade Face Mask Recipes

Here's post #5 in my series "How I Pamper Myself." (In case you missed the previous posts, feel free to check out How I Wash My Makeup Brushes, Homemade Eye Makeup Remover, Homemade Face Moisturizing Oil, and 5 Homemade Facial Cleansers.) While face masks are pretty easy to whip up at home, they definitely feel indulgent to me. Unfortunately, I rarely think to do them more than a couple of times a month.

There are tons of DIY face mask recipes out there, but I have only tried a few. My requirements are that they not contain too many ingredients or too odd of ingredients (I am sure papayas are nice for this, but I would rather use a fruit I commonly have in my own kitchen rather than make a special purchase) and that they not be too time-consuming to create. I realize that's entirely a matter of opinion, though. I will pull out the food processor, but I would prefer to not have to do this, if that makes sense. Here are a few that I have tried that I feel are worth mentioning.

{Ingredients for DIY Face Masks}


My tried and true recipe that I have been using the longest is one I got from the book Vinegar Fridays. Every time I use this mask, I notice that my skin feels firmer and my complexion is glowing, so it definitely does good things.

Martha Washington's Vinegar Facial Mask
  • 1 egg
  • 1 tsp. honey
  • 1/2 tsp. apple cider vinegar
  1. Whisk the ingredients together in a small bowl.
  2. Then, apply to face. I often use a basting brush, but fingers work fine, too. 
  3. Leave on for 20 minutes. 
  4. Rinse with warm water.

Next, I decided to try this one since it calls for common ingredients, and honey is known to be wonderful for skin.

Apple Honey Mask
  • 1 apple, cored and quartered
  • 2 Tbs. honey
  1. Chop apple in food processor.
  2. Add honey.
  3. Refrigerate for 10 minutes.
  4. Pat onto face and leave for 30 minutes.
  5. Rinse with warm water and pat dry.
The pros of this mask recipe are that it 1) smells nice 2) feels good when applied to skin and 3) my face felt nice after using it, essentially all I would hope for. The cons, however, were that it 1) had a weird consistency - both runny and pulpy at the same time - 2) made way too much (I wonder if I was supposed to use only 1/4 of the apple?) and 3) it became sticky before it was time to rinse off. While this wasn't the worst beauty item I have ever made, it was not my favorite for those reasons, and I would probably stick with the other recipes I have tried so far.


This next recipe smells absolutely delicious! If I hadn't remembered it had raw egg in it, I probably would have drunk the left over portion because it reminded me of a smoothie. Again, I decided to try this because it has honey, and also a fruit that is readily available to me this time of year: strawberries. And because I feel like I am sharing so much with my lovely readers lately, here is a special something for just for you: a late-night self-portrait taken while wearing my smoothie mask. My skin felt very soft after using the strawberry lemon mask, but a bit on the tight side. I suppose the dryness is why it is suggested for acneic skin, but I am not sure if this is a desirable result. I will probably try it a few times throughout the summer before making my final decision. It's certainly worth a try.

Strawberry Lemon Mask (for Acne)
  • 1 tsp. lemon juice
  • 1 egg white
  • 1 1/2 tsp. honey
  • 1/2 cup strawberries
  1. Mash/blend all ingredients. (I used my food processor for this.)
  2. Smoothe onto face.
  3. Leave on for at least 10 minutes.
  4. Rinse with warm water and pat dry.
{Yep. That's me with a smoothie 'stache.}


This last one I saw on Pinterest. It looked interesting because the picture shows the model peeling the mask off her face. Either I got the proportions wrong, or this doesn't really happen. No matter, though. This was a nice little recipe. The lemon juice cuts the egg smell and makes this one smell nicer than good old Martha Washington's recipe. I'm not sure where the expression "egg on your face" came from, but I can tell you from personal experience that it's not a bad thing. In fact, it's definitely good for your face. Additionally, those two recipes with egg are probably my favorite since they are the easiest to make, meaning I don't have to use my food processor. (For the record, this is not hard, it just means that I have more to clean up after doing my mask, and frankly, who wants to spend lots of time on clean-up when she just got done pampering herself?)

Egg White Mask (for Oily Skin)
  • 1 egg (separated)
  • few drops lemon juice 
  1. Whisk together an egg white and a few drops of lemon juice. (The directions said to use fresh squeezed, but I used lemon juice from a bottle.)
  2.  Apply to clean skin. (I used my fingers for this.) 
  3. Wait 15-20 minutes.
  4. Wash off with warm water and pat dry.
  5. The directions say to follow with an oil-free moisturizer, but I use my homemade moisturizing face oil instead.
Well, this concludes my post on homemade face mask recipes. Hopefully, you found one that sounds good. Feel free to share how you will be pampering yourself this Mother's Day! I think my day will include some ice cream, and hopefully, somebody else will do the cooking.

Friday, May 10, 2013

5 Homemade Facial Cleansers

I have what I would call combination skin with an oily T-zone and drier cheeks, but I was having all sorts of breakouts this winter, which prompted me to look for a new face wash. It didn't help that I made a really BIG mistake in using some Clean & Clear because I had purchased months before, having gotten what I thought was a super good deal with a coupon. Truly, it's not all that good of a deal if it makes your skin go crazy. Plus, this stuff is loaded with parabens and other chemical crap that I have been strategically eliminating from my day-to-day usage.

Next in my series of posts on the topic of "How I Pamper Myself," I am writing about a few different DIY facial cleanser recipes that I have been experimenting with for several weeks now. (My previous posts included How I Wash My Makeup Brushes, My Homemade Face Moisturizing Oil, and Homemade Eye Makeup Remover, in case you missed those.) There are many, many variations of homemade facial cleansers out there and this is just a small sampling that I tried. My original plan was to try at least 4 different recipes for at least a week each so that I could give a fair analysis of my results.

{This is my new favorite face wash!}

2/18/13 Trial #1: Baking Soda/Water
Up first was a simple sounding paste made with baking soda and water. I first tried this at night. My initial reaction was that this felt gritty in my palm, but adding more water made it slightly softer. My skin felt okay after the first usage, but I worried that it was too harsh to use regularly. By the second night, with twice daily usage, my skin felt smooth and my cheeks were not as dry. The acne on my forehead appeared to be clearing up, but I wasn't sure. After the third day, I was convinced that my skin was indeed looking better, but I could not tolerate the abrasive texture of this cleaning method any longer. I couldn't even bring myself to do this twice on the third day. So, my plan to last a week had failed. I don't remember where I came across this idea originally, but I do know that it was not my favorite homemade face wash! This works fine to wash my hair, but not my face, apparently.

2/21/13 Trial #2: Oil Cleansing Method (OCM)
This one seems a bit strange, but it also sounded relatively simple, so I decided to try it next. It's just a mixture of two oils, extra virgin olive oil (EVOO) and castor oil (found in the laxative section of the grocery store) It may seem counterintuitive to wash one's face with oil, but this actually feels really lovely and seems to produce very desirable effects. I learned a little chemistry lesson while researching this: oil dissolves oil, so using oil to make a cleanser is actually ideal for skin, since it naturally has oil. Plus, it's nourishing and not over-drying. Unlike my horrible experience with the Clean & Clear, this did not over-dry my skin (which, you are probably aware, makes your oil glands go into over-gear producing more oil to compensate, a vicious cycle).

On the first night, I combined a 50/50 mixture of my EVOO and the castor oil, because that was the proportion recommended for "normal" skin. I started with a small batch of just 1 teaspoon of each and mixed them in a small plastic bottle that is meant for travel sized portions of toiletries.

To Wash:
  1. Apply oil mixture to DRY skin. Gently rub in. I do this all over my face, including my eye lids.
  2. Soak a wash cloth in hot water. (I make it as hot as I can tolerate since it cools quickly.)
  3. Apply wash cloth to face and allow the steam to clean your face. I usually wait about 1 minute for the wash cloth to cool off completely.
  4. Gently wipe oil from face with the wash cloth. This removes eye makeup pretty well so for the most part, I have not needed to use my homemade eye makeup remover. I also do not find that I need to apply moisturizer after washing since the OCM is so hydrating.
My initial reaction to the OCM was that my skin felt good afterward, and it was not too oily. I quickly learned to keep wash cloths on hand in the bathroom instead of in the linen closet (since Logan was going through a phase of sleeping on the floor in the hallway, blocking my access to the closet). The main difference was the waiting portion of the cleaning routine. Normally, I would wash, rinse immediately, dry my face, and be done. I have since come to love the waiting because it forces me to just sit and be still for 1 whole minute, evidently not something I typically do! It's like giving myself a mini-facial, which is very pampering, in my opinion. On the morning of the 24th, I forgot keep my face dry in the shower, so I just decided to skip washing for that morning. I used my homemade face oil after the warm water splash and that got me through the day just fine. My skin seemed to be clearing up and I had less acne, but I was anxious to try out some other cleansers, so I kept experimenting.

2/28/13 Trial # 3: Oatmeal
This sounded easy enough. I like that it really only had one ingredient. I had already ground up some oatmeal in the food processor, making a knock-off Aveeno oatmeal bath that I had seen on Pinterest. I didn't share this one because it grossed Logan out and he refused to soak in it after the first time, so as far as a home remedy for eczema goes, that one was a strike-out for me. I put some in a small bowl that has a lid and kept it in the bathroom during this trial period. To wash my face, I just a tablespoon of oatmeal in my palm and then added enough water to make a paste. (I realized that this was way too much and vowed to use less after that.) Initially, I was surprised by how gentle this was to use. I had expected some abrasiveness. The smell wasn't overwhelming, it was distinctly "breakfast-y" but not so much as to deter me from using it. After the first use, my face felt clean and it appeared brighter. It didn't feel dry, but I saw dryness on my cheeks and followed up with my homemade face oil. Also, when I washed with this, I feared it was no good in the eye area. I wasn't even willing to attempt it, so I had to use my homemade eye makeup remover when washing in the evenings. Questions that came to mind were I wonder if this would be okay with whole oats, or did I do the right thing by using my ground oats? and Is this more appropriate as a weekly scrub/exfoliant rather than a daily cleansers? As you can see by the dates, I kept with this method for a bit. One downside to washing with oatmeal, however, is that I did not like finding bits of it in my hairline and eyebrows after I thought I was done rinsing. For that reason alone, I wanted to keep looking for another face wash method.

3/10/13 Trial #4: EVOO/Grapes/Milk
Well, I already knew I liked the olive oil, and milk is an ancient method for cleansing the skin. Lots of different fruits are purported to be good for the skin, probably because of the acids, I am guessing. What sold me on this particular recipe is that it didn't call for ingredients that were exotic or expensive. I can't tell you how many recipes I saw that asked for me to gather 15 different items, many of which I do not regularly have on hand, so this one looked like a winner for simplicity's sake! Grapes? Check.

2 Tbs EVOO
5 fresh grapes
1 tsp milk (I used whole milk)

  1. Process ingredients in a food processor until smooth and watery. (I found this hard to accomplish due to the peels plus the small size of the batch.)
  2. Apply to face. (The directions did not say how to use this at all, so used my hands.)
  3. Rinse with warm water.
My initial question was How long does it keep? The pros for this method were that it was easy to make with items most people have in their kitchens, it felt good going on the skin, and my face felt clean and moisturized. The cons were that it smelled bad, it looked icky, it probably wasn't safe to use near the eyes (I did not venture to try this), and it may have possibly clogged up my sink. I wanted to determine how long it would keep for and try it at least 3 times (to keep with my somewhat scientific method of giving stuff more than one chance to prove itself to me). On the second night, I found that it had congealed in the fridge, so I tried to warm it in my palms and apply it to my face, following with a warm wash cloth a la the OCM. This was a mistake. The smell nearly gagged me when I was confined under the wash cloth and forced to inhale the odor. I really did not like using this stuff, but my skin looked better than it had in weeks. The answer to my initial question: I would consider this to be something that is a one-time use formula, which makes it better for a weekly "mask" application, not something I would do daily. (Food processor each day? No thanks!)

3/13/13 Trial #5: Pure EVOO
Well, this fits my first requirement of being simple. It's just straight extra virgin olive oil. When I first tried this, I had no complaints. I used it the same way I did the OCM, just without the castor oil. However, I eventually decided that I didn't like how my skin felt afterward; it was just too oily. And it had seemed that my acne had improved more when using the 50/50 blend that included castor oil.

4/8/13 The Winner for Me: Back to the OCM!
My skin is not completely clear of break-outs, but it is definitely much improved from the winter when I was using the dreaded Clean & Clear. It's also very smooth and moisturized, and I swear it looks brighter and healthier. I now use the OCM just at night. For the most part, it gets rid of all my eye makeup, so I rarely need to use my homemade eye makeup remover. In the mornings, I just rinse my face with warm water and follow with my homemade face oil. This fits my lifestyle in that it is simple, inexpensive, and safe to use. The castor oil, which I found at Kroger, was on sale for $1.59 (regularly $1.89) for 4 ounces. Extra virgin olive oil is widely available, and I am considering buying it in bulk. The bottle I bought from Kroger was $3.49 for 8.5 ounces, but I just finished it off last night while experimenting with some other homemade beauty products. When I went back to this face cleanser, I made myself a larger batch consisting of 2 tablespoons of castor oil and 2 tablespoons of EVOO. I know that I can tweak the proportions as needed, but for now, I am happy my natural face wash.

Tuesday, May 7, 2013

My Homemade Face Moisturizing Oil

So, this was actually one of the first homemade beauty items that I decided to make and the reason is kind of odd. Back in the fall, Brett informed me after reading some random blog, that Zooey Deschanel uses some uber-expensive face oil. This information took awhile to absorb because I first had to wonder what blogs he is reading? Also, why would he care about some female celebrity's beauty rituals? Then, it hit me: he thinks she is hot. Duh! And, whatever makes her hot will also make me hot, right? I assume this is how his mind works, at least.

Therefore, I decided to do some research. I no longer remember the exact article that he had read and shared with me, but Googling "Zooey Deschanel's face oil" immediately pulls up one that gives me the name of this product. I believe that it's what we looked at back in November when he first brought up this interesting topic of discussion. Upon initially seeing this in November, the first thing I realized was that cost was a huge deterrent. $30 for 2 ounces! That is a bit steep for me (perhaps not for Zooey Deschanel?), but I assume it is also a bit on the high end for my readers, as well. That's when it dawned on me that I could surely just mix up my own face oil and save tons of money.

That meant more research! I found this blog, which described tons of oils and their respective helpful properties. Then, I jotted down a few oils that I was interested in possibly using, depending upon availability and price. The oils I selected came from a natural foods store. For my base oil, I chose sweet almond oil, which comes in a 16 ounce bottle for $10.99. (I was considering jojoba originally but it was more expensive, so I went with the almond oil. Also, I rationalized that if for some reason, I didn't like my face oil, the almond oil could serve as an all-over moisturizer until it was used up.) For the extra nourishing oil, I decided on evening primrose oil for two reasons: the blogger said it was great for all skin types, and it is supposed to be beneficial to folks with breast pain, which I touched on in my previous post. This came in a 4 ounce bottle for $19.99, so it was the brunt of my cost. Lastly, I chose my essential oil from myriad possibilities. Lemongrass, according to the blogger, is good for all skin types, plus it is supposed to brighten and tone skin. Honestly, I am not sure if I have noticed the last couple of things, but it smells nice, which was the deciding factor for me. It came in a 1 ounce bottle for $5.99, which is not bad, really, because essential oils are used so sparingly. (Again, I rationalized this expense by telling myself that if this didn't work out, I would just add a few drops each time I mix up my all-purpose cleaner.) All told, I spent just under $40, which was an initial investment, but I look at it that way: as an investment. I can now make a bajillion batches of my homemade face oil for a little more than Zooey Deschanel apparently paid for 2 ounces of her fancy-pants face oil.

{3-Ingredient DIY Face Oil}
Ingredients:
  • base oil (I use almond oil)
  • nourishing oil (I use evening primrose oil)
  • essential oil (I use lemongrass)
Directions: 
  1. Fill your container (I used a small plastic bottle intended for travel-size portions of toiletries, but I assume glass is the preferred material here. My container holds about 2 ounces, I belive.) about 2/3 of the way with your base oil. I use almond oil. Jojoba and argan are considered to be really good stuff, if you don't mind the extra cost. Tip: I have found that a small silicone funnel is especially handy for transferring oil from the large bottle to the smaller bottle.
  2. Next, add the extra nourishing oil until the container is nearly full. Again, I used evening primrose oil, but there are many, many others to choose from. Tip: The eye dropper is optional. I really like my flexible funnel.
  3. Lastly, add a few drops of the essential oil. I used 5 or 6 drops of lemongrass.
  4. Shake well and apply to face using a cotton ball. You really only need a couple of drops to cover the whole face, although sometimes I add an extra drop if I am planning to moisturize my neck. To apply, sweep upwards in gentle, circular motions. Tip: I have also used this oil as a hand moisturizer, specifically as a cuticle treatment, which has worked nicely. Tip: Because you will use such small amounts of oil, I like to tear my cotton balls in half to prevent waste.
Note: This oil should keep for 8-12 months (according to Crunchy Betty) if kept in a tightly closed container and stored in a dark place. I found that mine only lasts me about 2-3 months, so I don't have to worry about it going bad.

I first made this face oil back in December and I have made it once more since then. (There was an unfortunate accident resulting in spillage. Good thing it wasn't the uber-expensive $30/2 ounce kind!) I use this oil once a day now, in the mornings. (At night, I wash my face using the oil cleansing method, which I promise I will share soon!) I feel that it does an awesome job of moisturizing my face, even during the winter months. The only issue is that I was struggling with was more acne, at least until the weather recently got warmer. I don't think the oil is to blame, (in fact, I am sure it is not, I am saying the blame is my own for buying crumby Clean & Clear face wash because it was a good deal), but down the road I would like to experiment with my blend of oil and possibly consider tea tree oil to help with the acne. There are tons of possibilities out there, and I really only have tried one version so far. The beauty of homemade face oil, is that you can tweak it to fit your skin type and current needs, so I am betting that I will be making this for a long, long time (and not just because I have oodles and oodles of ingredients left)!

Note: If you liked this post, you might also be interested in how I clean my makeup brushes and how to make your own eye makeup remover.

Friday, May 3, 2013

Homemade Eye Makeup Remover

I have been working on wiping out chemicals from our daily usage since becoming a stay-at-home mom almost four years ago. Household cleaners were easy enough to take care of so they were some of the first that I started making myself. (For my all-purpose green cleaner recipe, look here.) But, beauty items are trickier, it seems. There is a lot more trial and error involved because everyone has different skin types and preferences from these types of products. So, I am now sharing my second post in a series of ways that I like to pamper myself. I think all moms can use some pampering right about now.

Why make my own eye makeup remover? I became fed up with the ingredients store-bought eye makeup removers several months back. I am done with parabens, and it is disturbing to see how many household products (including tons of things that people apply to their bodies!) in which they can be found. (There is a story here, that I have not shared on the blog, because truthfully, I have shared it with only a few people who are close to me. The short version is that last July I had a breast cancer scare, and thankfully, the lump that I found is harmless -- NOT cancer, praise God!)

Honestly, it is hard to weed through all of the ingredients in various cosmetics, so I am very slowly changing things. If you read my post about how I clean my makeup brushes, you can probably deduce that I am not about to give up makeup! However, I do want to use things that I feel are safe. Eye makeup remover seemed like it would be fairly easy to make at home, and I was sure that there were safe recipes to be found. I discovered this blogger who saved me a lot of trouble by testing out several recipes herself. For obvious reasons, I wasn't interested in trying anything that she said burned her eyes! I decided to try out her personal favorite, and that is what I have been using since (except for times when I clean my face with the Oil Cleansing Method, which I will explain in a later post on homemade facial cleansers). It is as easy as I had hoped to make my own eye makeup, and more importantly, it is something I feel completely safe applying to my face. The fact that it works, is all the more reason to make your own eye makeup remover at home.

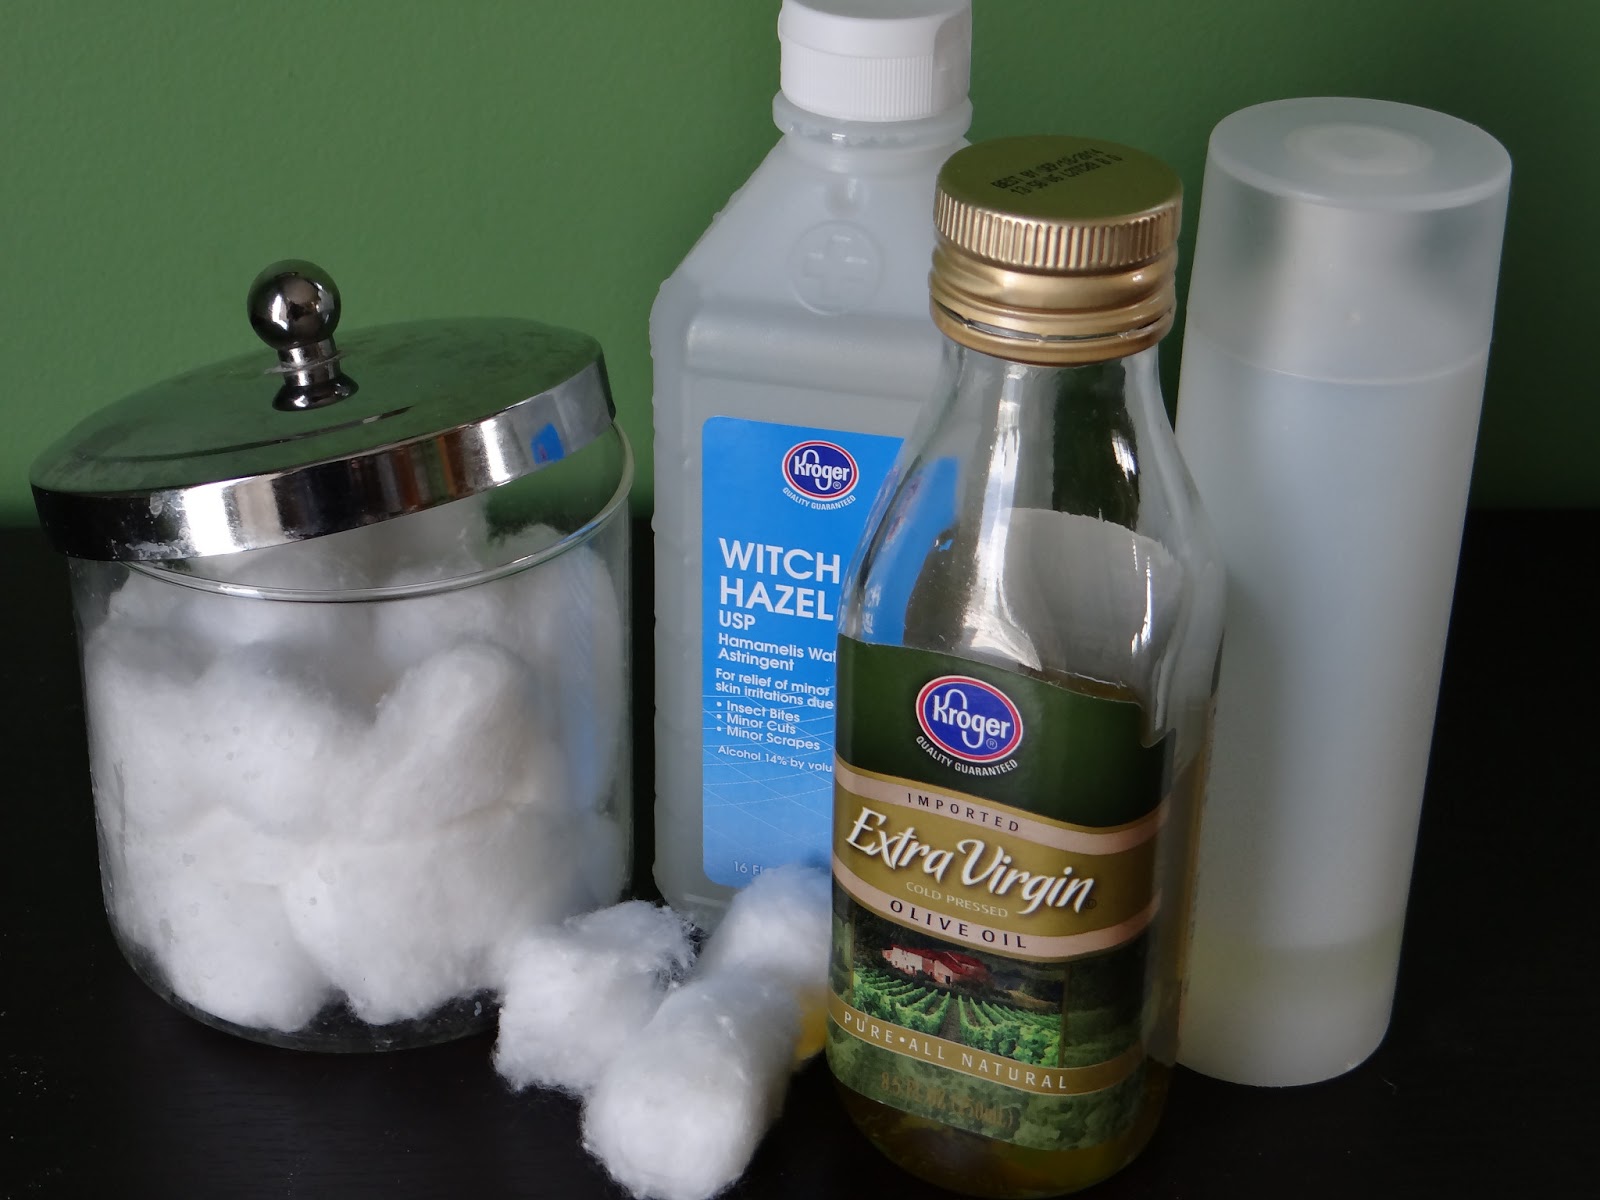
{Just 3 ingredients are needed for this DIY eye makeup remover.}

Ingredients:
  • 2 Tbs witch hazel (Y.ou can find this in the first aid section of the grocery store)
  • 2 Tbs oil (I use extra virgin olive oil but you could also try jojoba oil or almond oil.)
  • 2 Tbs filtered water (I use water from my Brita pitcher.)
Directions:
  1. Add all ingredients to your container. Tip: A funnel is helpful for this. I have been using the same container that formally held my store-bought eye makeup remover (I think the brand was Boots), which I washed out. It is far, far too large for the amount of eye makeup remover that this recipe yields, but that doesn't matter to me.
  2. While bottle is capped, shake well before using.
  3. Apply a small amount -- really, you don't need much -- to a cotton ball and gently sweep over eyes. Sometimes, I even tear the cotton balls in half and just use one half to avoid waste. Note: You can also use this to remove makeup anywhere on your face, which I have done before going to work out.
  4. This will safely keep for a few weeks, but since you are only making a small batch, you should be able to use it all within a reasonable time frame.


Wednesday, May 1, 2013

How I Wash My Makeup Brushes

It's May! Aside from spring officially having made it to Michigan, there are lots of nice things to look forward to in May. One is, of course, Mother's Day, and the other is my birthday, which happens to fall on Mother's Day this year. With the thought of a little self-indulgence in mind, I have decided to do a series of posts on simple and inexpensive ways that I like to pamper myself.

I have a few new followers so I hope you will bear with me as I take a divergence from the usual kids' crafts. If you don't know me very well, I pretty much love to make anything, not just crafty things. Also, I've been planning to share this since February, so it's about time I got around to it. Any time I can find a way to make something myself, I am open to trying it because a) It almost always saves me money b) It almost always is better for me (and my family) than the commercial version and c) It is almost always better for the environment. One beauty-related example that I have shared in the past, which lives up to all of those things, is how I gave up shampoo over a year and half ago.

My next tip is super simple, which is why I am starting here: how I wash my makeup brushes. This is an idea I found on Pinterest, and I knew that it would be better for my brushes than the soap and water that I previously used. As I have mentioned before, vinegar is awesome! This solution removes my Bare Minerals powders from the brushes plus the mascara from my eyelash comb. This doesn't take very long, and it's a great investment in myself. Having clean brushes means having cleaner skin, which means fewer breakouts, all good things! Plus, it may be psychological, but I believe that the makeup goes on better and looks nicer when I wash my brushes at least a couple times a month. (Ideally, I would do this once a week, but sometimes I just plain forget, or I realize they won't be dry in time for my next makeup application.)

{This cup from my brother's wedding rehearsal dinner works well for this.}

Materials:
  • 1 cup hot water
  • 1 Tbs distilled white vinegar
  • cup to hold water/vinegar mixture
  • towel
Directions:
  1. Combine 1 cup hot water with 1 tablespoon vinegar.
  2. Soak brushes for 20 minutes.
  3. Rinse brushes with hot water. Rinse again with cold water.
  4. Use a clean towel to pat brushes to remove excess moisture. Then, allow them to air-dry completely by laying them on the towel.

Sunday, May 13, 2012

Best.Weekend.Ever.

I am having a beautiful, blessed weekend. On Friday evening, Mia and I attended our first Mother/Daughter banquet at church. It was so fun to have Mommy/Mia time, and the theme was cupcakes, which we love.

Yesterday was my birthday. I'm 33 in case you are wondering. I would love to tell you I am 29, but I fear that those little "crinkles" (I'm not ready to admit that they are wrinkles...) that have cropped up in the past couple of years will give away my little white lie, so what's the use? To start off my day, I got to sleep in!! Then, Brett made me blueberry pancakes for breakfast. Heaven on a plate. After that, he gave me a super-sweet and amazingly thoughtful gift:

{I am not sure I did it justice, but the shoe is super cute!}
These are some shoes I found at DSW last year... They were so cute and amazingly comfortable, but not so practical, and being a full-time mom meant that I couldn't justify spending the money for something I didn't need. We waited and waited for them to get down to an acceptable sale price. Sadly, they never did and I was bummed at the end of the season when we lost out on the price-is-right-waiting-game. Enter Brett. A couple of months ago he informed me that a box would be arriving from Amazon, and that I was NOT allowed to open it. Do you know how hard it was not peaking into that box on the top shelf of the closet, especially when he told me it was my birthday present? My curiosity was heightened since I have not received a birthday present from him in about 3 years. (Okay, the back story there is he got me a lovely emerald heart shaped necklace on my 28th birthday, which like this year, fell on the day before Mother's Day -- my first Mother's Day. The problem was that the gift caused stress for us because he kept talking about how he shouldn't have spent so much money. However, I can't really wear it much. If you have little ones you know that they love to pull on jewelry. I have lost plenty of costume jewelry to little hands, and I definitely do not want anything to happen to something I will always treasure. I still don't know how much money he spent, and I don't want to know. All I know is that the necklace is beautiful and I love it. So, I think that this is why he has avoided giving me gifts for my birthday and/or Mother's Day since then.) Now, you can imagine my surprise when I found out what the contents of that box were.

I wore my new shoes to church today, and I felt so pretty. (Plus, I was relieved to discover that they continued to be comfy throughout the morning, and I didn't have any problems with my hip. I'm not able to wear heels any more sine it aggravates the bursitis in my hip -- yet another reason I probably can't get away with claiming to still be 29. However, I can apparently get away with wedge sandals. Hooray!) I think that he has resumed gift-giving at the perfect time, when I needed to be reminded that I am not just a mom; I'm a woman, too. And sometimes, moms need pretty things, even if they aren't all that practical. Now, if Logan will just out-grow the pulling phase, I can get back to wearing that emerald necklace.

After getting my fantastically impractical gift, it was time for me to pack up my gear because I headed off for an entire day of scrapbooking -- 8 whole hours to myself to do what I enjoy!! Oh, yeah, I even accomplished a few pages. One or two more sessions, and I should be able to finish the 2011 album. On a side note, while scrapbooking, my parents called to wish me a happy birthday. My mom asked if I felt "older and wiser." I told her, "Well, I definitely fell older, but I'm not sure about wiser." (It turns out that eating the fried chicken at the Mother/Daughter banquet wasn't a wise choice. I haven't had it in years, and there's a reason for that. It doesn't really agree with me, and it has been that way for awhile now. Oh, the joys of getting older. Do you see why I am in a bit of denial?)


Now, all joking about getting older aside, this was the icing on the amazing cake that was my weekend, a sweet hand-made Mother's Day card from a sweet little five year old. Brett must have patiently told her how to spell each word and I am sure it took awhile for Mia to write this message: "DEaR MaMa I HOPE YOU HaVE a HaPPY MOTHERS DaY." (Don't you love the backwards "S" in "Mother's?") The drawing on the left is a self-portrait of Mia walking her stuffed dog, Browna. So cute! 


Mia gave me another Mother's Day card that she made during Sunday School. Okay, this one wasn't really a surprise since I am the Sunday School teacher, but it's nice that she still wanted to make one for me.

Oh, and I almost forgot to mention that Brett got me a Mother's Day present, too. I got $30 in iTunes gift cards. Oh, to splurge on music for myself -- what a foreign concept! I am sure I will love it once I get over the shock and uncertainty. I don't know how many years it has been since I have bought a CD for myself, and the tiny little iPod I own (which I am sure is hopelessly obsolete as it has been sitting in a cupboard for quite awhile) never really got much use. I have never even downloaded my own music before. (Maybe doing so will help me to not feel so old.) Seriously. All the music I listen to is kid-friendly stuff I play in the mini-van while driving kids to and fro. It's either kids' music CD's, Disney soundtracks, or the Christian station, not that there is anything wrong with those. I enjoy them all, but sometimes Mommy misses country music and 80's rock, for example. (Another side note about how old I have apparently become: Do you know that they play 80's music on the oldies stations now? How can it be possible that the music I grew up listening to is now considered "oldies?")

So, now I need to back to my point that I really want to remember: My weekend was fabulous. I received beautiful, thoughtful gifts from my amazing family. But the best gift was the one I gave myself, the gift of some downtime (and not feeling guilty for taking it). I thoroughly enjoyed letting myself relax and celebrating the fact that I am a person, too. I went for a walk in the warm sunshine with my mother-in-law and sister-in-law, and this is the best part: there was no dog tugging on her leash or needing to have her poop cleaned up, there were no children whining that they were too hot/too cold/too tired/too whatever, there was no need to turn around and tell anyone to get his fingers away from the wagon wheels or to sit down or we'll have to go home... It's interesting that I know that I need to get to church each week in order to feel centered once more, but after 5 years of being a parent, I still struggling to understand how important it is to have me time. It really does make such a huge difference. Good thing I happened to have read this blog post recently, aptly titled, "Mommy Is A Person." Sometimes we need gentle reminders. Other times we need to be bombarded with the same message over and over. I think this weekend was cathartic for me in this way because it really helped drive home the message that even though I am all of this stuff to my kids, Mommy is also a person!