Admittedly, my kids are not always thrilled about this. For example, they just plain ignored the slip that said, "make a list of our blessings." Fortunately, they were happy the other day when it said "do a Christmas craft." I didn't really have anything planned, but I had remembered pinning this idea ages ago. So I pulled out my sandpaper (purchased from Dollar Tree for this project) and my cookie cutters and we got to work.
The original craft that I was inspired by involved a lot of puffy paint (cute, but not exactly young child-friendly!) and it was intended to be used as invitations for a cookie exchange. This sounds very cute, too, but here is how I modified the craft to make a more appropriate project for my two kids.
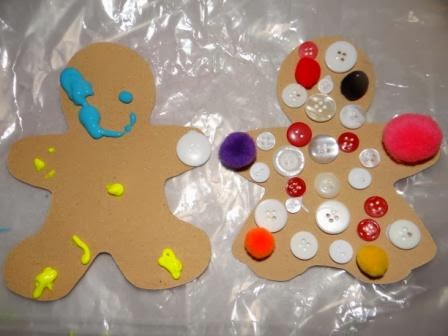 |
| {Gingerbread Boy and Girl by Logan, Age 4} (Can also be captioned, "why puffy paint should not be placed in the hands of preschoolers!" Although, his wasn't too bad. It was actually dry by the following morning, which surprised me.) |
Materials:
- sandpaper
- gingerbread boy and girl cookie cutters
- pen
- scissors
- tacky glue
- embellishments: buttons, feathers, pom poms, beads, pipe cleaners, craft foam, felt, markers, yarn, sequins, etc.
- puffy paint (optional -- not suggested for preschoolers and toddlers!)
- something to protect work surface (recommended -- I like cereal box liners.)
- old clothes/paint shirts (optional -- strongly recommended if using puffy paint!)
 |
| {Our Sandpaper Gingerbread Family by Mia, Age 6} |
Directions:
- Flip sandpaper over to the non-textured side. Place a gingerbread boy or girl cookie cutter on top and trace around it using a pen. Repeat as many times as desired. I found that we could fit 5 gingerbread people per sheet of sandpaper. (2 large and 3 small) Cut out the gingerbread people.
- (If desired, protect work surface and kids' clothing before decorating gingerbread people.) Allow kids to decorate their gingerbread people by using tacky glue to apply whatever embellishments you have at hand. We used many craft staples that you likely have at home: buttons, yarn, pom poms, pipe cleaners, and regular markers. There are many, many, many possibilities. For example, Mia used buttons in the traditional fashion to make a shirt and Logan used them just for decoration all over an entire gingerbread girl. She also used feathers in more than one way -- to make a skirt and also cut and shaped to make hair. (Note: If you are brave enough to let your kids use puffy paint, remember that it will stain clothing and plan accordingly. Also, it is very tricky to "pipe" it neatly, as you can see from my own example with the blobby outline around the head, so that may be frustrating for little ones.)
- Make sure that glue dries completely before displaying your gingerbread people.
 |
| {Brett came home and asked, "Where's Mama's?" Now I have one, too.} |
Other Ideas:
- I think it would be cute to string several of these together to make a garland.
- Since we have both boy and girl cookie cutters in both large and small sizes, Mia decided that she would make one gingerbread person to represent each member of the family. This would a cute thing to do as a family or as a class: everyone decorates a gingerbread person to look like himself.
- These could also be made into ornaments by punching a hole and then adding ribbon, yarn, bakers twine, or a pipe cleaner. The only downside is that the sandpaper is kind of flimsy, so you may want to first reinforce these with a layer of card stock. A more durable option would be craft foam.
- In fact, if you don't have sandpaper, craft foam would be fine for this project. You just will not have the textural aspect unless you find a way to create it. One way would be to add a layer of glitter, but this is going to be messier than sandpaper, by far.
- To make these into puppets, add a craft stick like we did here.
- I really do like the idea, too, of using these as invitations to a cookie exchange. In the past, I made my own apron invitations for an exchange, but these would be a bit easier to mass produce.
- If you don't have a gingerbread cookie cutter, don't run out and buy one! (unless they are already on clearance, in which case feel free to share where you are finding them -- not that I need any more...) You could also use a teddy bear or a puppy or any other item that would look good in brown.
- Looking for more ideas of things that you can do with cookie cutters? You might also like: cinnamon applesauce ornaments, gingerbread men paper dolls, craft foam ornaments (page 20), and Christmas sun catchers.


