Showing posts with label science activities. Show all posts

Wednesday, January 29, 2014

Snow Day Science Experiment

We are on our third snow day in a row. And once again, it was because of the extreme cold not the snow that school was canceled! Since it was too cold to venture outside, we ended up doing some indoor activities. First up was a science experiment: inflating a balloon with vinegar and baking soda, which I had heard about here. Our first balloon worked great. The second one was a flop, and we were done after that.

{We successfully inflated a balloon using science!}


Materials:

  • empty plastic bottle (with a small mouth, preferably)
  • vinegar
  • baking soda
  • balloon
  • 2 funnels

Directions:

  1. Using a funnel, fill the bottle about 1/3 of the way with vinegar. (Note: I first drew a line with a black Sharpie so that the kids would have a visual for when to stop pouring.) One child held the funnel and bottle while the other one poured the vinegar. (Note: Our bottle was an old teriyaki bottle that I pulled from the recycling bin. The neck is warped from the dishwasher, but it had the narrowest mouth of any bottle I could find in the bin, so it was the clear choice.)
    {Pouring the vinegar into the bottle}
  2. With a second funnel (or the first funnel, assuming you have first dried it completely), add baking soda to a balloon, filling it about half way. They switched roles so that the first pourer was now the holder of the funnel and the balloon, and the first holder was now the pourer of the baking soda.
    {Pouring the baking soda into the balloon}
  3. Carefully stretch the balloon's opening so that it fits over the mouth of the bottle. (Note: They can tear, so watch out for this.) Be sure not to spill the baking soda into the bottle while you are doing this. I did this step myself.
  4. Kids can now lift up the balloon, allowing the baking soda to spill into the bottle. The chemical reaction makes the balloon inflate, which is fun for everyone! (Note: If your balloon happens to break apart while doing this, try to stop them from pouring in any more baking soda. Otherwise, you wind up with a volcano instead of an inflated balloon. While fun, too, this was not the science experiment I was going for, so I wasn't prepared for it!)
    {Adding the baking soda to the vinegar}
{I love his excitement!}

Wednesday, April 3, 2013

Homemade Bouncy Balls Experiment

Yesterday, we tried what was essentially a science experiment: attempting to make homemade bouncy balls. I found the idea on Pinterest. The only possible problem was that this blogger's directions very clearly stated that Elmer's Glue-All must be used, and I only had Elmer's School Glue on hand. So, I checked our local Wal-mart, but they were all out of the Glue-All for some reason. Then, I had the idea that Aleene's Tacky Glue is probably pretty similar to the consistency of Elmer's Glue-All, so I decided it was worth a shot.

The bouncy balls ended up being the right size, shape, and consistency, I believe. They bounced just a bit, which I think is the desired effect. I can't say for certain, since I did not try it with the Glue-All, but I think this worked as well as could be expected for homemade bouncy balls. Obviously, we could not expect them to bounce as high as store-bought balls. I think Mia was a tad disappointed by this because she said, "It just bumps a little bit." However, this provided some spring break entertainment without breaking the bank, which was what I was looking for in an afternoon activity.

{Finished Bouncy Balls}

{Bowl #2: BEFORE Mixing}
Materials:
  • 2 Tbs warm water
  • 1/2 tsp Borax
  • 1 Tbs Aleene's Tacky Glue (or Elmer's Glue-All) not regular glue
  • 1 Tbs corn starch
  • 2 bowls
  • spoons for mixing
  • food coloring (optional)
Directions:
  1. In the first bowl, mix 2 tablespoons of warm water with 1/2 teaspoon of Borax. Stir to dissolve. There will be some powder that does not fully dissolve. Add desired food coloring and stir to mix. Kids can help with mixing, and also with adding food coloring, if you are comfortable with that. Tip: If you are unfamiliar with Borax, it can be found in the laundry aisle of your grocery store. I bought mine at Meijer for $3.42 and it has lasted me well over 2 years, so it is very affordable. It has lots of practical uses including making homemade cleaning solution (which I use to clean practically everything), homemade laundry detergent (which I use to wash all laundry except for diapers), and growing crystal snowflakes.
  2. In a second bowl, combine 1 tablespoon of Aleene's Tacky Glue (or Elmer's Glue-All, not regular glue) with 1/2 teaspoon of the Borax mixture from the first bowl. DO NOT MIX! Let it stand for 15 seconds, then stir the mixture until it is too thick to continue stirring any longer. This is a bit harder for little hands, so probably will need to be done by an adult.
  3. Using your hands, quickly roll the mixture into a ball. Kids can help with this step. Allow it to harden. We let ours set for about 30 minutes before playing with them. (You may not need to wait that long, but I wasn't sure.)
  4. Try out your bouncy ball. Have fun, but don't expect it to perform like a regular store-bought bouncy ball!
  5. You can repeat step 2 as many times as you like while you still have the mixture from step 1 available. We made two balls, one per child, but there was enough left over to make several more.
    {Forming the Bouncy Ball}
{Trying out the Bouncy Ball}

Wednesday, April 11, 2012

Grass Guy


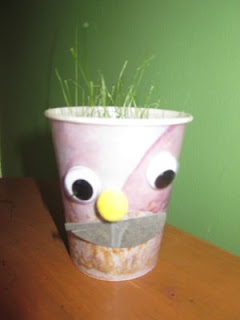
Mia refers to this cute little fellow as "Grass Guy." This is the second year in a row she has come home from preschool with one of these little "homemade Chia Pets." The kids plant grass seeds during the "Watch it Grow" unit and bring it home sometime after giving them their first "haircuts." I love the simplicity. All you need is a paper cup, some soil, grass seeds, googly eyes, pom pom nose, and half circle of paper for the mouth. She loves watering "Grass Guy," and she's eagerly awaiting his next "haircut."

{Update: Grass Guy's hair was getting long...}

{So, Mia gave him a trim. -- April 29, 2012}