Showing posts with label owl. Show all posts

Tuesday, November 26, 2013

Cupcake Liner Owl Craft

This cute craft is brought to you by our lovely library lady. During story time, Logan (my kid who is actually not all that into crafting) happily produced this cheery bird. I think that he loves Mrs. D., so she motivates him to be creative, which is great. The cupcake liner eyes are perfectly adorable, and I only wish that I had thought of it myself!

{Cupcake Owl by Logan, Age 4}
Mia liked this feathery fellow, too, so we made a few more to hang in the window. For most of them, I just traced the original to get the body's shape. However, she wanted one baby owl, so I drew a smaller body.

Materials:
{Red Owl by Logan}
  • construction paper
  • pencil
  • scissors
  • glue (tacky glue works best)
  • 2 googly eyes (or paper circles)
  • feathers (or paper strips)
  • 2 cupcake liners (we used both regular size and mini)

Directions:
  1. Draw and cut out the owl body. If you are making several, you may want to keep the first cut-out and use it for a template. The basic shape is an oval. On one end, instead of rounding it, create a pointed triangle shape. Fold this down for the owl's head. (My kids ended up wanting these to hang out like a flap instead of being secured, so I am not sure that is what Mrs. D. intended, but it wasn't worth arguing.)
  2. For feathers, Mrs. D. had cut several strips of construction paper in brown, black, tan, gray, and white. If planning to use paper feathers, cut these in advance and curl them around your finger or a pencil.
  3. Cut diamond shapes for the beaks. To make several, I first cut a strip of paper, then cut smaller rectangles. I folded each rectangle in half (hamburger fold) and then cut a triangle, leaving the fold in tact. Once unfolded, these formed the beaks. We used yellow and orange construction paper. Mrs. D. had also cut out brown construction paper feet, which we skipped. If you don't want to use googly eyes, cut black paper circles.
  4. Have your child assemble his owl. Glue two cupcake liners to the head to make the eyes. Then add the googly eyes or paper circles to the centers. Next, glue down the beak. If you are including feet, now is a good time to glue them to the bottom of the owls' body, either on the front or the back. Then, add feathers. We used actual feathers, which is why tacky glue worked the best, but the paper strips can be adhered easily using school glue or a glue stick. (Glue stick is the least messy.) 
    {One of Mia's owls, which I call "Showgirl."}
  5. Allow glue to dry before displaying your owl craft. 
    {Mama & Baby Owls by Mia, Age 6}
Other Ideas: I decided that it would be fun to perch the owls on actual twigs, and I envisioned using pipe cleaner legs to secure them. However, Mia was happy to make owls without feet so I never mentioned this. I also came up with the idea to use paper (or fabric) flowers for the eyes, and Mia made one very showy owl that had pink feathers and paper flower eyes with jeweled centers (from my scrapbooking supplies), which ended up being her absolute favorite.

Friday, October 21, 2011

Paper Owl Craft

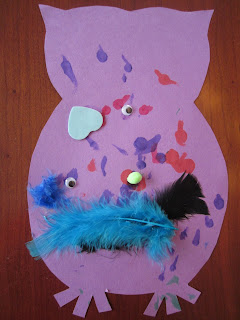
The inspiration for this craft came to me in a somewhat odd fashion. My husband removed the plastic rings holding together a twin-pack of jelly jars (from Sam's Club) and I looked at it and said, "That would make perfect owl eyes!" Of course, he gave me a look that said, "You're nuts. Only you would look at plastic packaging and proclaim it to be perfect owl eyes," but any creative types reading this can totally relate (unless it's just me and I really am nuts). Either way, these owls are a "hoot" for fall, if I do say so myself.
{Owl by Mia, Age 4}
{Owl by Logan, Age 2}

Materials:
  • construction paper 
  • pencil 
  • scissors 
  • cardboard (optional) 
  • Bingo markers 
  • feathers 
  • glue 
  • wiggly eyes 
  • plastic rings from packaging (optional) 
  • other materials: pom poms, craft foam, buttons, pipe cleaners, yarn, sequins, etc. (optional)

Directions:
  1. Draw or trace an owl onto a piece of construction paper. My kids chose purple. Any color would work. Tip: If you plan to make several owls, consider using templates. I made owl templates by drawing outlines onto paperboard (cereal box sides) from the recycling bin. Here is a template you could use, if desired. Then, just trace the owl onto construction paper.
  2. Cut out owl shape/s.
  3. Decorate the owls. We used Bingo markers for chest feathers and Mia glued on colored feathers for the wings and above the eyes. Both kids glued on wiggly eyes. (Logan's is more abstract.) I helped Mia cut small circles of construction paper to go behind her wiggly eyes, which are framed by those plastic rings that started this whole project idea. The owls don't have beaks because their attention waned by that time, but simple paper diamonds would work. You could also try pom poms, pipe cleaners, craft foam, buttons, yarn, or sequins for decorations.
  4. Allow all glue to dry before displaying your owl craft.

Wednesday, November 3, 2010

Paper Plate Owl Craft

Every time Mia watches Timmy Time on Playhouse Disney, I look at the clay-mation owl character and think about how his face reminds me of a paper plate. That's the inspiration behind this project.  And for whatever reason, it seems like an appropriate craft for fall.

Paper Plate Owl by Mia, Age 3 1/2

Materials Needed:
  • paper plate
  • brown paint
  • yellow paint
  • brown construction paper
  • orange construction paper
  • scissors
  • glue 
  • paintbrush
  • 2 big wiggle eyes
  • 2 round Styrofoam take-out lids (or yellow construction paper)
  • pencil (optional)
  • newspaper (optional)
Directions:
  1. Cover work surface with newspaper. Paint the back side of a paper plate brown. (You could also color it with crayon, marker, or colored pencil.) Allow paint to dry.
  2. Paint two round Styrofoam lids yellow. (If you don't have these, you can cut two circles out of yellow construction paper.) Allow paint to dry.
  3. Cut out two triangles from brown construction paper and glue onto the top of the plate to make ears.
  4. Cut two rectangles from brown construction paper, about the same diameter as the yellow eyes. Cut fringe along one side of each rectangle. Curl the fringe up around a pencil (or your finger). Glue paper fringes onto the plate to form "eyelashes."
  5. Glue a wiggle eye onto each yellow Styrofoam lid, and glue yellow lids just below the brown "eyelashes."
  6. Cut a diamond out of orange construction paper and glue below the eyes to create the beak.