Showing posts with label autumn leaf craft. Show all posts

Monday, November 21, 2011

Fall "Stained Glass" Crafts with Melted Crayons

{Acorn by Mia, Age 4}
Once again I was looking for a way to use up our collection of broken crayon bits, which I have been saving for a few months since we made scribble cookies. After seeing this acorn craft, I decided we would melt them and make some stained glass-like crafts. That said, I encountered a number of problems while doing this, so I have lots of advice to offer if you want to make crafts by melting crayons (and not have it be a complete catastrophe).
  • First, you may want to peel the wrappers off of your crayon bits as you collect them in your container. (I have been using a plastic bowl, but a jug or jar would work well.) The reason I say this is that I spent a long time doing this all at once and I ended up with wax shoved underneath three of my fingernails, which is pretty painful.
  • After that, I spent another long while making wax shavings with a pencil sharpener, since Mia got frustrated quickly while trying to help. While this was necessary for making the craft, I ended up with blisters, which I wasn't thrilled about. If you do this, I would plan in advance and make some shavings each day for a week so that you don't have the issue with blistering
  • I sorted all of our shavings by color families (blues, reds, greens, etc.) into individual bowls. This was probably too perfectionistic since the kids mixed the colors all together in their projects, anyway. Don't be too concerned about being perfectly organized, unless, of course, you are so compelled.
  • I am pretty sure I ruined our ironing board and possibly, the iron. (Oh darn, how will I iron now? I obviously use it so frequently, right?) I thought I had taken proper precautions to protect them, however, it wasn't enough. I still ended up with melted crayon everywhere! If you are still reading and you are feeling brave enough to try this project, make sure you don't care about your iron or ironing board. If, however, you would like to save your iron and ironing board, note that one sheet of construction paper and one dish towel aren't going to cut it. Cover your board with plenty of paper or maybe old tee-shirts or towels that you don't care about ruining. Or buy yourself a used iron/ironing board at a garage sale, and keep it on hand for craft projects.
Materials:
{Turkey Eating Acorn by Mia, Age 4}
  • wax paper
  • old, broken crayons
  • pencil sharpener
  • container to hold wax shavings
  • pencil
  • scissors
  • warm iron
  • black construction paper (optional for making "windows")
  • tape 
  • clear contact paper  
  • paper trimmer (optional)
  • templates (optional)
    Large Acorn
    Small Acorn
    Turkey
    Large Maple Leaf
    {Acorn by Logan, Age 2}
    Small Leaves
Directions:
  1. Use a pencil sharpener to make crayon shavings.
  2. Tear off two sheets of wax paper, approximately the same size, making sure they are large enough for your design.
  3. Use a pencil to draw or trace your design on the non-waxy side of one piece of wax paper. When using a template, you will lay your wax paper over top and outline the shape onto your wax paper. 
  4. Have your child sprinkle crayon shavings inside the design area. Don't worry about being perfect; it will change as the wax melts, anyway. Remind them to use a small amount. Big clumps of wax don't work as well as a thin layer.
  5. Lay the second sheet of wax paper on top and carefully transfer both sheets to your ironing board. (Make sure you have protected the surface before doing this.)
  6. Cover the wax paper with a large, old towel. Then, gently press down the iron. I checked on the progress about every 10 seconds until I thought they were melted enough. (There is no exact science to this, though, so watch closely. The wax will melt quickly. Only adults should use the iron.)
  7. Set the wax paper/crayon "sandwich" aside to cool.
  8. If you want your project to look like a stained glass window, draw/trace your design onto a piece of black construction paper and cut out the shape. Tape your now cool melted wax creation to the back side, trimming as needed.
  9. Using scissors or a paper trimmer (my preferred method), cut two pieces of clear contact paper slightly larger than your wax paper shape or black paper (if making a stained glass "window").
  10. Slowly peel the backing off of one piece of contact paper. Place the wax paper shape or black paper onto it. Peel the backing off of the second piece of contact paper and place it over top so the sticky sides meet. Trim away excess as needed, leaving 1/4" all the way around.
  11. Use tape to display the stained glass craft in a window.
  12. {Maple Leaf by Mia, Age 4}
     
    {Oak Leaf by Logan, Age 2}


      Friday, October 21, 2011

      Coffee Filter Leaves

      Here is a cute, simple craft that Mia learned at preschool. You can make several of these leaves to decorate your windows for fall. Or perhaps you could try making them into a mobile. Either way, this project is great for little hands and doesn't require very much adult preparation.

      {Leaves by Mia, Age 4}
      Materials:
      • real leaves
      • coffee filters
      • pencil/pen
      • scissors
      • Bingo markers
      • newspaper/paper towel
      • spray bottle with water

      Directions:
      1. Trace your leaf onto a coffee filter and cut out the leaf shape.
      2. Lay the coffee filter leaf onto a few layers of newspaper or paper towel.
      3. Spray the leaf with water.
      4. Dot the leaf with Bingo markers.
      5. Spray with water a second time to get the colors to blend somewhat. (Don't spray too much water or you will wash away most of the colors.)
      6. {Leaves by Logan, Age 2}
      7. Lay wet leaf shape on paper towel to dry.
      Other Options:
      • If you can't find actual leaves, draw some freehand or use a template like this or this.
      • If you don't have Bingo markers, try using washable markers or watercolor paints. If you use watercolors, you won't need a spray bottle.
      • If you don't have coffee filters, you can also use paper towels or watercolor paper.

      Monday, October 17, 2011

      Fall Print Making with Styrofoam

      I can remember doing printmaking with Styrofoam during elementary school and I thought that this technique would work well for a fall leaf craft. It also works for any design you can think of like Mia's abstract drawing.

      Materials:
      {Print #1 By Mia, Age 4, Lots of Paint}
      • Styrofoam
      • scissors
      • wooden skewer
      • paint
      • tray/plate for paint
      • brayer (or paint brush)
      • paper
      • real leaves (optional)

      Directions:
      {Print #2 By Mia, Age 4, Less Paint}
      1. Trim a piece of Styrofoam (ours was recycled from clean, dry meat packaging) into a square or rectangle to fit your paper.
      2. Use a wooden skewer to draw (or trace) your design into the Styrofoam. I drew my leaf freehand, and Mia made an abstract design, but you could trace around a real leaf if you like.
      3. Pour some paint onto another Styrofoam tray (or a plate) and cover your brayer (or paintbrush with paint).
      4. Apply paint to the Styrofoam.
      5. Press your painted design firmly onto your paper. If you like, experiment with different colors of paint and paper for different looks to your prints. You can also make a print, and then make another print with the leftover paint. It will have a different appearance than the first print, which I think is clearer, and often looks better. 
      6. If you like, number your prints: 1/3 means that this print is the first I made of 3 using this design.
      7. Allow paint to dry before displaying your prints. 

      Falling Leaves Decoration

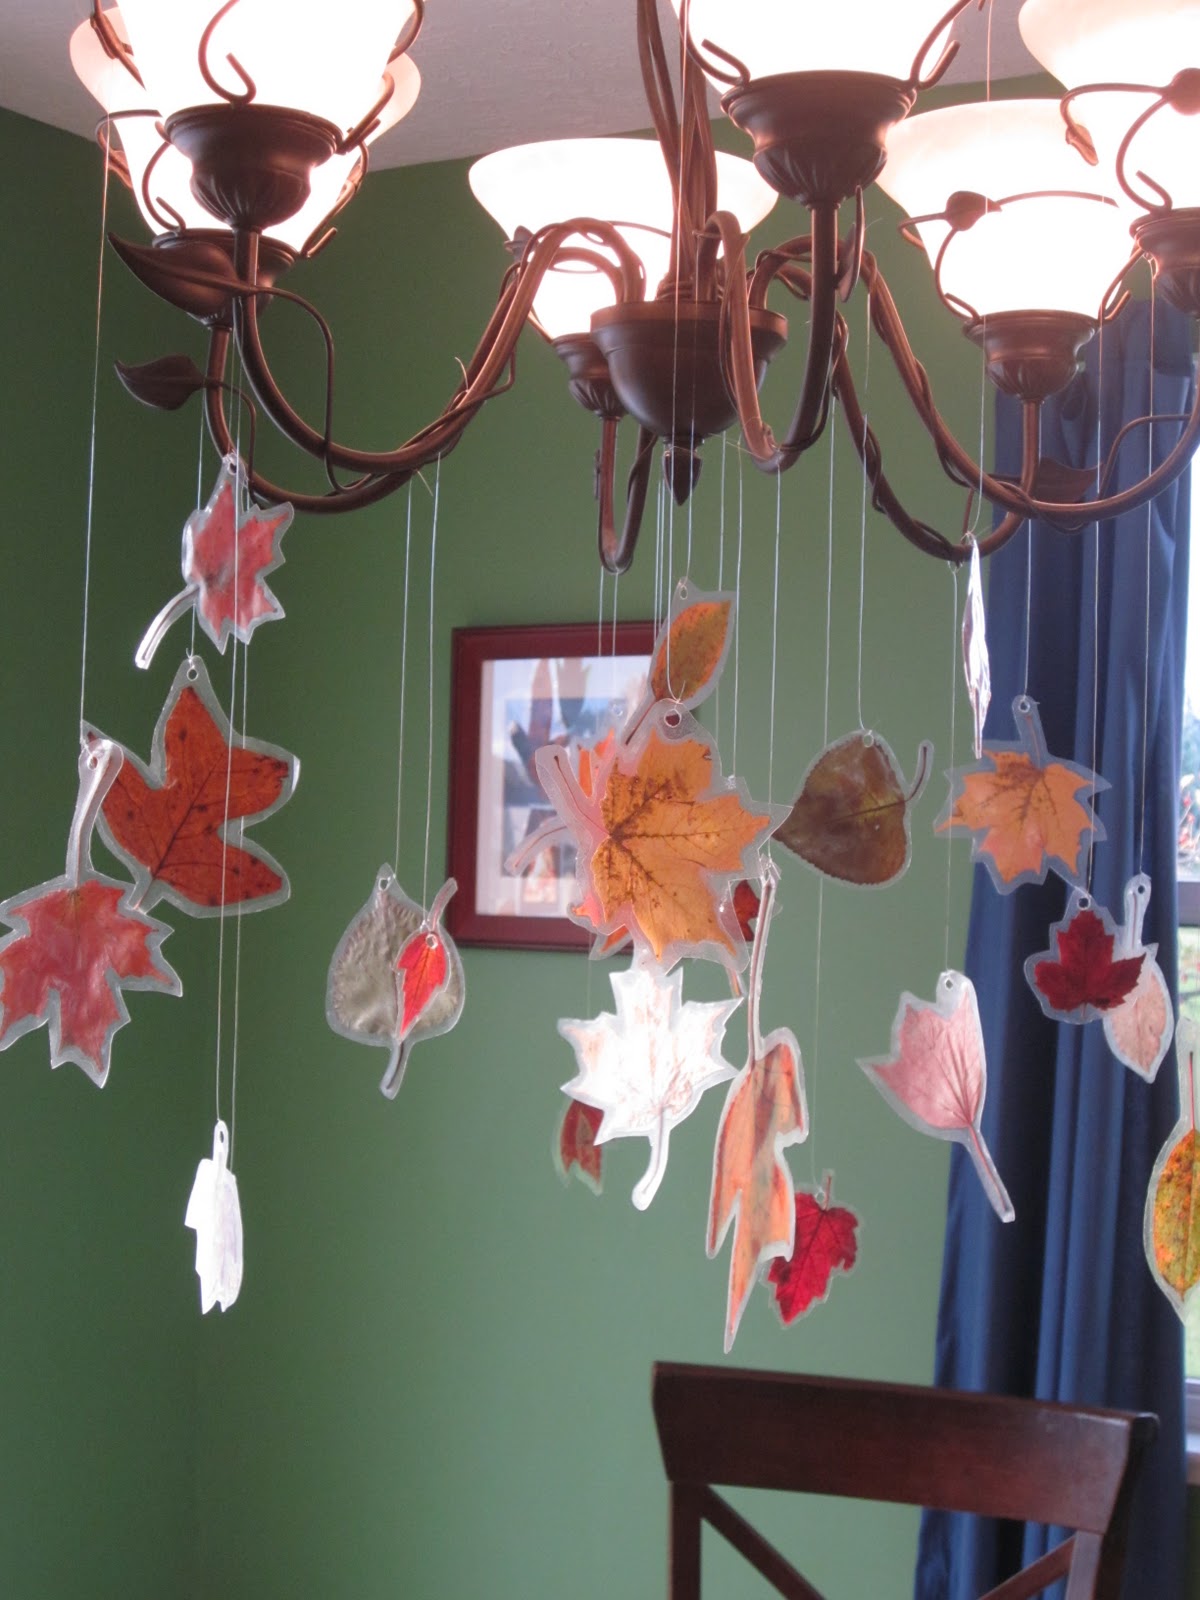
      This idea was inspired by Disney FamilyFun Magazine's Leaf Mobile craft. We changed it a bit to hang from our dining room light fixture instead of branches since it was rainy, and Mia wasn't interested in using branches, anyway. The end result is festive and I love how the leaves sway gently whenever someone walks by. It's a beautiful way to keep the best part of fall around just a little while longer, even though the trees are rapidly becoming bare.

      Materials:
      • actual leaves
      • heavy book/s (for pressing leaves)
      • clear contact paper
      • hole punch
      • scissors
      • fishing line
      • paper trimmer (optional)

      Directions:
      1. Collect colorful fall leaves and press them between the pages of a heavy book (we used two) for a day or two.*
      2. Using a paper trimmer or scissors, cut various sizes of squares and rectangles of clear contact paper that are about an inch wider than the leaves. You will need two identical contact paper squares per leaf.
      3. Peel the backing off of one contact paper square and place sticky side up. Lay a leaf on top and press down gently. Peel the backing off of the second contact paper square and place sticky side down on top of the first square, lining them up as best you can.
      4. Punch a hole for hanging, and then trim away excess contact paper, leaving about 1/4" border all the way around the leaf.
      5. Cut lengths of fishing line and tie one to each leaf. Tie the leaves to your light fixture (or branches if you prefer.)
      *Note: Yesterday I read in the paper that you can preserve fallen leaves using glycerin. It is supposed to help them retain their colors and not become as brittle. I have not tried this before, but I am curious about it. If you have experience with this technique, I would love to hear about it. Martha Stewart says that you should do the following to preserve your fall leaves:
      1. Wipe away dirt or moisture.
      2. Mix two-parts water with one-part glycerin.
      3. Layer the leaves in a pan and pour the solution over them so that they are completely immersed.
      4. Use a plate to weight the leaves down and keep them covered for 4-5 days.
      5. Remove leaves and wipe clean with a soft, dry cloth.

      Thursday, October 13, 2011

      Autumn Sun Catchers

      {Apple Sun Catcher by Mia, Age 4}
       We started making sun catchers back in March and have continued through the summer and into the fall. I don't see why not. Sun catchers aren't just for spring and summer. Shapes we tried included an apple, a pumpkin, Indian corn, and an oak leaf. I like doing sun catchers because they are simple enough for toddlers to do provided that you have done some gotten your materials cut in advance.

      Materials:
      {Leaf Sun Catcher by Mia, Age 4}
      • pencil 
      • clear tape
      • scissors
      • clear contact paper
      • construction paper
      • tissue paper 
      • paper trimmer (optional)
      • hole punch (optional)
      • yarn, string, ribbon, etc. for hanging (optional)
      Directions:
      1. If you are making a shape that is symmetrical, fold your paper in half like a hot dog before drawing and cutting out your shape. This makes it go a bit faster, and hopefully it creates less frustration, too. If you are making a shape that isn't symmetrical, simply draw (or trace) your shape and cut it out on two pieces of paper. Tip: If you are using two pieces of paper, you will need to make sure they stay together so that you get identical fall shapes.
      2. Cut two pieces of clear contact paper (I used both a paper trimmer and scissors for this.) so that they are 1/4 inch larger than the construction paper all the way around. Tip: Do not remove backing from contact paper until you are ready to use it.
      3. Adhere one piece of paper to the clear contact paper so that there is a border of 1/4 inch all around the paper. Tip: Slowly peel the contact paper away from the backing as you smooth the construction paper down onto the contact paper. This way you don't end up with "bubbles."
      4. Have your child stick tissue paper squares onto the contact paper fall shape until it is filled. (Mia has created her own technique for filling in small spaces: crumpling up the tissue paper into balls. It makes the sun catcher a bit bulkier, but it does work, and I think it adds a bit of visual interest to the design.)
      5. Layer the second piece of construction paper on top of the first, making sure that the fall shapes line up.
      6. Add the second piece of contact paper over the top, smoothing it down as you go. Trim away excess if desired, but don't trim too much or the sun catcher will not stay together. 
      7. You can display your sun catcher in a window using clear tape. Another option is to use a hole punch to make two holes near the top, thread some ribbon or yarn through the holes, tie it off, and then hang your sun catcher.
      {Pumpkin Sun Catcher by Logan, Age 2}

      {Indian Corn Sun Catcher by Mia, Age 4}


      Tuesday, November 2, 2010

      Falling Leaves Crayon Resist Project

      Remember doing a crayon resist project in art class in elementary school? I know I do. After seeing a crayon resist leaf project on this website, I was inspired to come up with one my own.
      Falling Leaves Crayon Resist by Mia, age 3 1/2 (drawing by Mama)

      Materials Needed:
      • white paper
      • watercolor paints
      • paint brush
      • small container of water
      • crayons in fall colors (red, orange, yellow, etc.)
      • real leaves (optional)
      Directions:
      1. Draw outlines of various leaf shapes onto white paper using crayon. I chose to space the leaves out all over the paper so that it looks like they have fallen somewhat randomly, and some of them go over the edge of the paper. Draw veins on the leaves for extra dimension. (You could trace an actual leaf if you don't want to draw the leaves free hand.)
      2. Color in the leaves with crayons, making sure to press firmly. You may wish to leave parts of the leaves uncolored. (These parts will get filled in with paint.)
      3. Using one color of watercolor paint (Mia chose red), wash over the entire piece of paper.
      4. The paint will fill in the white spaces, and of course, the crayon-covered parts will resist the paint. Allow the paint to dry before displaying your artwork.

      Friday, September 17, 2010

      Awesome Autumn Leaf Craft


      Funky Oak leaf, by Mia (age 3 1/2)
      I have seen many fall craft projects involving leaves, but this is by far, the coolest I have come across. You will love the results! I found this idea on this website:

      http://www.kidscraftweekly.com/leafy_issue.html

      Materials Needed:
      • real leaves
      • newspaper
      • scissors
      • watercolor paints
      • paintbrushes
      • white acrylic paint
      • scissors
      • pencil, pen, or marker
      Directions:
      1. Lay a dry leaf on top of newspaper and trace around it. Larger leaves tend to look better.
      2. Use watercolors to fill in the leaf outline.
      3. Let watercolors dry and cut out leaf shape.
      4. Paint a white rectangle or square (larger than your leaf) on another piece of newspaper. Foam brushes work nicely for this. You don't need more than one coat of paint. It looks nice if the newsprint shows through somewhat.
      5. While the paint is still wet, lay your watercolor leaf on top. It will adhere itself as the paint dries. No glue necessary!
      6. Cut newspaper into a rectangle or square and display. You may choose to leave some newsprint border around the white, which looks nice.
       Notes:
      My "traditional" Maple leaf
      • I used a black gel pen to trace the leaves with. When cutting out the leaf shapes, I left the black outline because I like the graphic quality, plus is was softened by the watercolors, giving it a kind of blurry look. You could trim the outline off if you prefer or use pencil so it doesn't show as much.
      • Mia used lots of colors to paint her leaves, not all of them ones that you would see in nature. I chose to stick to the traditional fall color palette for my leaves. I think both turned out equally well.
      • I didn't have to actually do step #6 (trimming paper to a square) because I used an insert in the newspaper that was already the shape I wanted.
      • I left a bit of the newsprint border showing not just for the graphic contrast it provides, but also because it has today's date at the top. (If you're like me you save all kinds of projects the kids make but you don't always remember to date them because they were drying, for example. This eliminates that problem!)