Friday, February 28, 2014

February at Our House

2/2/14
M: "The snow looks fresh and nobody has walked in it. It's so smooth and it tastes better!"
Oddly, she said this while we were on the way to church, so I have no clue how she knew it would taste better. I guess, of course, that fresh snow must always be better.

2/3/14
After getting herself dressed for school, Mia showed me this outfit consisting of striped shirt, striped skirt, and striped leggings.


Me: "Wow! Those are some stripes."
M {giggles}: "That don't even match!"
Pretty sure I will miss these days come junior high.

2/3/14
M: "Mom, are unicorns real?"
Me: "I don't know. What do you think?"
M: "You should Google it!"
When in doubt, Google it. Funny that I taught her that without even trying.

2/5/14
L: "Can you give me a snot tissue?"
Yep. Although, I usually just call them "tissues."

2/6/14
L {backing up into my lap with a picture book in hand}: "Beep! Beep! Beep!"
Love him!

2/9/14
M {watching women's figure skating during the Olympics}: "I choose my favorite based on how much I like their outfit. I can also choose by their hair and name... and right now, my favorite is Gracie Gold!"
And this is why they don't have this event judged by seven year old girls.

2/12/14
L {at Walmart}: "Wait. Go that way. I think I saw a tiara for you!"
See, he knows me so well. 

2/12/14
L {noticing Olympic coverage on the TV at the library}: "We have that on our TV, too!"
What a coincidence!

2/13/14
L: "Can we build a skate park at our house?"
I guess we technically could. I am just not sure how or why we would do that.

2/16/14
L {in bathroom}: "Door, I command you to stay!"
Let me know how that works out for you...

2/16/14
L {at dinnertime}: "Are we praying to Jesus... and Santa?"
Well, I don't know. I guess I can't blame him for keeping his options open.

2/22/14
M: "Mommy, the car stinks to me."
Me: "I don't know what you mean."
M: "Well... I've been gassy."
I think this one is self-explanatory. Don't you?

2/24/14
The kids are sick of this winter!
M: "When will the snow go away? I want to catch butterflies."
Me: "Well, there aren't too many butterflies in February."
L: "Yeah! I want to wear my boots and jump in mud."
If only I could make that happen...

2/25/14
L {explaining what snack he ate at preschool}: "I had a yogurt cafe." (parfait)
Sounds delish. 

2/26/14
L {While headed out the door in the morning}: "Mom, you're the line leader for our house."
Obviously. In fact, I am the leader of ALL things at our house -- or if I am not, then I should be. Maybe he was on to something with the tiara suggestion.

2/28/14
L: "I know why they call those Craisins. 'Cause they're crazy."
I imagine so. About as crazy as a dried fruit can be.

2/28/14
L {after tumbling off the ottoman, comes and shows me his boo-boo}: "I hurt my bender part."
Me: "That is called your elbow."
L: "Elbow starts with 'L.'"
Clearly, he was not hurt badly.

2/28/14
M {putting on her apron to help make pizza for dinner}: "Aprons are made of apes and wrens."
Great. I am so glad we cleared that up.

100th Day of School Shirt

Remember earlier this year when she got to wear a poodle skirt for the 50th day of school? Well, today was Mia's 100th Day celebration at school, and she was very excited to wear a special "new" shirt. We made it last week when school was closed. (Again.) Fortunately, the note had come home the day before so we knew that we were supposed to design a shirt, and this was a great snow day activity.

{Finished Flower Shirt}


Mia found a slightly stained shirt to use, and she told me that she wanted to cover it with flowers. I helped her collect all sorts of flowers from my craft supplies. She selected her 100 favorites, a mix of silk, felt, and paper flowers. Next, she arranged them on the shirt, making various designs, and layering smaller flowers on top of larger flowers. Finally, I hot glued them in place. Very simple.


{Cheese! She was happy with the results.}


This morning she chose to dress herself in flowered leggings, flowered socks, a skirt, and her "special" black shoes. She added a butterfly necklace and butterfly hair tie. Even though we had counted exactly 100 flowers, she felt certain that there were actually a "gazzillion" of them to go with what she called her "garden" theme!

{My Garden Girl}

Thursday, February 27, 2014

Easy Dinosaur Cupcakes

Logan was my summer baby. This means that he will never celebrate his actual birthday at school. Since it is his first year of preschool, I decided that we could have the class celebrate his half birthday today. (Celebrating half birthdays is not something we have done before at our house, but it seemed appropriate in this instance, and the teacher agreed that it was a perfect idea.)

He even lucked out in that they ended up planning a field trip to the bowling alley! After the cupcakes had been handed out, someone announced his name and said it was his "birthday" over the P.A. system. I think he thought this was odd, but it didn't seem to stop him from gobbling up his cupcake while they all sang "Happy Birthday."

Meanwhile, I was just happy to see that he was devouring the whole cupcake since he usually has a habit of eating just the icing, and he had wanted me to make frosting shots for the party. (He didn't call them that, of course, but can you imagine giving cups of frosting to a group of preschoolers?!) Anyway, I was glad that these cupcakes were such a hit.

{Happy half birthday to my future paleontologist!}


To make them, I did a double batch of my favorite white cake recipe and a single batch of my favorite buttercream frosting recipe (which was not quite enough -- I had three cupcakes that didn't get frosted, but that was okay since there were plenty for the class. If I had used my angle spatula instead of piping the frosting it would have been plenty.). I tinted the frosting green, to simulate grass and topped them with dinosaur fruit snacks from Kroger. The most important part, though, was the dinosaurs.

I had been to several stores looking for gummi dinosaurs, and it turns out that nobody carries those in our area. I could have ordered some online, but that would have required more advance planning, and I wouldn't have wanted to pay the shipping cost, anyway! Fortunately, someone gave me idea of fruit snacks, which worked great. I placed three on top of each cupcake, mixing up the colors and types of dinosaurs so that there weren't duplicates on any one cupcake. (Yes, this is anal and unnecessary... I was happy with the results, and more importantly, so was my favorite future paleontologist.) I also discovered that fruit snacks hold up very well as cupcake toppers, all of the kids liked them, and as a bonus, they were very affordable. I bought two boxes at $1 each and still had a few packages left over.

Monday, February 24, 2014

DIY Paper Chains Photo Backdrop

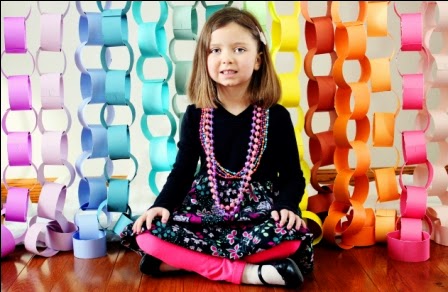
After a month, I am getting around to sharing some of Mia's birthday photos! These were taken by Erin of E.K. Photography, so be sure to check her out and give her some love. In my opinion, some of the cutest pics of Mia were the ones that Erin took using the paper chains that I made for a backdrop.


I saw a photo on Pinterest, which of course, always makes things look easy. This is easy, but there were no directions on how long to make the chains, how many chains to make, or how wide to make the strips, all of which I feel are kind of important to the success of a project! Here are the steps I used to create this paper chain photo backdrop.


  1. Each chain was made using 4 pieces of 12" x 12" card stock, cut into 2 inch wide strips with a paper trimmer. (I had previously tried 1" and 3" strips and found them to be too skinny and too fat, respectively. The perfect width, after trial and error, was 2" strips.) 
  2. I stapled each strip into a ring, linking them as I went along. This wasn't hard, but it did take some time. In total, there were 14 paper chains for the backdrop. Ideally, I would have made more chains for a wider backdrop, but I ran out of card stock -- or at least enough of the same color so that I could make chains that were long enough. (They had to be taller than Mia, of course.)
  3. To display the chains, Erin and I slipped them onto her backdrop holder, arranging them in a sort of rainbow.


All photos used with permission of E.K. Photography.

Saturday, February 22, 2014

White Chocolate Popcorn Treat

Mmmmmm is the only sound you can clearly make when your mouth is full. Coincidence? I think not -- especially if your mouth is full of this white chocolate goodness! Warning: This is delicious and dangerously addictive!

{Do I even need a caption? I mean, really?}


Ingredients:
  • popcorn -- about 8 cups 
  • 2 cups tiny pretzel twists
  • 1 cup dry roasted peanuts (I use unsalted.)
  • 1/2 cup Craisins (M&Ms are tasty, too!)
  • 12-oz. bag white chocolate morsels (I definitely recommend using actual white chocolate and not "vanilla" baking chips, which do NOT melt as well and are more likely to scorch.)
  • 1 Tbs. cooking oil (Optional. I use EVOO. Vegetable oil also works)


Directions:
  1. Pop popcorn. I add 1/2 cup kernels to my air popper. (You can also use a bag of plain white microwave popcorn.) Make sure to remove all unpopped kernels. You don't want to break a tooth!
  2. Combine popcorn, pretzels, peanuts, and Craisins (or M&Ms) in a very large bowl.
  3. Place the white chocolate chips into a microwave-safe bowl. You might also wish to add a tablespoon of cooking oil, which helps eliminate scorching. (Trust me, you don't want to scorch your chocolate. Smells terrible, and such a waste!) Begin cooking at high for 30 seconds. Remove from microwave and stir. Continue cooking for 15 second intervals, stirring in between, until white chocolate is melted. (This is about 1 minute 15 seconds total for my microwave.)
  4. Pour melted white chocolate over popcorn mixture and stir to combine until it is evenly coated. Spread onto wax paper and allow to harden completely. Store in an air-tight container (if you happen to have any left over!) Perfect for parties -- or just to enjoy, because you know you want to!

Friday, February 21, 2014

Less Mess Finger Painting

I am not sure of the origin of this idea, but I am pretty sure it was floating around on Pinterest. The basic concept is to cut up a sponge into smaller pieces and let kids use them as ink pads for finger painting. Here is what I did for this less messy version of finger painting, which could also be considered printmaking or stamping of fingers, depending upon how the child uses the tools. No matter how you do it, this is a brilliant that gets two thumbs (or fingers) up from this crafty mama!

  1. I originally cut my sponge (brand new) into six pieces, one per color of paint: red, orange, yellow, green, blue, and purple. Then, I thought better of that idea and cut each section in half again so that each child would have a set! (Also, cutting it into twelve sections produced segments that were just the right size for fingers so there was little waste.)
  2. After cutting the sponge, I began completely soaking each section in a color of tempera paint, before realizing that only the top section of the sponge needed to be saturated with paint. Once I realized that, I added less paint to each piece of sponge. As I soaked each section of sponge, I then set it on a Styrofoam tray which became the paint palette. 
    {Sponge Paint Palette}
  3. I laid a cereal box liner on my table to protect it (like free wax paper!). Then, I set some finger paint paper on top.
  4. Mia put on her paint shirt and dipped pressed a finger or two onto the paint-laden sponge and then applied the paint to the paper. (It turned out that Logan was not interested at this time, but I will have the sponges for another time, and can easily add more paint as needed.) When she was done, she had barely any paint on her fingers, so the clean-up was a breeze! As a bonus, I didn't have a messy tray to rinse off because the paint was contained in the small sponge pieces. Overall, this is brilliant, and gets two thumbs (or fingers) up from this crafty mama.
    {A Finger Painted Flower Garden}

Valentine's Projects - 2014

I've recently chatted with a couple other people about how I do not make the kids' valentines. (That may actually surprise you since I like to make just about everything else!) For what they are, though, and considering how little time children actually spend appreciating them, this is not worth it to me. (I do understand what a friend said, though, about a child wanting a certain theme or character that wasn't readily available. It was smart of her, in that case, to make them herself!) For my kids, I just run out after Valentine's Day,-- when stuff is on clearance -- and pick up one or two boxes that I know they will like to set aside for the next year.

This year, for example, Mia had a choice of Disney fairies or princesses and she selected the fairies. (I found her a box of princess valentines that came with suckers to use next year. I figure suckers don't really go bad. Any other candy I would worry about, but suckers should be fine.) Logan chose Cars, so he will have either the Toy Story ones or the Hot Wheels that I just picked up the other day. They still get choices, but I don't have to spend 20 minutes in the store while they debate among a million options. So far, it has worked for us. (And for the record, I'm not knocking anybody's choice to make the cutesy homemade kind. I have seen some really awesome ones! It's just not something I care to do as long as my kids are fine with the current system.)

That said, we did do a few Valentine's Day related crafts this February. Mia's teacher sent home a note a few days before their class party that said they needed to have a valentine holder of some sort. I was trying to figure out what sort of box to use when I remembered the cute felt envelopes featured in the February issue of FamilyFun magazine. We had everything we needed at home, so this was a good choice. I showed Mia the picture, and she loved it, so it was decided. I downloaded the Special Deliveries Envelope pattern and then traced it onto some pink felt that I had left over from making the poodle skirt. (My only complaint is that they don't tell you how much felt you need, so let me tell you. I measured it to be about 41" by 28.5" so allow a bit extra, just in case my measurements are slightly off.)

{Finished valentine holder is 91/2" x 141/2"}


For embellishment, we added a red felt heart, and Mia selected 2" blue self-adhesive felt letters. (We didn't have a "M" so she decided an upside down "W" would work in its place.) I skipped the step for cutting holes and threading ribbon through to make this a chair back valentine holder since I wasn't sure if they would fit the chairs at school, and this seemed like unnecessary effort. It turned out great, and she was very happy. I was also glad that it could easily fit inside her backpack for the bus ride home, which would not have been the case if we had gone with a box of some sort!

{This is the great heart garland!}


As Valentine's Day approached, Mia felt that we needed some extra decorations and I showed her how I had made some heart-shaped chains inspired by this blogger's photo that I had seen on Pinterest. Her directions are great, and I wish I had actually read them first. One important step that I missed was starting with folded paper to get that nice edge at the bottom of the heart. I just gave Mia some 1" strips of red and pink construction paper and showed her how to invert them before stapling (as opposed to overlapping them for traditional chain links). Then, I suggested that she pinch the bottom segment to form the base of the heart. Mostly, she skipped that so her hearts are rounded and sweet-looking instead of crisp and precise. She was happy with the results, so I couldn't have cared less. Besides, they looked kid-made, and that was the point! Mia quickly used up the red and pink and asked me to make more strips out of purple and blue paper. By the time she was done, we had a garland that draped nearly all the way from one side of the dining room to the other. (Some of the chain links were regular circles interspersed among the hearts.)

{Close-up of Heart Chains}


Today was yet another snow day. (Well, technically, it was an ice day.) Anyway, I had some project ideas in mind and one was stamped hearts from toilet paper tubes, which came from this blogger. (I had wanted to try this before Valentine's Day, but then Mia's school needed lots of TP tubes for science night and I sent in all that I had at the time, around 50!) Mia was not interested, but Logan happily created some stamps with the heart-shaped tubes that I made. We had two tubes to work with since I no longer had a big stash of them: one to dip in pink paint and one to dip in purple paint, both of which I poured onto a Styrofoam tray. These stamps were quick and easy to make using the directions found on the Rust & Sunshine blog. My only suggestion would be that you could also cut the tubes in half to make more if you wanted to do this with more kids but were short on tubes.

{Art in Process...}


{Finished Stamped Art}

{Close-up of Tubes, After Stamping}