Pages

Monday, October 31, 2011

A Lesson on Love (from a Young "Animal Expert")

Here are Mia's memorable quotes for October. Some make me laugh when I read them and one conversation in particular reminds me that I am blessed.

10/6/11
"Mom, Ritzy raced with me. I put a slap bracelet on her paw and we raced!" (Well, that would explain why the dog was acting so weird.)

10/12/11
Mia: "I love you, Mama." {kisses my cheek} "Everyone loves Mama."
Me: "They do?"
Mia: "Yeah, just like Daddy, Mia, and Logan, and Ritzy dog!"
{Logan pauses from nursing to kiss my cheek, too.}

Isn't it amazing how kids just know when you need affirmation the most? I was feeling like a wretched mom because of an incident the previous day. They had run away from me in public and I had just screamed at them. I was pretty angry, not only because they were headed toward the parking lot, but also because I had told them to wait for me and they didn't. I love that little ones forgive so easily and love unconditionally. If only the rest of us could remember that, we would be so much better off.

10/21/11
"I'm helping Ritzy breathe." {demonstrates panting}

10/25/11
Mia: "Some animals take baths in yogurt."
Me: "Really? What animals are those?"
Mia: "Hippos and dolphins." (stated in a very matter-of-fact way)

10/27/11
Said while struggling to cut out a shape she had drawn:
"Mom, my scissors are not following the directions."

10/30/11
Said while cleaning up toys:
"I know all the directions. Logan doesn't know the directions 'cause he's a boy." 

Mummy Dogs


In the "spirit" of Halloween, I decided to make a version of these mummy dogs for last night's dinner. I only made 5 (instead of 10) because that is how many hot dogs I had that weren't frozen, and I used slices of colby jack deli cheese in place of American cheese slices (which I haven't bought in a long time). I also lined my baking sheet with parchment paper, because we have found this to be very helpful when baking. Other changes I made were cutting the crescent rolls into strips of 8 instead of 10. It just seemed like it would be easier to work with wider strips. I think I was right because I still had strips that tore. As it was, they weren't more than 1/2 inch wide, so I can't imagine how much harder it would be if the strips were any narrower. I used a pizza slicer to cut the strips for the bandages instead of a knife or scissors the directions said to do. This plan worked great. Finally, I skipped the mustard eyes because we didn't have any in the refrigerator.

Overall, my mummy dogs were a success, despite all of the tweaks I made to the recipe. I am not sure how you even get the dough to wrap around 10 hot dogs; 5 seemed like plenty. And 1/2 piece of colby jack per mummy dog seemed about right. The cheese oozed out a bit, but that seems okay for creepy cuisine, right?

Friday, October 28, 2011

Jar-o'-Lanterns

I love these cute glass jack-o'-lanterns from Disney FamilyFun Magazine so much that I wish I had thought of them myself. Here's why: 1) They are quick and easy to make. 2) It's a nice way to re-purpose something that might otherwise get thrown away. 3) If you like to do crafts, you probably have the materials on hand already (glass jars, masking tape, scissors, paintbrush, orange acrylic paint-- or blend your own with yellow and red if you don't have orange). 4) The end result is super cute. (Obviously, this is the most important thing in a craft project.) You and your kids can whip up several of these in time for Halloween.

We attempted fancier faces than the directions suggested, and I think they came out fine. You, of course, can stick with simple triangles if you prefer. Mia told me what she wanted and I did my best to cut the shapes out of masking tape. I think having a variety of sizes and types of jars makes a nice little display, just like real pumpkins (although we haven't even carved ours yet). Not having any of those flameless tea lights available, I used regular tea lights. While the fake kind would probably be safer since they aren't a fire hazard and they wouldn't make the jars get hot, the way I see it, these are glass jars, and I don't plan to keep them where kids can get at them anyway. (This is really my only complaint with this craft; it's intended for small children, and realistically, glass isn't an ideal material for little ones to work with. That said, I know Mia well enough to know she could handle it at age 4 1/2 so I wasn't concerned.) So, for the photo, I took them out to the porch and then put them back on the counter where they have been since Mia made them a few days ago.

Wednesday, October 26, 2011

Beef Barley Stew

This hearty and delicious stew is what I made for dinner last night. It's quickly becoming a family favorite, so it is fortunate that we can get at least two meals from this recipe.


Ingredients:   Yield: 6-8 servings
  • 1 1/2 pounds beef stew meat, cut into 1-inch pieces
  • medium onion, chopped (I use 1/2 onion instead.)
  • 2 Tbs. vegetable oil
  • 1 quart water (I have been substituting 3 cups beef broth + 1 cup water.)
  • 15 oz. can tomato sauce
  • 5 medium carrots, cut into 1/2-inch pieces
  • 1 stalk celery, thinly sliced
  • 2 tsp. salt (I use 1/4 tsp. since I substituted broth for water.)
  • 1/2 tsp. dried oregano
  • 1/2 tsp. paprika (I omit this.)
  • 1/4 tsp. pepper (I usually use less.)
  • 2 cups frozen corn (Recipe says you can also use fresh.)
  • 2 cups frozen green beans (Recipe says you can also use fresh.)
  • 3/4 cup medium pearl barley
Directions:
  1. In a skillet, brown beef and onion in oil; drain. Transfer to a 5-quart slow cooker.
  2. Add water (or water/beef broth), tomato sauce, carrots, celery, salt, oregano, paprika (if you wish), and pepper.
  3. Cover and cook on low for 4-5 hours. (Our slow cooker is weird, so it takes less time.)
  4. Add beans, corn, and barley; cover and cook on low 2 hours longer or until barley, beef, and vegetables are tender. (Again, for us, this takes less time than the recipe states. It has taken some trial and error to figure it out.)

Monday, October 24, 2011

Shortcut Chicken & Dumplings

This is not a slow-cooker meal, so I consider it more of a Sunday supper dish.We had it last evening. The shortcuts of using condensed soup and refrigerated biscuits make it accessible to home cooks like myself who don't have the greatest of skills, but are trying to make yummy dishes that will satisfy the whole family. This one fits the bill, in my opinion. I only wish that I were one of those blogger who thinks to take pictures of the meal. Here is the recipe as I make it.

Ingredients:               Makes 4 servings
  • 2 Tbs. all-purpose flour (original recipe calls for 1 Tbs.)
  • 12 oz. skinless, boneless chicken breast halves or thighs, cut into 1-inch pieces
  • 2 Tbs. butter
  • 1 stalk celery, sliced
  • 1 medium carrot, chopped
  • 1/2 onion, cut into wedges (original recipe calls for a whole onion)
  • 1 1/4 cups chicken broth
  • 1 (10 3/4 oz.) can condensed cream of chicken with herbs soup
  • 1/8 tsp. pepper
  • 1 tube of refrigerated buttermilk biscuits (original recipe calls for package of six; I buy packages of 8, put in 4 or 5 and just bake the rest)
  • 1 cup frozen peas
Directions:   
  1. Place flour in a plastic bag. Add chicken pieces and shake until coated.
  2. In a large saucepan, cook chicken, celery, carrots, and onion in hot butter until chicken is brown.
  3. Stir in broth, condensed soup and pepper. Bring to boiling.
  4. Reduce heat. Simmer, covered, about 20 minutes, or until chicken and vegetables are tender. Meanwhile, separate biscuits. Cut each biscuit into small pieces (I cut them into eighths but the original recipe suggests quarters.)
  5. Stir peas into chicken mixture; return to boiling.
  6. Place biscuits on top of chicken mixture. Simmer, covered, over medium-low heat 10-15 minutes or until a toothpick inserted in center of biscuit comes out clean. Serve in bowls.

Halloween Cut-Out Sugar Cookies

{I decorated these cookies. The one one the right is the last little ball of dough, and I pinched a small stem with my fingers.}

{Cutting out the shapes}
I have been searching for the best sugar cookie recipe for awhile now. I am not sure if this is it, but it is pretty darn close. The dough is a great consistency for making cut-out cookies and the flavor is good. My only confusion is that they taste more like a butter cookie than a sugar cookie, which reminds me of shortbread. I think I will keep looking for the perfect sugar cookie recipe, but for now, I will share how these turned out. 

{There's no such thing as too much frosting.}
{Don't forget to add lots of sprinkles.}


{You may have to taste-test to ensure that your cookies are edible.}
{Take pride in your work.}
Possibly the best part of this whole experiment was trying out our jack-o'-lantern cookie cutter that I got on clearance at Jo-Ann's last year after Halloween. It's by Wilton and it has several smaller shapes that you can use to make the facial features, which I think is a cute idea instead of plain pumpkin cookies. For frosting, we used this recipe. Again, I am not sure it is the best one available, but it is the best I have tried so far. It is easy to make and easy to spread, and it made enough so that we could divide it up into different containers for making various colors. We left some plain white for the ghosts, and we mixed red and yellow food coloring to make orange for the jack-o'-lanterns. We also attempted (and failed) to make black for some cats (which we didn't even end up cutting out). It was more of a purplish gray, but it all tastes the same, so purple pumpkins were just fine. We also used green sugar sprinkles decorating (I was thinking of stems; the kids had other ideas.) as well as some other Halloween sprinkles. Making and decorating our Halloween cut-out cookies was good family fun, and I think it may become an annual tradition at our house.

Friday, October 21, 2011

Paper Owl Craft

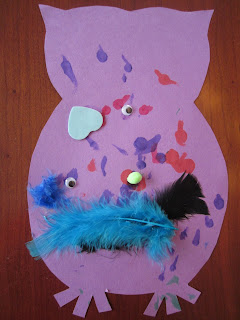
The inspiration for this craft came to me in a somewhat odd fashion. My husband removed the plastic rings holding together a twin-pack of jelly jars (from Sam's Club) and I looked at it and said, "That would make perfect owl eyes!" Of course, he gave me a look that said, "You're nuts. Only you would look at plastic packaging and proclaim it to be perfect owl eyes," but any creative types reading this can totally relate (unless it's just me and I really am nuts). Either way, these owls are a "hoot" for fall, if I do say so myself.
{Owl by Mia, Age 4}
{Owl by Logan, Age 2}

Materials:
  • construction paper 
  • pencil 
  • scissors 
  • cardboard (optional) 
  • Bingo markers 
  • feathers 
  • glue 
  • wiggly eyes 
  • plastic rings from packaging (optional) 
  • other materials: pom poms, craft foam, buttons, pipe cleaners, yarn, sequins, etc. (optional)

Directions:
  1. Draw or trace an owl onto a piece of construction paper. My kids chose purple. Any color would work. Tip: If you plan to make several owls, consider using templates. I made owl templates by drawing outlines onto paperboard (cereal box sides) from the recycling bin. Here is a template you could use, if desired. Then, just trace the owl onto construction paper.
  2. Cut out owl shape/s.
  3. Decorate the owls. We used Bingo markers for chest feathers and Mia glued on colored feathers for the wings and above the eyes. Both kids glued on wiggly eyes. (Logan's is more abstract.) I helped Mia cut small circles of construction paper to go behind her wiggly eyes, which are framed by those plastic rings that started this whole project idea. The owls don't have beaks because their attention waned by that time, but simple paper diamonds would work. You could also try pom poms, pipe cleaners, craft foam, buttons, yarn, or sequins for decorations.
  4. Allow all glue to dry before displaying your owl craft.

Coffee Filter Leaves

Here is a cute, simple craft that Mia learned at preschool. You can make several of these leaves to decorate your windows for fall. Or perhaps you could try making them into a mobile. Either way, this project is great for little hands and doesn't require very much adult preparation.

{Leaves by Mia, Age 4}
Materials:
  • real leaves
  • coffee filters
  • pencil/pen
  • scissors
  • Bingo markers
  • newspaper/paper towel
  • spray bottle with water

Directions:
  1. Trace your leaf onto a coffee filter and cut out the leaf shape.
  2. Lay the coffee filter leaf onto a few layers of newspaper or paper towel.
  3. Spray the leaf with water.
  4. Dot the leaf with Bingo markers.
  5. Spray with water a second time to get the colors to blend somewhat. (Don't spray too much water or you will wash away most of the colors.)
  6. {Leaves by Logan, Age 2}
  7. Lay wet leaf shape on paper towel to dry.
Other Options:
  • If you can't find actual leaves, draw some freehand or use a template like this or this.
  • If you don't have Bingo markers, try using washable markers or watercolor paints. If you use watercolors, you won't need a spray bottle.
  • If you don't have coffee filters, you can also use paper towels or watercolor paper.

Monday, October 17, 2011

Fall Print Making with Styrofoam

I can remember doing printmaking with Styrofoam during elementary school and I thought that this technique would work well for a fall leaf craft. It also works for any design you can think of like Mia's abstract drawing.

Materials:
{Print #1 By Mia, Age 4, Lots of Paint}
  • Styrofoam
  • scissors
  • wooden skewer
  • paint
  • tray/plate for paint
  • brayer (or paint brush)
  • paper
  • real leaves (optional)

Directions:
{Print #2 By Mia, Age 4, Less Paint}
  1. Trim a piece of Styrofoam (ours was recycled from clean, dry meat packaging) into a square or rectangle to fit your paper.
  2. Use a wooden skewer to draw (or trace) your design into the Styrofoam. I drew my leaf freehand, and Mia made an abstract design, but you could trace around a real leaf if you like.
  3. Pour some paint onto another Styrofoam tray (or a plate) and cover your brayer (or paintbrush with paint).
  4. Apply paint to the Styrofoam.
  5. Press your painted design firmly onto your paper. If you like, experiment with different colors of paint and paper for different looks to your prints. You can also make a print, and then make another print with the leftover paint. It will have a different appearance than the first print, which I think is clearer, and often looks better. 
  6. If you like, number your prints: 1/3 means that this print is the first I made of 3 using this design.
  7. Allow paint to dry before displaying your prints. 

Falling Leaves Decoration

This idea was inspired by Disney FamilyFun Magazine's Leaf Mobile craft. We changed it a bit to hang from our dining room light fixture instead of branches since it was rainy, and Mia wasn't interested in using branches, anyway. The end result is festive and I love how the leaves sway gently whenever someone walks by. It's a beautiful way to keep the best part of fall around just a little while longer, even though the trees are rapidly becoming bare.

Materials:
  • actual leaves
  • heavy book/s (for pressing leaves)
  • clear contact paper
  • hole punch
  • scissors
  • fishing line
  • paper trimmer (optional)

Directions:
  1. Collect colorful fall leaves and press them between the pages of a heavy book (we used two) for a day or two.*
  2. Using a paper trimmer or scissors, cut various sizes of squares and rectangles of clear contact paper that are about an inch wider than the leaves. You will need two identical contact paper squares per leaf.
  3. Peel the backing off of one contact paper square and place sticky side up. Lay a leaf on top and press down gently. Peel the backing off of the second contact paper square and place sticky side down on top of the first square, lining them up as best you can.
  4. Punch a hole for hanging, and then trim away excess contact paper, leaving about 1/4" border all the way around the leaf.
  5. Cut lengths of fishing line and tie one to each leaf. Tie the leaves to your light fixture (or branches if you prefer.)
*Note: Yesterday I read in the paper that you can preserve fallen leaves using glycerin. It is supposed to help them retain their colors and not become as brittle. I have not tried this before, but I am curious about it. If you have experience with this technique, I would love to hear about it. Martha Stewart says that you should do the following to preserve your fall leaves:
  1. Wipe away dirt or moisture.
  2. Mix two-parts water with one-part glycerin.
  3. Layer the leaves in a pan and pour the solution over them so that they are completely immersed.
  4. Use a plate to weight the leaves down and keep them covered for 4-5 days.
  5. Remove leaves and wipe clean with a soft, dry cloth.

Thursday, October 13, 2011

"Nummy!"

Something clicked for Logan recently and his speech has really taken off! The list of new words and approximations that I have been making since his home teacher's last visit got so long that I was scribbling around the sides of the note paper and it was getting hard to keep track of his progress. I was incredibly excited to share this with Ms. Michelle today, especially since Ms. Pam, the speech pathologist came along on this visit. Last Tuesday, while he was at his LESA playgroup, he said three new approximations: "bell," (while playing with play dough and seeing a bell shaped cookie cutter) "eat," and "drink" (During snack time of course, and he now consistently makes the "k" sound for "drink," usually while signing "drink") and then when we got home he added "moon" (He saw the moon.) and "nummy" (for "yummy") to his repertoire.

And his vocabulary has just exploded since then! Last Thursday, he started saying "bobby" for "baby" and I have heard him continue to say this when he sees a doll or picture of a baby. He also started saying "bye bye" although now he has shortened it to "bye" while he pretends to talk on the phone or when we are leaving. Last Friday, he saw a toy dog and called it "doggie" and later in the day he started saying "heh-woh" for "hello" while pretending to talk on the phone. I can't tell you how long I have been waiting for him to start saying versions "hello" and "goodbye." This was bugging me a bit because it seemed like every other kid (and usually much younger than Logan) was able to say them, so this is a big milestone for both of us.

On September 30, Logan peed in the potty for the first time. (Stick with me. I promise this is connected to his language development.) This was totally his idea, and I was pretty shocked that we was successful since he was just 25 months old. Then, when he went again a few minutes later, I called Brett and asked him to bring home some M&M's because it looked like we were potty training, whether we were ready for it or not. This has been a huge motivator for Logan and it has also increased his vocabulary because he really wants to earn those M&M's, or "nummies" as he calls them. He has gone potty at least once every day since then, and usually more like three or four times. Plus, he started asking to go "potty" and telling me when he needs to go "pee pee" (or has already gone in his diaper). Several times a day, he looks longingly at the pantry and declares "nummy!" so I tell him he can earn a "nummy" by going potty. It's definitely working.

In the past few days, Logan has continued to add more new words and approximations to his vocabulary. This Tuesday at playgroup, he said something that sounded like "puff" and something else that sounded very much like "please" during snack time. On the way home, he saw a school bus and announced "bus" or at least something that sounded a lot like "bus." Yesterday, while playing outside, he was concerned about the "bug" on the slide and kept pointing it out and saying "bug" until I did got rid of it. He also asked me to fill his watering can by saying an approximation for "water."

Logan was eating yogurt for breakfast this morning with a frog spoon and Brett reports that he pointed to the eye and said "eye" and then he said "froggy." During his home visit later in the morning, he said several new words while he helped Ms. Pam read Brown Bear Brown Bear What Do You See? by choosing the correct animal magnet and putting it on the magnet board each time a new animal was introduced. He called out "bear," "bird," "blue,"and "duck." 

During our session, Ms. Pam had me circle words/approximations that Logan has said from a list of common words that kids first learn and when she totaled up the list she said he knew 31 words. And we can now add "hockey" to the word list, too. He kept throwing a puck around this afternoon while yelling "hockey!" He is definitely all boy. We don't play or watch a lot of hockey, so why he would even have that as one of his first words is beyond me. Ms. Pam said our "homework" is to get him to start adding verbs to his vocabulary and then connecting them with the nouns he knows. I am hoping that this will be easy for my very active little guy.

Autumn Sun Catchers

{Apple Sun Catcher by Mia, Age 4}
 We started making sun catchers back in March and have continued through the summer and into the fall. I don't see why not. Sun catchers aren't just for spring and summer. Shapes we tried included an apple, a pumpkin, Indian corn, and an oak leaf. I like doing sun catchers because they are simple enough for toddlers to do provided that you have done some gotten your materials cut in advance.

Materials:
{Leaf Sun Catcher by Mia, Age 4}
  • pencil 
  • clear tape
  • scissors
  • clear contact paper
  • construction paper
  • tissue paper 
  • paper trimmer (optional)
  • hole punch (optional)
  • yarn, string, ribbon, etc. for hanging (optional)
Directions:
  1. If you are making a shape that is symmetrical, fold your paper in half like a hot dog before drawing and cutting out your shape. This makes it go a bit faster, and hopefully it creates less frustration, too. If you are making a shape that isn't symmetrical, simply draw (or trace) your shape and cut it out on two pieces of paper. Tip: If you are using two pieces of paper, you will need to make sure they stay together so that you get identical fall shapes.
  2. Cut two pieces of clear contact paper (I used both a paper trimmer and scissors for this.) so that they are 1/4 inch larger than the construction paper all the way around. Tip: Do not remove backing from contact paper until you are ready to use it.
  3. Adhere one piece of paper to the clear contact paper so that there is a border of 1/4 inch all around the paper. Tip: Slowly peel the contact paper away from the backing as you smooth the construction paper down onto the contact paper. This way you don't end up with "bubbles."
  4. Have your child stick tissue paper squares onto the contact paper fall shape until it is filled. (Mia has created her own technique for filling in small spaces: crumpling up the tissue paper into balls. It makes the sun catcher a bit bulkier, but it does work, and I think it adds a bit of visual interest to the design.)
  5. Layer the second piece of construction paper on top of the first, making sure that the fall shapes line up.
  6. Add the second piece of contact paper over the top, smoothing it down as you go. Trim away excess if desired, but don't trim too much or the sun catcher will not stay together. 
  7. You can display your sun catcher in a window using clear tape. Another option is to use a hole punch to make two holes near the top, thread some ribbon or yarn through the holes, tie it off, and then hang your sun catcher.
{Pumpkin Sun Catcher by Logan, Age 2}

{Indian Corn Sun Catcher by Mia, Age 4}


Wednesday, October 12, 2011

Children's Book Exchange

I haven't gotten a chain letter in many years, so I didn't realize people did this anymore, but when this one came in the mail, I thought it sounded fun:

Dear ______________________________
This is a children's book exchange. That's right. A book exchange!

  1. Send ONE new book to the child listed at "Child #1" below.
  2. Then make 6 copies of the blank letter.
  3. Use the blank letter that I sent you and move MY name to the #1 spot and put YOUR name on the "Child #2" spot and make 6 copies of that.
  4. Mail both a blank and a filled out copy to SIX friends and start enjoying your books!
If you can't do this in one week, please let me know because it is unfair to children who have participated and are waiting for their own special books to arrive.

A manila envelope will mail the new book nicely and you should receive 36 books if everyone participates. Seldom does anyone drop out, as you know kids love to read books and receive mail. You should receive your books in about 2 weeks if you get your letters out right away.

It will be lots of fun, but let me know if you can't participate ASAP please!

Thanks and enjoy your books!

Child #1 (name, age, address)

Child #2 (name, age, address)

(Make sure you include a blank copy of this letter for your friends so they don't have to retype it.)

Sincerely,


The only problem is that I mailed the letters and the book out at the beginning of September and Logan has received no books. At this point, I assume he will not get any books at all. Fortunately, he is too young to realize this so he isn't disappointed. However, I feel a bit let down because I had tried to do something fun and it didn't work out the way I had hoped.

An Apple a Day...

I love fall, especially all of the delicious things that we can make after we have been apple picking. We enjoy making this apple crisp at least once every year, and Mia helped me make it the other day. (She very methodically laid the apple slices in neat rows. I am not sure where that came from but she insisted that they needed to be arranged in this way.) While the apple crisp baked, we had apples cooking down on the stove top for some yummy fresh applesauce. I have doubled a recipe and tweaked it a bit, and now I want to make sure to remember the changes I made because I think they are great. I substituted apple cider for the water after reading that suggestion in the newspaper. This was very tasty, and I was able to use less sugar. I like to use a variety of apples for applesauce and apple crisp, basically a mix of whatever we have picked, which varies depending on which point in the season we make it to the orchard. This time we had Golden Delicious, Ida Red, Mutsu, and possibly a couple of others that I can't recall. Last year, we made caramel apples with this caramel apple wrap kit and they turned out great. It was so much easier than dipping in melted caramel. I haven't found them in the store yet, but I am on the look-out because I definitely want to make these with the kids again this year.


Home-made Applesauce
Makes about 2 1/2 cups
  • 2 quarts apples (peeled and sliced)
  • 2 cups apple cider
  • 1/3 cup sugar
  • 2 tsp. lemon juice
  • cinnamon (optional)
Put all of the ingredients in a sauce pan and cook until tender (about 45 minutes) and most of the liquid has cooked down. Mash the mixture using a potato masher (or an electric mixer if you don't like lumps). Place in the refrigerator to cool. Enjoy topped with cinnamon or as is.

Tuesday, October 11, 2011

TP Tube Indian Corn Craft

Once again, we have a supply of toilet paper tubes and I thought that they could be made into an Indian corn craft. I was thinking that these would look nice as either napkin holders or as place cards for a fall table setting. This craft is quick, easy, and only requires a few materials. You could substitute paint for the Bingo markers and paper bag for the raffia if you don't have those items on hand.
{By Mia, Age 4}

Materials:
  • toilet paper tube
  • Bingo markers
  • raffia
  • glue
Directions:
  1. Use Bingo markers to dot color onto an empty toilet paper tube to look like Indian corn kernels. We used red, orange, and purple Bingo markers from Dollar Tree. Allow ink to dry.
  2. Unroll a piece of raffia (ours was the handle from a paper shopping bag) and tear it into strips.
  3. Glue the strips of raffia to the inside of the toilet paper tube to make the corn husks.
  4. Once glue is dry you can place a napkin inside the tube or take a marker and add a name to the outside to make a place card holder for your fall table.

Bubble Wrap Indian Corn Print Making

I am not sure where I came up with this idea originally. In looking for pictures, I discovered that there are several versions posted online already. I will share how we did this project. This was fun, but kind of messy.

{Indian Corn Craft by Mia, Age 4}

Materials:
{By Logan, Age 2}
  • yellow construction paper
  • paint (we used orange, yellow-orange, brown, white, and blue)
  • paint brush
  • tray/plate for paint
  • newspaper
  • bubble wrap
  • scissors
  • paper bag
  • glue
Directions:
  1. Cut bubble wrap into the shape of an ear of corn.
  2. Protect work surface with newspaper. Pour some paint onto a Styrofoam tray (leftover from meat packaging) or a plate. Paint the bubble wrap in various colors of Indian corn. My kids used big foam paintbrushes, but if you have older kids, they could paint each individual bubble a different color with a smaller paintbrush.
  3. Press bubble wrap paint-side down onto a piece of yellow construction paper. Allow paint to dry.
  4. Once paint is dried, cut out your ear of corn.
  5. Crumple up a paper bag. We used a grocery bag, but a paper lunch sack would also work. Tear the bag into strips and glue the strips to the backside of your paper to make the corn husks.
  6. After glue is dried you can display your bubble wrap printed Indian corn craft.

Friday, October 7, 2011

Beaded Indian Corn Mosaic Craft

Here is another variation of an Indian corn craft that we made using leftover dyed pasta beads and some cardboard from the recycling bin.
{Indian Corn Mosaic By Mia, Age 4}

{Mia's Work in Progress}
Materials:
  • cardboard
  • pencil
  • scissors
  • dyed pasta beads (or plastic beads)
  • tacky glue
  • green crepe paper (optional)
  • hole punch (optional)
  • yarn, ribbon, or string for hanging (optional)
Directions:
{Indian Corn Mosaic By Logan, Age 2}
  1. Draw an ear of corn (long narrow oval) with husks onto a piece of cardboard and cut it out. If you don't want to draw it freehand, try printing off a template.
  2. Help your child apply dots of tacky glue all over the cardboard.
  3. Have your child adhere pasta (or plastic) beads to the dots of glue.
  4. If desired, cut two strips of green crepe paper, glue to the cardboard, and trim the ends to look like husks as I did for Logan's project.
  5. Allow all glue to dry before displaying your project. The beaded cardboard ends up being fairly heavy so it may not stick to your refrigerator. One option is to punch two holes and thread yarn, ribbon, or string through for hanging.

Indian Corn Scissor Skills Project

We are loving this fantastic week's worth of Indian summer! Here is another Indian corn craft project that I came up with so Mia could practice her scissor skills.
{By Mia, Age 4}

{By Logan, Age 2}
Materials:
  • construction paper in fall colors (yellow, green, orange, brown, red, purple, tan)
  • pencil (optional)
  • safety scissors
  • glue
Directions: 
  1. Take a piece of yellow or tan construction paper and fold it like a hot dog. Cut out a skinny football or long oval shape to make the ear of corn. Open the folded paper.
  2. Cut several long strips of various colored paper about 3/4" - 1 1/4" wide.
  3. Have your preschool age child cut the strips into smaller squares. While s/he is cutting squares, you can cut out two green (or brown) leaf shapes for the corn husks. If you wish, you can fold your paper in half, draw the shape with a pencil, and then cut out two identical shapes (either connected like Logan's or separated like Mia's).
  4. Have your child glue the colored squares onto the corn to make the kernels. (Younger children can also do this even if they are not able to use scissors. Logan made his own project.)
  5. Glue down the corn husks and allow all glue to dry. Now your project is ready to display.

Monday, October 3, 2011

Paper Bag Indian Corn Craft

I was trying to come up with some fall craft ideas that we hadn't already done to death, and I realized Indian corn was perfect. We have made several variations of Indian corn lately, (and I have a few more ideas to try) so I will get them posted soon. For now, here is the first version, which we made with a re-purposed brown paper shopping bag.

{By Mia, Age 4}
Materials:
  • paper bag (raffia type handle optional)
  • scissors
  • pencil
  • Bingo markers
  • glue (optional)
  • newspaper (to protect work surface)
Directions:
  1. Draw a corn cob on a paper bag. Ours was a shopping bag that got torn and couldn't be used again. (The basic shape for the ear of corn is a long thin oval.) Add corn husks to the sides.
  2. Cut our your corn cob and husks.
  3. Cover your work surface with newspaper and use Bingo markers to dot on color for the Indian corn kernels. We used orange, red, and purple Bingo markers from Dollar Tree. (If you have yellow or white, those would work nicely, too.) Leave some of the background paper brown to give some extra contrast.
  4. If you like, you can use a green Bingo marker to color in your corn husks, which is what Mia chose to do. You could also leave them plain brown, which would look dried out like actual Indian corn husks. Or, if your paper bag has raffia type handles, cut them off and unroll them. Arrange as desired, glue to the paper bag, and trim off the excess so that it looks like corn husks. This is what I did for Logan's.
    {By Logan, Age 2}

Candy Corn Sun Catcher

{By Mia, Age 4}
Materials:
  • pencil 
  • clear tape
  • scissors
  • clear contact paper
  • yellow construction paper
  • tissue paper (yellow, orange, white)
  • paper trimmer (optional)
  • hole punch (optional)
  • yarn, string, ribbon, etc. for hanging (optional)
Directions:
{By Logan, Age 2}
  1. fold your paper in half like a hot dog before drawing and cutting out your shape. This makes it go a bit faster, and hopefully it creates less frustration, too.  Tip: If you are using two pieces of paper, you will need to make sure they stay together so that you get identical candy corn shapes.
  2. Cut two pieces of clear contact paper (I used both a paper trimmer and scissors for this.) so that they are 1/4 inch larger than the construction paper all the way around. Tip: Do not remove backing from contact paper until you are ready to use it.
  3. Adhere one piece of paper to the clear contact paper so that there is a border of 1/4 inch all around the paper. Tip: Slowly peel the contact paper away from the backing as you smooth the construction paper down onto the contact paper. This way you don't end up with "bubbles."
  4. Have your child stick tissue paper squares onto the contact paper candy corn  shape until it is filled. (Mia has created her own technique for filling in small spaces: crumpling up the tissue paper into balls. It makes the sun catcher a bit bulkier, but it does work, and I think it adds a bit of visual interest to the design.)
  5. Layer the second piece of construction paper on top of the first, making sure that the candy corn shapes line up.
  6. Add the second piece of contact paper over the top, smoothing it down as you go. Trim away excess if desired, but don't trim too much or the sun catcher will not stay together. 
  7. You can display your sun catcher in a window using clear tape. Another option is to use a hole punch to make two holes near the top, thread some ribbon or yarn through the holes, tie it off, and then hang your sun catcher.